
Hoe sluit je een LCD aan op een Arduino?
19 mei 2023
Het LCD-scherm (Liquid Crystal Display) is een veelgebruikt scherm voor Arduino-projecten, omdat het een eenvoudige manier biedt om informatie zoals tekst en basistekens weer te geven voor de gebruiker. Het is een handig scherm voor zowel beginners als ervaren gebruikers en is doorgaans een van de eerste schermen die mensen gebruiken wanneer ze beginnen met een Arduino-bord.
In deze tutorial wordt uitgelegd hoe u een 16x2 LCD-karakterdisplay en een Arduino UNO-kaart met elkaar kunt verbinden en laten communiceren via seriële communicatie.
De principes in deze tutorial kunnen ook worden toegepast op andere LCD-schermen en andere ontwikkelingsboards. Laten we aan de slag gaan!
LCD - Arduino-handleiding - Inhoudsopgave
- Benodigde hardware en gereedschap
- LCD-pinout
- Arduino-pinout
- Circuit - aansluitschema en schema voor SPI-communicatie
- Voorbeeldcode met behulp van SPI-interface
- Circuit - aansluitschema en schema voor RS232 TTL-communicatie
- Hallo wereld! Voorbeeldcode met RS232 TTL-interface
- Problemen met uw LCD oplossen - Arduino-project
- Extra bronnen
Benodigde hardware en gereedschappen
LCD's zijn verkrijgbaar in verschillende formaten en configuraties, maar de meest gebruikte is de 16x2 LCD. Deze heeft 2 rijen waarin 16 tekens per rij passen.
We gebruiken het 16x2 Newhaven-display met onderdeelnummer NHD-0216K3Z-NSW-BBW-V3, dat een ingebouwde PIC16F690-microcontroller heeft. Dit LCD-scherm ondersteunt drie seriële interfaces: I2C, SPI en RS-232 (TTL). Dit artikel richt zich op de SPI- en RS-232-interfaces en geeft codevoorbeelden voor beide.
Dit display is hier te koop. De datasheet en productspecificaties kunnen hier worden bekeken of gedownload.
Houd er rekening mee dat voor het gebruik van de SPI-interface een weerstand aan het display moet worden gesoldeerd, terwijl dat voor de RS-232 TTL-interface niet nodig is. Als u deze tutorial wilt volgen zonder de weerstand te solderen, kunt u daarom de instructies voor de RS-232 TTL-interface en het gedeelte met codevoorbeelden volgen.
Wat je nodig hebt om Arduino aan te sluiten op een LCD-scherm
- LCD 16x2
- Enkele rij pin header connector
- Arduino UNO
- breadboard
- Overbruggingsdraden
- Soldeer en soldeerbout
- USB A-mannelijk naar B-mannelijk kabel (printerkabel)
- Arduino IDE
- 0 ohm weerstand (optioneel - alleen voor SPI-communicatie)
We raden u aan ons blogartikel Hoe elektronica te beschermen tegen ESD te lezen voordat u aan deze tutorial begint, vooral als u een beginner bent op het gebied van elektronica.
16x2 LCD-pinout
Het Newhaven 16x2 karakter LCD-scherm biedt een eenvoudige manier om te communiceren met het Arduino UNO-bord via seriële communicatie. De pinnen op de P1-poort zijn speciaal ontworpen voor RS232 TTL seriële communicatie, en de pinnen op de P2-poort zijn voor seriële I2C- en SPI-communicatie.
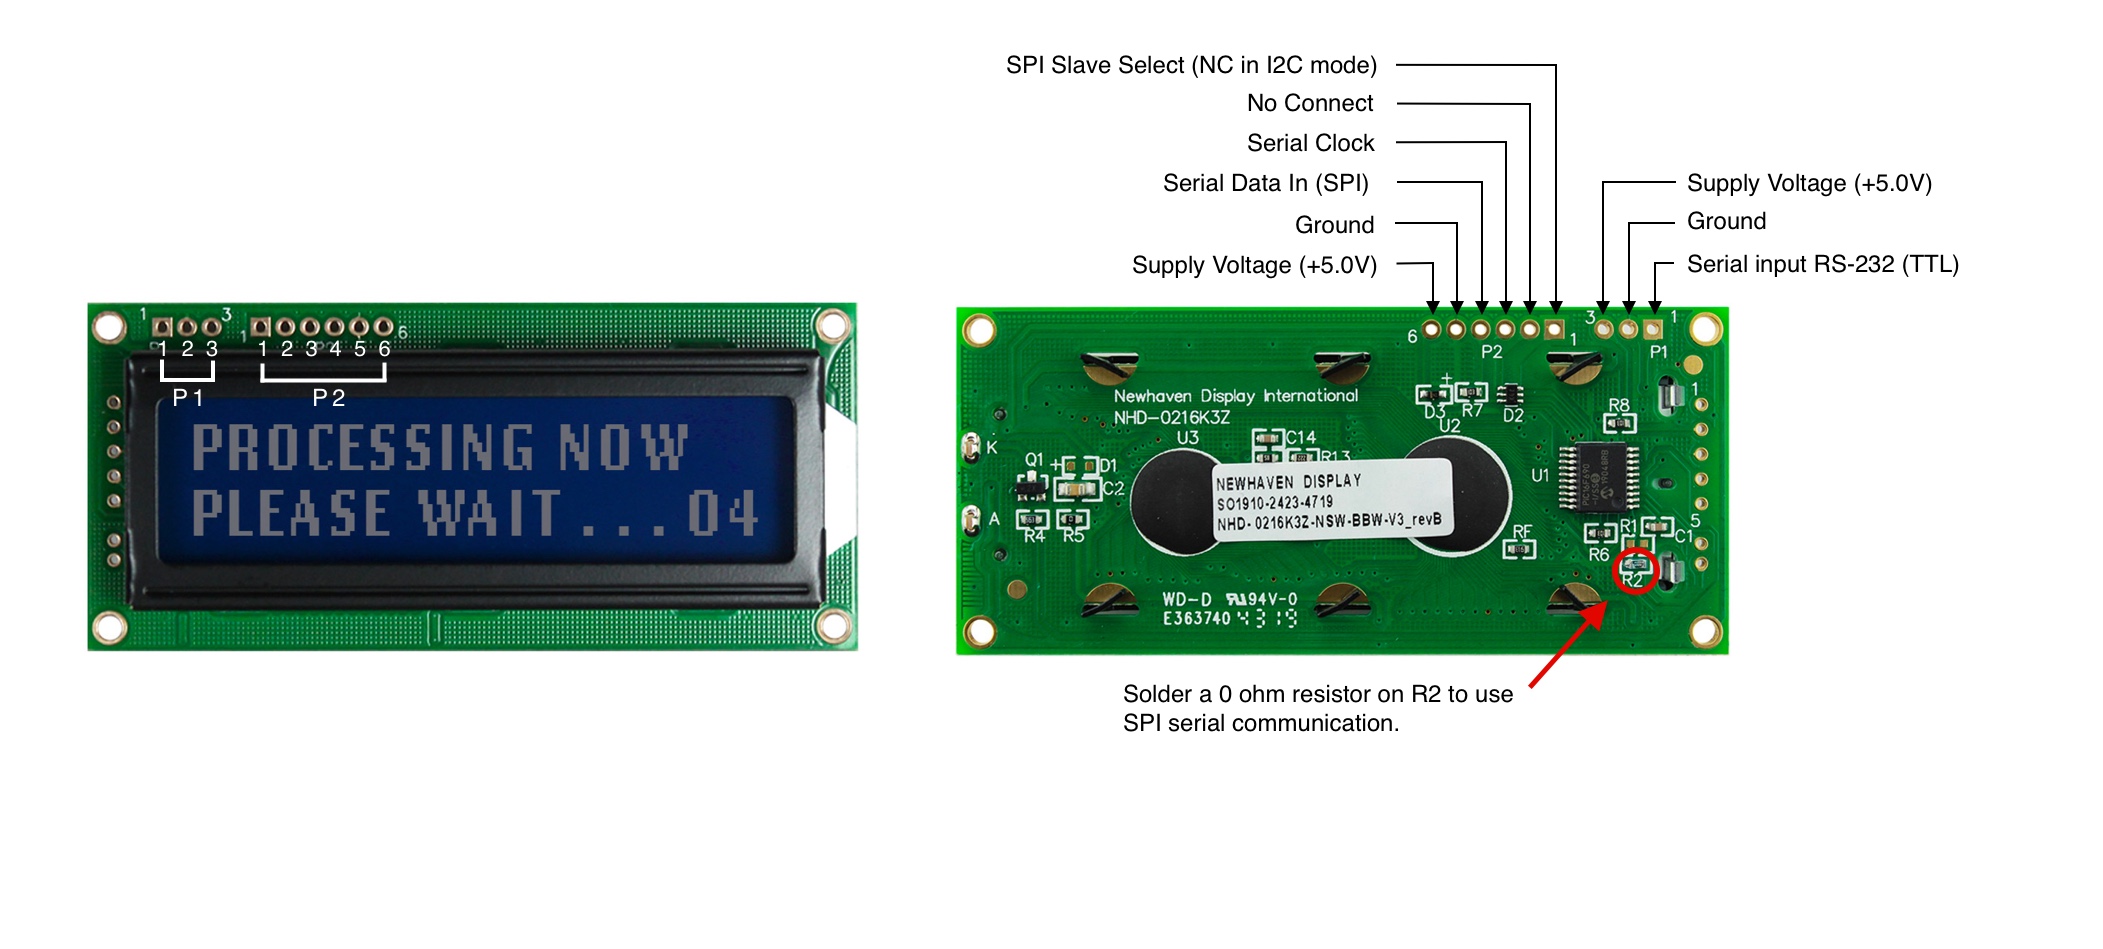
P1 Pinbeschrijving - RS232 TTL-communicatie
| Pincode | Symbool | Functiebeschrijving |
|---|---|---|
| 1 | RX | RS-232 (TTL) seriële ingang |
| 2 | V SS | Grond |
| 3 | V DD | Voedingsspanning (+5,0 V) |
P2 Pinbeschrijving - SPI- en I2C-communicatie
| Pincode | Symbool | Functiebeschrijving |
|---|---|---|
| 1 | SPISS | SPI Slave Select (NC in I2C-modus) |
| 2 | SDO | Geen verbinding |
| 3 | SCK/SCL | Seriële klok |
| 4 | SDI/SDA | Seriële gegevens in (SPI) / Seriële gegevens (I2C) |
| 5 | V SS | Grond |
| 6 | V DD | Voedingsspanning (+5,0 V) |
De volledige LCD-pinout-specificatie kan hier worden bekeken.
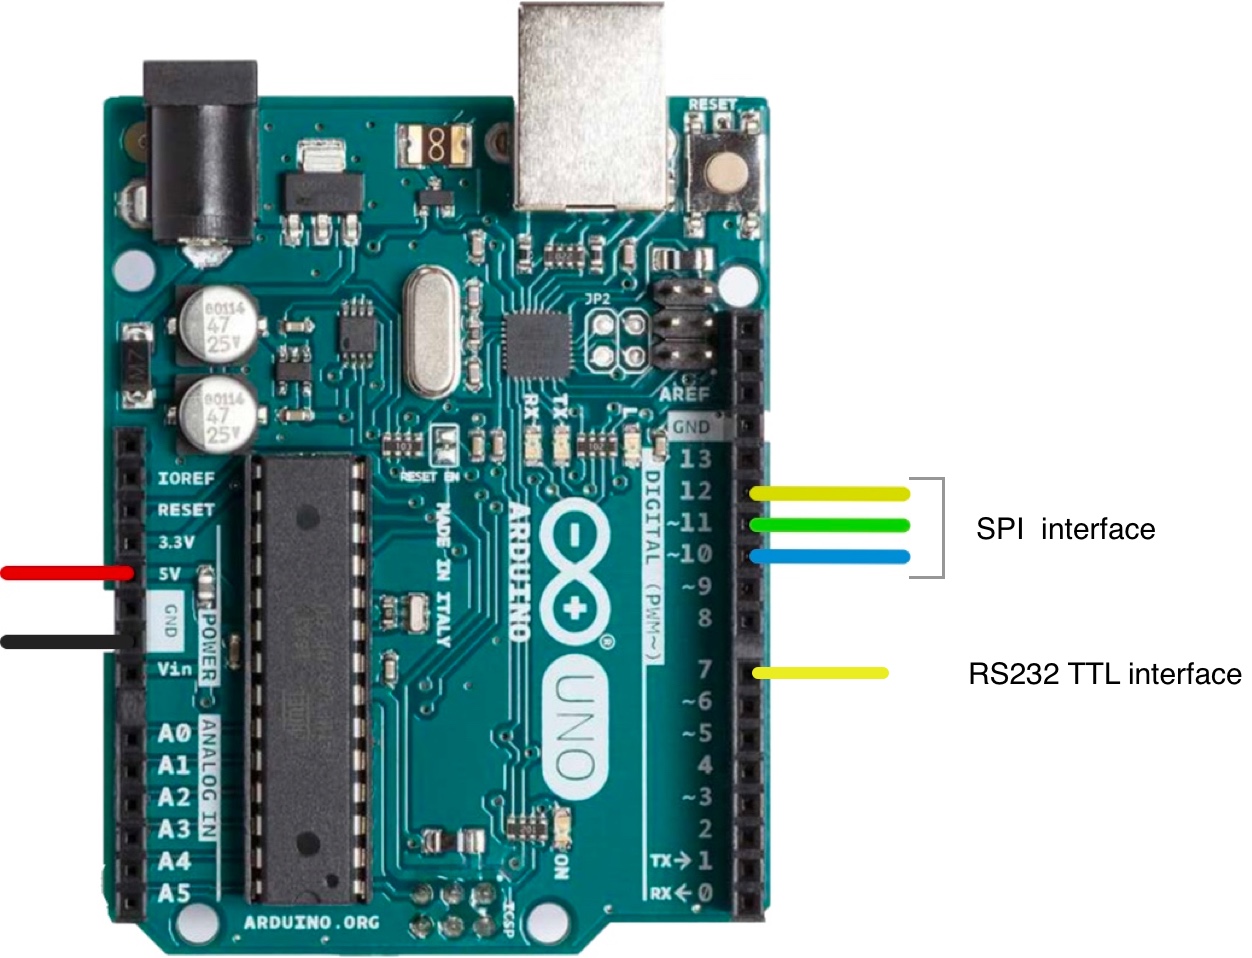
Arduino-pinout
Het Arduino UNO-bord heeft 20 input/output-pinnen, waaronder 14 digitale pinnen en 6 analoge pinnen. Voor dit project gebruiken we de 5V- en GND-pinnen van de voedingssignalen, pinnen 10, 11 en 12 voor SPI of I2C en pin 7 voor RS232 TTL.
Het volledige pinout-schema van Arduino UNO kan hier worden bekeken.
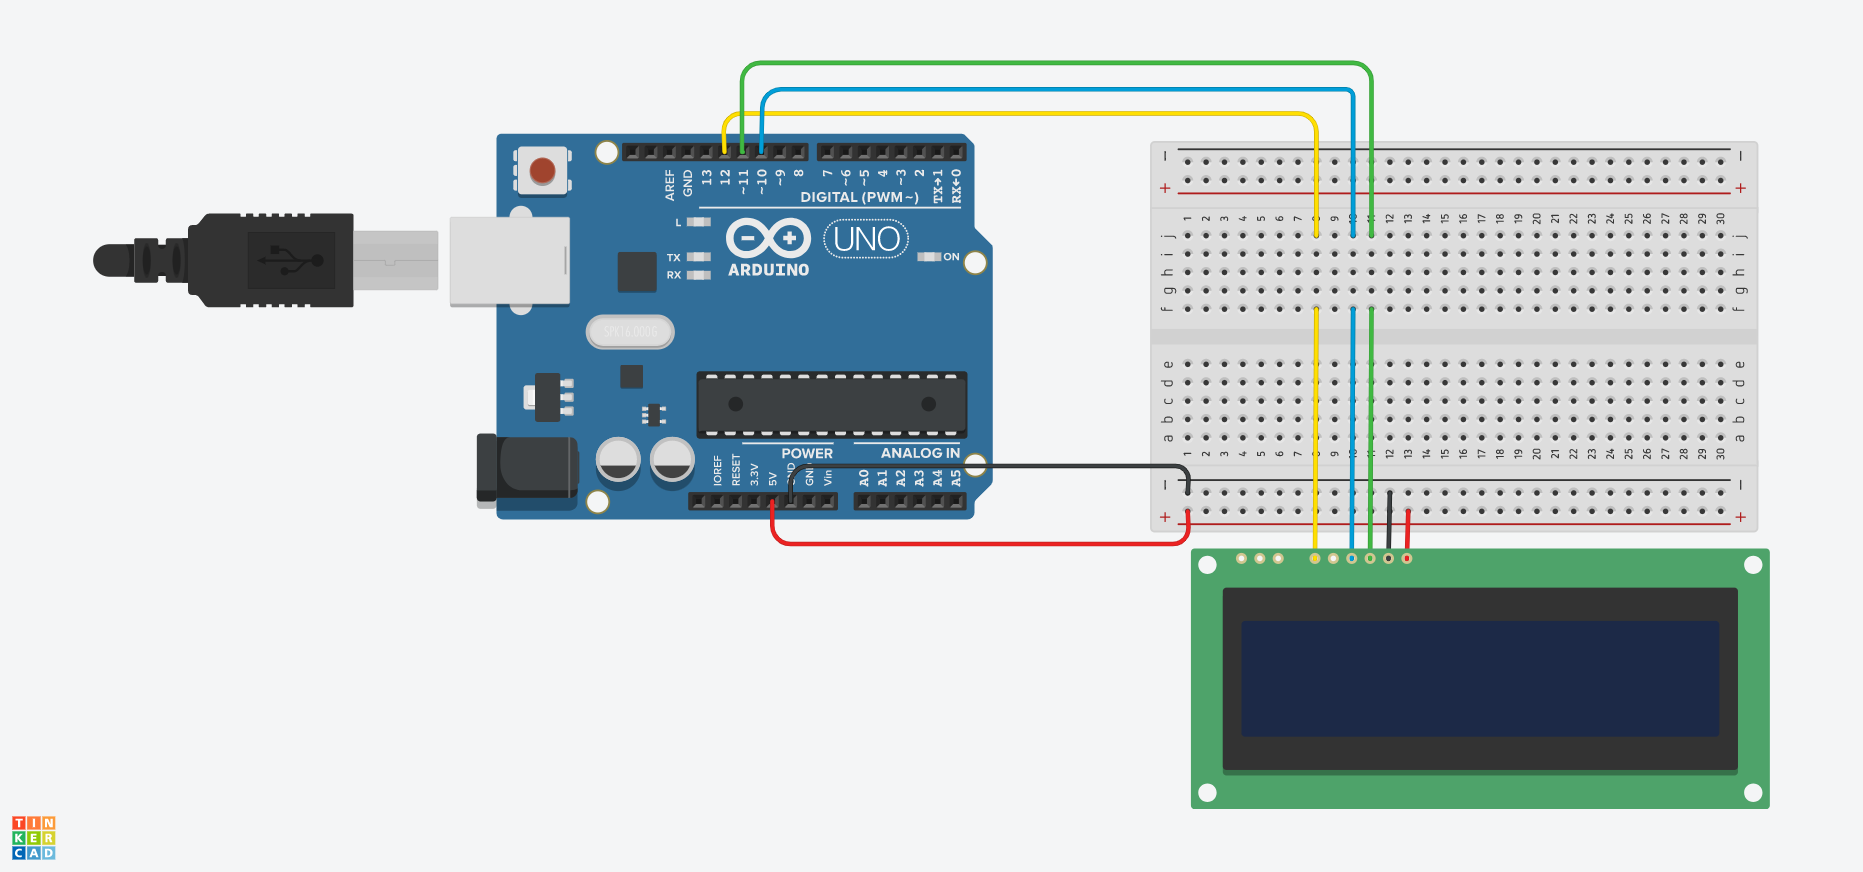
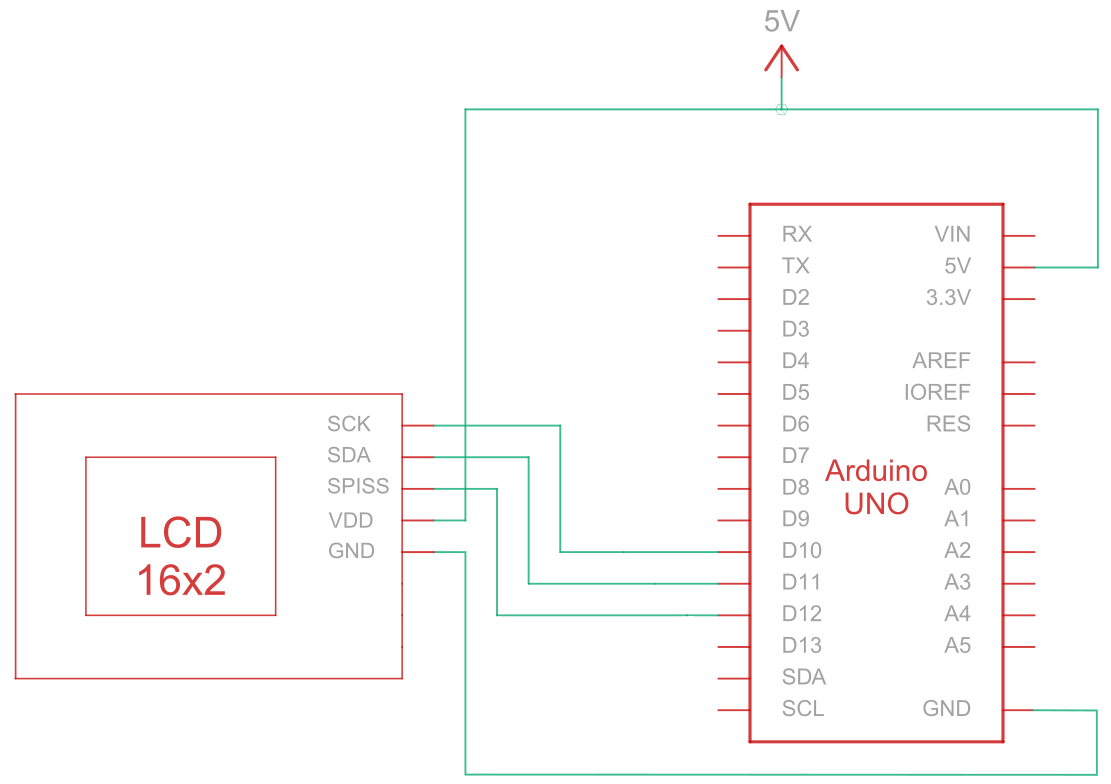
Circuit - Aansluitschema en schema voor SPI-communicatie
De Serial Peripheral Interface (SPI) is een synchrone seriële communicatiebus die wordt gebruikt voor korteafstandscommunicatie met hoge snelheid tussen meerdere apparaten. Het verbindingscircuit voor SPI-communicatie tussen de Arduino (masterapparaat) en het LCD-scherm (slaveapparaat) maakt gebruik van vijf draden om te communiceren, zoals beschreven in de onderstaande tabel:
| Arduino | LCD | Type verbinding |
|---|---|---|
| 5V-pin | Pin 6: V DD | Vermogen |
| Aardingspin | Pin 5: Aarde | Grond |
| Pin 10: Slave selecteren | Pin 3: SCK/SCL | Seriële klok |
| Pin 11: MISO | Pin 4: Seriële gegevens in (SPI) / Seriële gegevens (I2C) | Seriële gegevens in |
| Pin 12: MOSI | Pin 1: SPISS | SPI-slave selecteren |
Opmerking:
Om SPI in te schakelen, moet R1 open zijn en R2 worden ingekort zoals aangegeven in het gegevensblad. Zorg er bovendien voor dat de Arduino is uitgeschakeld voordat u begint met het aansluiten van het circuit.
SPI-bedradingscircuit
SPI-bedradingsschema
Arduino - LCD-voorbeeldcode met SPI-interface
De volgende codevoorbeelden laten zien hoe je seriële communicatie tussen Arduino en een 16x2 karakter LCD-scherm kunt gebruiken met behulp van de SPI-interface. Je vindt nuttige opmerkingen in de codevoorbeelden, maar laten we enkele functies hieronder eens nader bekijken:
- De
SPI_Out()functie stuurt commando's en gegevens naar het LCD-scherm via SPI. Dit gebeurt door de 8 bits van de invoerbyte te doorlopen en de waarde van elke bit naar het LCD-scherm te sturen. - De
Set_Pins()functie configureert de SPI-pinnen als uitgangspinnen. - De
Contrast instellen()functie stelt het contrast van het LCD-scherm in. - De
Set_Achtergrondverlichting()functie stelt de achtergrondverlichting van het LCD-scherm in. - De
Clear_Display()functie wist het LCD-scherm. - De
Cursor instellen()functie schakelt de knipperende cursor op het LCD-scherm in of uit, afhankelijk van de invoerparameter. - De
setup()functie is de hoofdfunctie en wordt één keer uitgevoerd wanneer de Arduino opstart. Deze wordt gebruikt om de instellingen, variabelen en alle andere noodzakelijke functies en configuraties voor het project te initialiseren. - De
lus()De functie wordt continu uitgevoerd zolang het Arduino-bord is ingeschakeld. In sommige voorbeelden hieronder is deze functie leeg en doet deze niets, omdat we sommige functies slechts één keer hoeven uit te voeren.
Arduino - LCD-codevoorbeelden met SPI:
- Hallo wereld!
- Tekst weergeven op de eerste en tweede rij
- Lange tekst weergeven
- Tekst weergeven met een knipperende cursor
- Cursor + tekst automatisch scrollen
- Automatisch scrollen
- Contrast
- Achtergrondverlichting
- Tekens/lettertypetabellen
U kunt de codevoorbeelden aanpassen en uitbreiden om ze af te stemmen op de specifieke vereisten van uw Arduino-gebaseerde project.
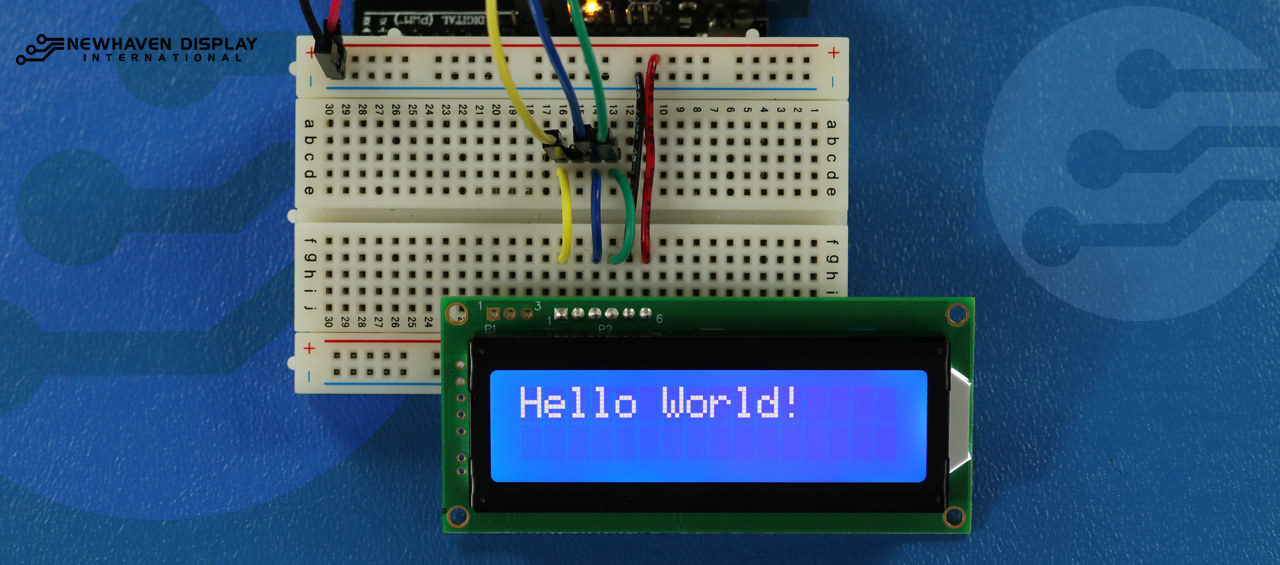
Hallo wereld!
Het volgende codevoorbeeld geeft "Hello Word!" weer op het LCD-scherm.
/*  SPI Wiring Reference for: NHD-0216K3Z-NSW-BBW-V3
  ---------------------------
  LCD         |   Arduino
  ---------------------------
  1(SPISS)  --> 12
  2(SDO)    --> No Connect
  3(SCK)    --> 10
  4(SDA)    --> 11
  5(VSS)    --> Ground
  6(VDD)    --> 5V
*/
/*****************************************************
   Arduino pin definition
  /*****************************************************/
#define SPISS_PIN   12
#define SDA_PIN     11
#define SCK_PIN     10
/*****************************************************
   SPI function to send command and data.
   For more information on SPI please visit our Support Center
  /*****************************************************/
void SPI_Out(unsigned char a) {
  digitalWrite(SPISS_PIN, LOW);
  for (int n = 0; n < 8; n++) {
    if ((a & 0x80) == 0x80) {
      digitalWrite(SDA_PIN, HIGH);
      delayMicroseconds(200);
    }
    else {
      digitalWrite(SDA_PIN, LOW);
    }
    delayMicroseconds(200);
    a = a << 1;
    digitalWrite(SCK_PIN, LOW);
    digitalWrite(SCK_PIN, HIGH);
    delayMicroseconds(200);
  }
  digitalWrite(SCK_PIN, HIGH);
  delayMicroseconds(200);
  digitalWrite(SPISS_PIN, HIGH);
}
/*****************************************************
   Set Arduino UNO IO ports as Output mode
  /*****************************************************/
void Set_Pins() {
  pinMode(SPISS_PIN, OUTPUT);
  pinMode(SCK_PIN, OUTPUT);
  pinMode(SDA_PIN, OUTPUT);
}
/*****************************************************
   Set LCD Contrast
  /*****************************************************/
void Set_Contrast() {
  SPI_Out(0xFE);              //prefix command
  SPI_Out(0x52);              //contrast command
  SPI_Out(0x28);              //set contrast value
  delayMicroseconds(500);
}
/*****************************************************
   Set LCD Backlight
  /*****************************************************/
void Set_Backlight() {
  SPI_Out(0xFE);             //prefix command
  SPI_Out(0x53);             //backlight command
  SPI_Out(0x08);             //set backlight value
  delayMicroseconds(100);
}
/*****************************************************
   Clear LCD
  /*****************************************************/
void Clear_Display() {
  SPI_Out(0xFE);             //prefix command
  SPI_Out(0x51);             //clear display command
  delayMicroseconds(1500);
}
/*****************************************************
   Set cursor
   Mode = 0 sets Blinking cursor off
   Mode = 1 sets Blinking cursor on
  /*****************************************************/
void Set_Cursor(int mode) {
  SPI_Out(0xfe);          //prefix command
  if (mode == 0) {
    SPI_Out(0x4c);        //Blinking cursor off
  }
  else if (mode == 1) {
    SPI_Out(0x4b);        //Blinking cursor on
  }
  delayMicroseconds(100);
}
/*****************************************************
   Write "Hello World!" to LCD
  /*****************************************************/
void Hello_World() {
  SPI_Out(0x48); // H
  SPI_Out(0x65); // E
  SPI_Out(0x6C); // l
  SPI_Out(0x6C); // l
  SPI_Out(0x6F); // o
  SPI_Out(0x11); // Blank
  SPI_Out(0x57); // W
  SPI_Out(0x6f); // o
  SPI_Out(0x72); // r
  SPI_Out(0x6c); // l
  SPI_Out(0x64); // d
  SPI_Out(0x21); // !
}
/*****************************************************
     Main function
  /*****************************************************/
void setup() {
  Set_Pins();         //set IO ports
  Set_Cursor(0);      //turns off blinking cursor
  Set_Contrast();     //set display contrast
  Set_Backlight();    //set display backlight
  Clear_Display();    //clear display
  Hello_World();      //display "Hello World!"
}
void loop() {
}
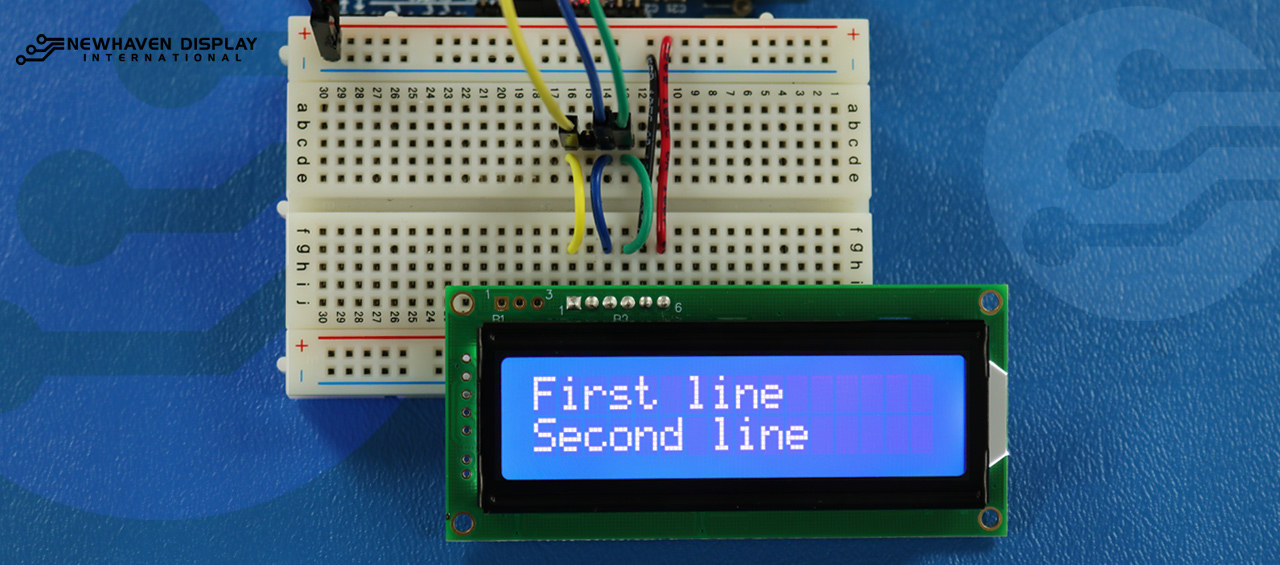
Tekst weergeven op de eerste en tweede rij
Deze code toont de tekst "Eerste regel" in de eerste rij en "Tweede regel" in de tweede rij.
/*****************************************************
  This code was written for the Arduino UNO using SPI Interface.
  This code displays text in row one and row two of LCD.
  /*  SPI Wiring Reference for: NHD-0216K3Z-NSW-BBW-V3
  ---------------------------
  LCD         |   Arduino
  ---------------------------
  1(SPISS)  --> 12
  2(SDO)    --> No Connect
  3(SCK)    --> 10
  4(SDA)    --> 11
  5(VSS)    --> Ground
  6(VDD)    --> 5V
*/
/*****************************************************
   Arduino pin definition
  /*****************************************************/
#define SPISS_PIN   12
#define SDA_PIN     11
#define SCK_PIN     10
/*****************************************************
   SPI function to send command and data.
   For more information on SPI please visit our Support Center
  /*****************************************************/
void SPI_Out(unsigned char a) {
  digitalWrite(SPISS_PIN, LOW);
  for (int n = 0; n < 8; n++) {
    if ((a & 0x80) == 0x80) {
      digitalWrite(SDA_PIN, HIGH);
      delayMicroseconds(200);
    }
    else {
      digitalWrite(SDA_PIN, LOW);
    }
    delayMicroseconds(200);
    a = a << 1;
    digitalWrite(SCK_PIN, LOW);
    digitalWrite(SCK_PIN, HIGH);
    delayMicroseconds(200);
  }
  digitalWrite(SCK_PIN, HIGH);
  delayMicroseconds(200);
  digitalWrite(SPISS_PIN, HIGH);
}
/*****************************************************
   Set Arduino UNO IO ports as Output mode
  /*****************************************************/
void Set_Pins() {
  pinMode(SPISS_PIN, OUTPUT);
  pinMode(SCK_PIN, OUTPUT);
  pinMode(SDA_PIN, OUTPUT);
}
/*****************************************************
   Set LCD Contrast
  /*****************************************************/
void Set_Contrast() {
  SPI_Out(0xFE);              //prefix command
  SPI_Out(0x52);              //contrast command
  SPI_Out(0x28);              //set contrast value
  delayMicroseconds(500);
}
/*****************************************************
   Set LCD Backlight
  /*****************************************************/
void Set_Backlight() {
  SPI_Out(0xFE);             //prefix command
  SPI_Out(0x53);             //backlight command
  SPI_Out(0x08);             //set backlight value
  delayMicroseconds(100);
}
/*****************************************************
   Clear LCD
  /*****************************************************/
void Clear_Display() {
  SPI_Out(0xFE);             //prefix command
  SPI_Out(0x51);             //clear display command
  delayMicroseconds(1500);
}
/*****************************************************
   Write "First Line" to row one on LCD
  /*****************************************************/
void Send_First_Line_Text() {
  SPI_Out(0x46); // F
  SPI_Out(0x69); // i
  SPI_Out(0x72); // r
  SPI_Out(0x73); // s
  SPI_Out(0x74); // t
  SPI_Out(0x20); // blank space
  SPI_Out(0x6c); // l
  SPI_Out(0x69); // i
  SPI_Out(0x6e); // n
  SPI_Out(0x65); // e
}
/*****************************************************
   Write "Second Line" to row two on LCD
  /*****************************************************/
void Send_Second_Line_Text() {
  SPI_Out(0x53); // S
  SPI_Out(0x65); // e
  SPI_Out(0x63); // c
  SPI_Out(0x6f); // o
  SPI_Out(0x6e); // n
  SPI_Out(0x64); // d
  SPI_Out(0x20); // blank space
  SPI_Out(0x6c); // l
  SPI_Out(0x69); // i
  SPI_Out(0x6e); // n
  SPI_Out(0x65); // e
}
/*****************************************************
   Set Row address
   Line = 1 sets for first row
   Line = 2 sets for second row
  /*****************************************************/
void Set_Row(int line) {
  SPI_Out(0xfe);      //prefix command
  SPI_Out(0x45);      //set cursor command
  if (line == 1) {
    SPI_Out(0x00);    //cursor position: row one, column one
  }
  else if (line == 2) {
    SPI_Out(0x40);    //cursor position: row two, column one
  }
  delayMicroseconds(100);
}
/*****************************************************
     Main function
  /*****************************************************/
void setup() {
  Set_Pins();         //set IO ports
  Set_Contrast();     //set display contrast
  Set_Backlight();    //set display backlight
  Clear_Display();    //clear display
  Set_Row(1);
  Send_First_Line_Text();       //writes to first line of display
  Set_Row(2);
  Send_Second_Line_Text();      //writes to second line of display
  delay(1000);
}
void loop() {
}
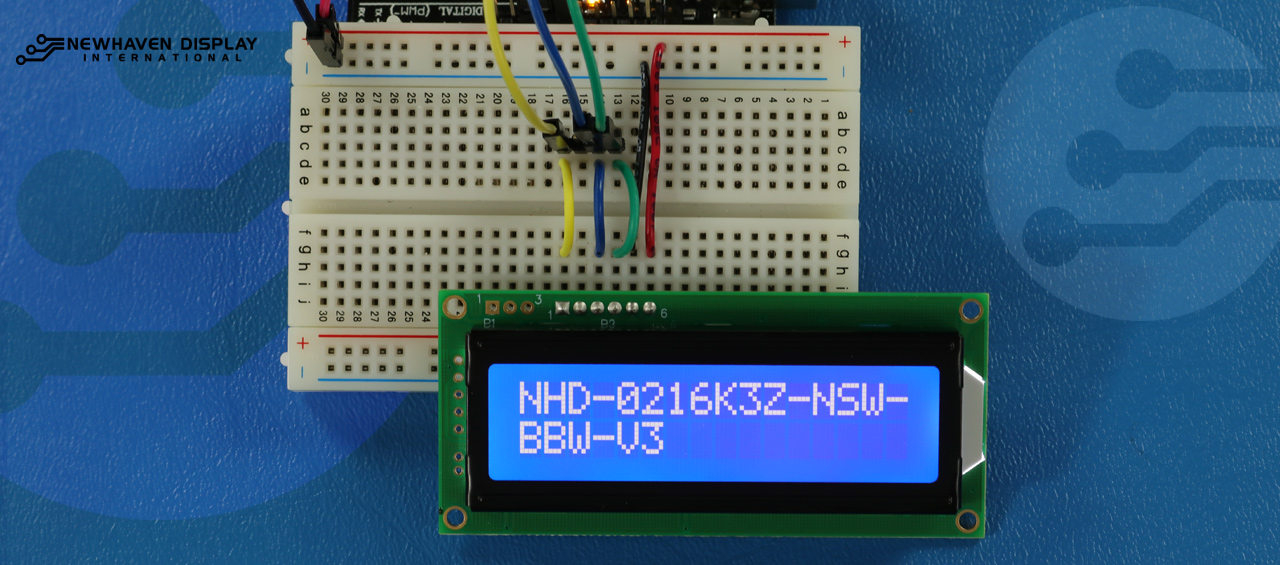
Lange tekst weergeven
Deze code geeft tekst weer die zich uitstrekt tot de tweede regel. Voor dit voorbeeld geven we de tekst "NHD-0216K3Z-NSW-BBW-V3" weer.
/*****************************************************
  This code displays the part number: NHD-0216K3Z-NSW-BBW-V3.
  /*  SPI Wiring Reference for: NHD-0216K3Z-NSW-BBW-V3
  ---------------------------
  LCD         |   Arduino
  ---------------------------
  1(SPISS)  --> 12
  2(SDO)    --> No Connect
  3(SCK)    --> 10
  4(SDA)    --> 11
  5(VSS)    --> Ground
  6(VDD)    --> 5V
*/
/*****************************************************
   Arduino pin definition
  /*****************************************************/
#define SPISS_PIN   12
#define SDA_PIN     11
#define SCK_PIN     10
/*****************************************************
   SPI function to send command and data.
   For more information on SPI please visit our Support Center
  /*****************************************************/
void SPI_Out(unsigned char a) {
  digitalWrite(SPISS_PIN, LOW);
  for (int n = 0; n < 8; n++) {
    if ((a & 0x80) == 0x80) {
      digitalWrite(SDA_PIN, HIGH);
      delayMicroseconds(200);
    }
    else {
      digitalWrite(SDA_PIN, LOW);
    }
    delayMicroseconds(200);
    a = a << 1;
    digitalWrite(SCK_PIN, LOW);
    digitalWrite(SCK_PIN, HIGH);
    delayMicroseconds(200);
  }
  digitalWrite(SCK_PIN, HIGH);
  delayMicroseconds(200);
  digitalWrite(SPISS_PIN, HIGH);
}
/*****************************************************
   Set Arduino UNO IO ports as Output mode
  /*****************************************************/
void Set_Pins() {
  pinMode(SPISS_PIN, OUTPUT);
  pinMode(SCK_PIN, OUTPUT);
  pinMode(SDA_PIN, OUTPUT);
}
/*****************************************************
   Set LCD Contrast
  /*****************************************************/
void Set_Contrast() {
  SPI_Out(0xFE);              //prefix command
  SPI_Out(0x52);              //contrast command
  SPI_Out(0x28);              //set contrast value
  delayMicroseconds(500);
}
/*****************************************************
   Set LCD Backlight
  /*****************************************************/
void Set_Backlight() {
  SPI_Out(0xFE);             //prefix command
  SPI_Out(0x53);             //backlight command
  SPI_Out(0x08);             //set backlight value
  delayMicroseconds(100);
}
/*****************************************************
   Clear LCD
  /*****************************************************/
void Clear_Display() {
  SPI_Out(0xFE);             //prefix command
  SPI_Out(0x51);             //clear display command
  delayMicroseconds(1500);
}
/*****************************************************
   Set cursor
   Mode = 0 sets Blinking cursor off
   Mode = 1 sets Blinking cursor on
  /*****************************************************/
void Set_Cursor(int mode) {
  SPI_Out(0xfe);          //prefix command
  if (mode == 0) {
    SPI_Out(0x4c);        //Blinking cursor off
  }
  else if (mode == 1) {
    SPI_Out(0x4b);        //Blinking cursor on
  }
  delayMicroseconds(100);
}
/*****************************************************
   Set Row address
   Line = 1 sets for first row
   Line = 2 sets for second row
  /*****************************************************/
void Set_Row(int line) {
  SPI_Out(0xfe);      //prefix command
  SPI_Out(0x45);      //set cursor command
  if (line == 1) {
    SPI_Out(0x00);    //cursor position: row one, column one
  }
  else if (line == 2) {
    SPI_Out(0x40);    //cursor position: row two, column one
  }
  delayMicroseconds(100);
}
/*****************************************************
   Write "NHD-0216K3Z-NSW-BBW-V3" to LCD
  /*****************************************************/
void Part_Number() {
  Set_Row(1);
  SPI_Out(0x4e); // N
  SPI_Out(0x48); // H
  SPI_Out(0x44); // D
  SPI_Out(0xb0); // -
  SPI_Out(0x30); // 0
  SPI_Out(0x32); // 2
  SPI_Out(0x31); // 1
  SPI_Out(0x36); // 6
  SPI_Out(0x4b); // K
  SPI_Out(0x33); // 3
  SPI_Out(0x5a); // Z
  SPI_Out(0xb0); // -
  SPI_Out(0x4e); // N
  SPI_Out(0x53); // S
  SPI_Out(0x57); // W
  SPI_Out(0xb0); // -
  Set_Row(2);
  SPI_Out(0x42); // B
  SPI_Out(0x42); // B
  SPI_Out(0x57); // W
  SPI_Out(0xb0); // -
  SPI_Out(0x56); // V
  SPI_Out(0x33); // 3
}
/*****************************************************
     Main function
  /*****************************************************/
void setup() {
  Set_Pins();         //set IO ports
  Set_Cursor(0);      //turns off blinking cursor
  Set_Contrast();     //set display contrast
  Set_Backlight();    //set display backlight
  Clear_Display();    //clear display
  Part_Number();      //display "NHD-0216K3Z-NSW-BBW-V3"
}
void loop() {
}
Blink - Tekst weergeven met knipperende cursor
Deze code geeft tekst weer met een knipperende cursor. In dit voorbeeld geven we de tekst "NHD-0216K3Z-NSW-BBW-V3" weer.
/*****************************************************
  This code displays the part number: NHD-0216K3Z-NSW-BBW-V3 with cursor on.
  /*  SPI Wiring Reference for: NHD-0216K3Z-NSW-BBW-V3
  ---------------------------
  LCD         |   Arduino
  ---------------------------
  1(SPISS)  --> 12
  2(SDO)    --> No Connect
  3(SCK)    --> 10
  4(SDA)    --> 11
  5(VSS)    --> Ground
  6(VDD)    --> 5V
*/
/*****************************************************
   Arduino pin definition
  /*****************************************************/
#define SPISS_PIN   12
#define SDA_PIN     11
#define SCK_PIN     10
/*****************************************************
   SPI function to send command and data.
   For more information on SPI please visit our Support Center
  /*****************************************************/
void SPI_Out(unsigned char a) {
  digitalWrite(SPISS_PIN, LOW);
  for (int n = 0; n < 8; n++) {
    if ((a & 0x80) == 0x80) {
      digitalWrite(SDA_PIN, HIGH);
      delayMicroseconds(200);
    }
    else {
      digitalWrite(SDA_PIN, LOW);
    }
    delayMicroseconds(200);
    a = a << 1;
    digitalWrite(SCK_PIN, LOW);
    digitalWrite(SCK_PIN, HIGH);
    delayMicroseconds(200);
  }
  digitalWrite(SCK_PIN, HIGH);
  delayMicroseconds(200);
  digitalWrite(SPISS_PIN, HIGH);
}
/*****************************************************
   Set Arduino UNO IO ports as Output mode
  /*****************************************************/
void Set_Pins() {
  pinMode(SPISS_PIN, OUTPUT);
  pinMode(SCK_PIN, OUTPUT);
  pinMode(SDA_PIN, OUTPUT);
}
/*****************************************************
   Set LCD Contrast
  /*****************************************************/
void Set_Contrast() {
  SPI_Out(0xFE);              //prefix command
  SPI_Out(0x52);              //contrast command
  SPI_Out(0x28);              //set contrast value
  delayMicroseconds(500);
}
/*****************************************************
   Set LCD Backlight
  /*****************************************************/
void Set_Backlight() {
  SPI_Out(0xFE);             //prefix command
  SPI_Out(0x53);             //backlight command
  SPI_Out(0x08);             //set backlight value
  delayMicroseconds(100);
}
/*****************************************************
   Clear LCD
  /*****************************************************/
void Clear_Display() {
  SPI_Out(0xFE);             //prefix command
  SPI_Out(0x51);             //clear display command
  delayMicroseconds(1500);
}
/*****************************************************
   Set cursor
   Mode = 0 sets Blinking cursor off
   Mode = 1 sets Blinking cursor on
  /*****************************************************/
void Set_Cursor(int mode) {
  SPI_Out(0xfe);          //prefix command
  if (mode == 0) {
    SPI_Out(0x4c);        //Blinking cursor off
  }
  else if (mode == 1) {
    SPI_Out(0x4b);        //Blinking cursor on
  }
  delayMicroseconds(100);
}
/*****************************************************
   Set Row address
   Line = 1 sets for first row
   Line = 2 sets for second row
  /*****************************************************/
void Set_Row(int line) {
  SPI_Out(0xfe);      //prefix command
  SPI_Out(0x45);      //set cursor command
  if (line == 1) {
    SPI_Out(0x00);    //cursor position: row one, column one
  }
  else if (line == 2) {
    SPI_Out(0x40);    //cursor position: row two, column one
  }
  delayMicroseconds(100);
}
/*****************************************************
   Write "NHD-0216K3Z-NSW-BBW-V3" to LCD
   delay(500) = 500 Milliseconds
  /*****************************************************/
void Part_Number() {
  Set_Row(1);
  SPI_Out(0x4e); // N
  delay(500);
  SPI_Out(0x48); // H
  delay(500);
  SPI_Out(0x44); // D
  delay(500);
  SPI_Out(0xb0); // -
  delay(500);
  SPI_Out(0x30); // 0
  delay(500);
  SPI_Out(0x32); // 2
  delay(500);
  SPI_Out(0x31); // 1
  delay(500);
  SPI_Out(0x36); // 6
  delay(500);
  SPI_Out(0x4b); // K
  delay(500);
  SPI_Out(0x33); // 3
  delay(500);
  SPI_Out(0x5a); // Z
  delay(500);
  SPI_Out(0xb0); // -
  delay(500);
  SPI_Out(0x4e); // N
  delay(500);
  SPI_Out(0x53); // S
  delay(500);
  SPI_Out(0x57); // W
  delay(500);
  SPI_Out(0xb0); // -
  Set_Row(2);
  delay(500);
  SPI_Out(0x42); // B
  delay(500);
  SPI_Out(0x42); // B
  delay(500);
  SPI_Out(0x57); // W
  delay(500);
  SPI_Out(0xb0); // -
  delay(500);
  SPI_Out(0x56); // V
  delay(500);
  SPI_Out(0x33); // 3
}
/*****************************************************
     Main function
  /*****************************************************/
void setup() {
  Set_Pins();         //set IO ports
  Set_Contrast();     //set display contrast
  Set_Backlight();    //set display backlight
  Clear_Display();    //clear display
  Set_Cursor(1);      //turns on blinking cursor
  Part_Number();      //display "NHD-0216K3Z-NSW-BBW-V3"
}
void loop() {
}
Cursor + tekst automatisch scrollen
Deze code geeft eerst tekst weer met de cursor erop en initialiseert vervolgens automatisch scrollen naar rechts.
/*****************************************************
  This code was written for the Arduino UNO using SPI Interface.
  This code displays the part number: NHD-0216K3Z-NSW-BBW-V3 while shifting to the right with a blinking cursor.
  /*  SPI Wiring Reference for: NHD-0216K3Z-NSW-BBW-V3
  ---------------------------
  LCD         |   Arduino
  ---------------------------
  1(SPISS)  --> 12
  2(SDO)    --> No Connect
  3(SCK)    --> 10
  4(SDA)    --> 11
  5(VSS)    --> Ground
  6(VDD)    --> 5V
*/
/*****************************************************
   Arduino pin definition
  /*****************************************************/
#define SPISS_PIN   12
#define SDA_PIN     11
#define SCK_PIN     10
/*****************************************************
   SPI function to send command and data.
   For more information on SPI please visit our Support Center
  /*****************************************************/
void SPI_Out(unsigned char a) {
  digitalWrite(SPISS_PIN, LOW);
  for (int n = 0; n < 8; n++) {
    if ((a & 0x80) == 0x80) {
      digitalWrite(SDA_PIN, HIGH);
      delayMicroseconds(200);
    }
    else {
      digitalWrite(SDA_PIN, LOW);
    }
    delayMicroseconds(200);
    a = a << 1;
    digitalWrite(SCK_PIN, LOW);
    digitalWrite(SCK_PIN, HIGH);
    delayMicroseconds(200);
  }
  digitalWrite(SCK_PIN, HIGH);
  delayMicroseconds(200);
  digitalWrite(SPISS_PIN, HIGH);
}
/*****************************************************
   Set Arduino UNO IO ports as Output mode
  /*****************************************************/
void Set_Pins() {
  pinMode(SPISS_PIN, OUTPUT);
  pinMode(SCK_PIN, OUTPUT);
  pinMode(SDA_PIN, OUTPUT);
}
/*****************************************************
   Set LCD Contrast
  /*****************************************************/
void Set_Contrast() {
  SPI_Out(0xFE);              //prefix command
  SPI_Out(0x52);              //contrast command
  SPI_Out(0x28);              //set contrast value
  delayMicroseconds(500);
}
/*****************************************************
   Set LCD Backlight
  /*****************************************************/
void Set_Backlight() {
  SPI_Out(0xFE);             //prefix command
  SPI_Out(0x53);             //backlight command
  SPI_Out(0x08);             //set backlight value
  delayMicroseconds(100);
}
/*****************************************************
   Clear LCD
  /*****************************************************/
void Clear_Display() {
  SPI_Out(0xFE);             //prefix command
  SPI_Out(0x51);             //clear display command
  delayMicroseconds(1500);
}
/*****************************************************
   Set cursor
   Mode = 0 sets Blinking cursor off
   Mode = 1 sets Blinking cursor on
  /*****************************************************/
void Set_Cursor(int mode) {
  SPI_Out(0xfe);          //prefix command
  if (mode == 0) {
    SPI_Out(0x4c);        //Blinking cursor off
  }
  else if (mode == 1) {
    SPI_Out(0x4b);        //Blinking cursor on
  }
  delayMicroseconds(100);
}
/*****************************************************
   Set Row address
   Line = 1 sets for first row
   Line = 2 sets for second row
  /*****************************************************/
void Set_Row(int line) {
  SPI_Out(0xfe);      //prefix command
  SPI_Out(0x45);      //set cursor command
  if (line == 1) {
    SPI_Out(0x00);    //cursor position: row one, column one
  }
  else if (line == 2) {
    SPI_Out(0x40);    //cursor position: row two, column one
  }
  delayMicroseconds(100);
}
/*****************************************************
   Write "NHD-0216K3Z-NSW-BBW-V3" to LCD
  /*****************************************************/
void Part_Number() {
    Set_Row(1);
  SPI_Out(0x4e); // N
  SPI_Out(0x48); // H
  SPI_Out(0x44); // D
  SPI_Out(0xb0); // -
  SPI_Out(0x30); // 0
  SPI_Out(0x32); // 2
  SPI_Out(0x31); // 1
  SPI_Out(0x36); // 6
  SPI_Out(0x4b); // K
  SPI_Out(0x33); // 3
  SPI_Out(0x5a); // Z
  SPI_Out(0xb0); // -
  SPI_Out(0x4e); // N
  SPI_Out(0x53); // S
  SPI_Out(0x57); // W
  SPI_Out(0xb0); // -
  Set_Row(2);
  SPI_Out(0x42); // B
  SPI_Out(0x42); // B
  SPI_Out(0x57); // W
  SPI_Out(0xb0); // -
  SPI_Out(0x56); // V
  SPI_Out(0x33); // 3
}
/*****************************************************
   Set Shifting mode
   Mode = 0 Move display one place to the left
   Mode = 1 Move display one place to the right
   delay(500) = 500 Milliseconds
  /*****************************************************/
void Set_Shift(int mode) {
  SPI_Out(0xfe);      //prefix command
  if (mode == 0) {
    SPI_Out(0x55);    //Move display one place to the left
  }
  else if (mode == 1) {
    SPI_Out(0x56);    //Move display one place to the right
  }
  delay(500);
}
/*****************************************************
     Main function
  /*****************************************************/
void setup() {
  Set_Pins();         //set IO ports
  Set_Contrast();     //set display contrast
  Set_Backlight();    //set display backlight
  Clear_Display();    //clear display
  Set_Cursor(1);      //turns on blinking cursor
  Part_Number();      //display "NHD-0216K3Z-NSW-BBW-V3"
}
/*****************************************************
     Loop function
  /*****************************************************/
void loop() {
  Set_Shift(1);     //shift display to the right
}
Tekst automatisch scrollen
Deze code zorgt ervoor dat de tekst "NHD-0216K3Z-NSW-BBW-V3" automatisch wordt gescrolld.
/*****************************************************
  This code was written for the Arduino UNO using SPI Interface.
  This code displays the part number: NHD-0216K3Z-NSW-BBW-V3 while shifting to the right.
  /*  SPI Wiring Reference for: NHD-0216K3Z-NSW-BBW-V3
  ---------------------------
  LCD         |   Arduino
  ---------------------------
  1(SPISS)  --> 12
  2(SDO)    --> No Connect
  3(SCK)    --> 10
  4(SDA)    --> 11
  5(VSS)    --> Ground
  6(VDD)    --> 5V
*/
/*****************************************************
   Arduino pin definition
  /*****************************************************/
#define SPISS_PIN   12
#define SDA_PIN     11
#define SCK_PIN     10
/*****************************************************
   SPI function to send command and data.
   For more information on SPI please visit our Support Center
  /*****************************************************/
void SPI_Out(unsigned char a) {
  digitalWrite(SPISS_PIN, LOW);
  for (int n = 0; n < 8; n++) {
    if ((a & 0x80) == 0x80) {
      digitalWrite(SDA_PIN, HIGH);
      delayMicroseconds(200);
    }
    else {
      digitalWrite(SDA_PIN, LOW);
    }
    delayMicroseconds(200);
    a = a << 1;
    digitalWrite(SCK_PIN, LOW);
    digitalWrite(SCK_PIN, HIGH);
    delayMicroseconds(200);
  }
  digitalWrite(SCK_PIN, HIGH);
  delayMicroseconds(200);
  digitalWrite(SPISS_PIN, HIGH);
}
/*****************************************************
   Set Arduino UNO IO ports as Output mode
  /*****************************************************/
void Set_Pins() {
  pinMode(SPISS_PIN, OUTPUT);
  pinMode(SCK_PIN, OUTPUT);
  pinMode(SDA_PIN, OUTPUT);
}
/*****************************************************
   Set LCD Contrast
  /*****************************************************/
void Set_Contrast() {
  SPI_Out(0xFE);              //prefix command
  SPI_Out(0x52);              //contrast command
  SPI_Out(0x28);              //set contrast value
  delayMicroseconds(500);
}
/*****************************************************
   Set LCD Backlight
  /*****************************************************/
void Set_Backlight() {
  SPI_Out(0xFE);             //prefix command
  SPI_Out(0x53);             //backlight command
  SPI_Out(0x08);             //set backlight value
  delayMicroseconds(100);
}
/*****************************************************
   Clear LCD
  /*****************************************************/
void Clear_Display() {
  SPI_Out(0xFE);             //prefix command
  SPI_Out(0x51);             //clear display command
  delayMicroseconds(1500);
}
/*****************************************************
   Set cursor
   Mode = 0 sets Blinking cursor off
   Mode = 1 sets Blinking cursor on
  /*****************************************************/
void Set_Cursor(int mode) {
  SPI_Out(0xfe);          //prefix command
  if (mode == 0) {
    SPI_Out(0x4c);        //Blinking cursor off
  }
  else if (mode == 1) {
    SPI_Out(0x4b);        //Blinking cursor on
  }
  delayMicroseconds(100);
}
/*****************************************************
   Set Row address
   Line = 1 sets for first row
   Line = 2 sets for second row
  /*****************************************************/
void Set_Row(int line) {
  SPI_Out(0xfe);      //prefix command
  SPI_Out(0x45);      //set cursor command
  if (line == 1) {
    SPI_Out(0x00);    //cursor position: row one, column one
  }
  else if (line == 2) {
    SPI_Out(0x40);    //cursor position: row two, column one
  }
  delayMicroseconds(100);
}
/*****************************************************
   Write "NHD-0216K3Z-NSW-BBW-V3" to LCD
  /*****************************************************/
void Part_Number() {
    Set_Row(1);
  SPI_Out(0x4e); // N
  SPI_Out(0x48); // H
  SPI_Out(0x44); // D
  SPI_Out(0xb0); // -
  SPI_Out(0x30); // 0
  SPI_Out(0x32); // 2
  SPI_Out(0x31); // 1
  SPI_Out(0x36); // 6
  SPI_Out(0x4b); // K
  SPI_Out(0x33); // 3
  SPI_Out(0x5a); // Z
  SPI_Out(0xb0); // -
  SPI_Out(0x4e); // N
  SPI_Out(0x53); // S
  SPI_Out(0x57); // W
  SPI_Out(0xb0); // -
  Set_Row(2);
  SPI_Out(0x42); // B
  SPI_Out(0x42); // B
  SPI_Out(0x57); // W
  SPI_Out(0xb0); // -
  SPI_Out(0x56); // V
  SPI_Out(0x33); // 3
}
/*****************************************************
   Set Shifting mode
   Mode = 0 Move display one place to the left
   Mode = 1 Move display one place to the right
   delay(500) = 500 Milliseconds
  /*****************************************************/
void Set_Shift(int mode) {
  SPI_Out(0xfe);      //prefix command
  if (mode == 0) {
    SPI_Out(0x55);    //Move display one place to the left
  }
  else if (mode == 1) {
    SPI_Out(0x56);    //Move display one place to the right
  }
  delay(500);
}
/*****************************************************
     Main function
  /*****************************************************/
void setup() {
  Set_Pins();         //set IO ports
  Set_Contrast();     //set display contrast
  Set_Backlight();    //set display backlight
  Clear_Display();    //clear display
  Set_Cursor(0);      //turns off blinking cursor
  Part_Number();      //display "NHD-0216K3Z-NSW-BBW-V3"
}
/*****************************************************
     Loop function
  /*****************************************************/
void loop() {
  Set_Shift(1);     //shift display to the right
}
Het LCD-contrast aanpassen
Deze code geeft de tekst "NHD-0216K3Z-NSW-BBW-V3" weer terwijl het contrast wordt gewijzigd.
    /*****************************************************
  This code was written for the Arduino UNO using SPI Interface.
  This code displays the part number: NHD-0216K3Z-NSW-BBW-V3 while changing the contrast.
  /*  SPI Wiring Reference for: NHD-0216K3Z-NSW-BBW-V3
  ---------------------------
  LCD         |   Arduino
  ---------------------------
  1(SPISS)  --> 12
  2(SDO)    --> No Connect
  3(SCK)    --> 10
  4(SDA)    --> 11
  5(VSS)    --> Ground
  6(VDD)    --> 5V
*/
/*****************************************************
   Arduino pin definition
  /*****************************************************/
#define SPISS_PIN   12
#define SDA_PIN     11
#define SCK_PIN     10
/*****************************************************
   SPI function to send command and data.
   For more information on SPI please visit our Support Center
  /*****************************************************/
void SPI_Out(unsigned char a) {
  digitalWrite(SPISS_PIN, LOW);
  for (int n = 0; n < 8; n++) {
    if ((a & 0x80) == 0x80) {
      digitalWrite(SDA_PIN, HIGH);
      delayMicroseconds(200);
    }
    else {
      digitalWrite(SDA_PIN, LOW);
    }
    delayMicroseconds(200);
    a = a << 1;
    digitalWrite(SCK_PIN, LOW);
    digitalWrite(SCK_PIN, HIGH);
    delayMicroseconds(200);
  }
  digitalWrite(SCK_PIN, HIGH);
  delayMicroseconds(200);
  digitalWrite(SPISS_PIN, HIGH);
}
/*****************************************************
   Set Arduino UNO IO ports as Output mode
  /*****************************************************/
void Set_Pins() {
  pinMode(SPISS_PIN, OUTPUT);
  pinMode(SCK_PIN, OUTPUT);
  pinMode(SDA_PIN, OUTPUT);
}
/*****************************************************
   Set LCD Contrast
  /*****************************************************/
void Set_Contrast() {
  SPI_Out(0xFE);              //prefix command
  SPI_Out(0x52);              //contrast command
  SPI_Out(0x32);              //set contrast value
  delayMicroseconds(500);
}
/*****************************************************
   Set LCD Backlight
  /*****************************************************/
void Set_Backlight() {
  SPI_Out(0xFE);             //prefix command
  SPI_Out(0x53);             //backlight command
  SPI_Out(0x08);             //set backlight value
  delayMicroseconds(100);
}
/*****************************************************
   Clear LCD
  /*****************************************************/
void Clear_Display() {
  SPI_Out(0xFE);             //prefix command
  SPI_Out(0x51);             //clear display command
  delayMicroseconds(1500);
}
/*****************************************************
   Set cursor
   Mode = 0 sets Blinking cursor off
   Mode = 1 sets Blinking cursor on
  /*****************************************************/
void Set_Cursor(int mode) {
  SPI_Out(0xfe);          //prefix command
  if (mode == 0) {
    SPI_Out(0x4c);        //Blinking cursor off
  }
  else if (mode == 1) {
    SPI_Out(0x4b);        //Blinking cursor on
  }
  delayMicroseconds(100);
}
/*****************************************************
   Set Row address
   Line = 1 sets for first row
   Line = 2 sets for second row
  /*****************************************************/
void Set_Row(int line) {
  SPI_Out(0xfe);      //prefix command
  SPI_Out(0x45);      //set cursor command
  if (line == 1) {
    SPI_Out(0x00);    //cursor position: row one, column one
  }
  else if (line == 2) {
    SPI_Out(0x40);    //cursor position: row two, column one
  }
  delayMicroseconds(100);
}
/*****************************************************
   Write "NHD-0216K3Z-NSW-BBW-V3" to LCD
  /*****************************************************/
void Part_Number() {
  Set_Row(1);
  SPI_Out(0x4e); // N
  SPI_Out(0x48); // H
  SPI_Out(0x44); // D
  SPI_Out(0xb0); // -
  SPI_Out(0x30); // 0
  SPI_Out(0x32); // 2
  SPI_Out(0x31); // 1
  SPI_Out(0x36); // 6
  SPI_Out(0x4b); // K
  SPI_Out(0x33); // 3
  SPI_Out(0x5a); // Z
  SPI_Out(0xb0); // -
  SPI_Out(0x4e); // N
  SPI_Out(0x53); // S
  SPI_Out(0x57); // W
  SPI_Out(0xb0); // -
  Set_Row(2);
  SPI_Out(0x42); // B
  SPI_Out(0x42); // B
  SPI_Out(0x57); // W
  SPI_Out(0xb0); // -
  SPI_Out(0x56); // V
  SPI_Out(0x33); // 3
}
/*****************************************************
  Function to:
    - change contrast from highest --> lowest
    - change contrast from lowest  --> highest
  delay(100) = 100 Milliseconds
  /*****************************************************/
void Contrast_Cycle() {
  for (int x = 50; x >= 0; x--) {
    SPI_Out(0xFE);             //High to Low contrast loop
    SPI_Out(0x52);
    SPI_Out(x);
    delay(100);
  }
  for (int x = 0; x <= 50; x++) {
    SPI_Out(0xFE);             //Low to High contrats loop
    SPI_Out(0x52);
    SPI_Out(x);
    delay(100);
  }
}
/*****************************************************
     Main function
  /*****************************************************/
void setup() {
  Set_Pins();         //set IO ports
  Set_Contrast();     //set display contrast
  Set_Backlight();    //set display backlight
  Clear_Display();    //clear display
  Set_Cursor(0);      //turns off blinking cursor
  Part_Number();      //display "NHD-0216K3Z-NSW-BBW-V3"
}
/*****************************************************
     Loop function
  /*****************************************************/
void loop() {
  Contrast_Cycle(); //cycle through contrast
}
Hoe de LCD-achtergrondverlichting te gebruiken
Er zijn verschillende methoden om de achtergrondverlichting van het LCD-scherm te regelen of aan te passen. Twee van de meest gebruikelijke manieren om de achtergrondverlichting van het LCD-scherm te regelen of aan te passen, zijn via een commando of een potentiometer.
Voor onze seriële displays zoals de NHD-0216K3Z-NSW-BBW-V3 kan de achtergrondverlichting worden geregeld via een commando. De Achtergrondverlichting_lus() functie stelt de helderheid van de achtergrondverlichting in een constante lus in van hoog naar laag en vervolgens van laag naar hoog.
De onderstaande code geeft de tekst "NHD-0216K3Z-NSW-BBW-V3" weer terwijl de intensiteit van de achtergrondverlichting wordt gewijzigd.
        /*****************************************************
  This code was written for the Arduino UNO using SPI Interface.
  This code displays the part number: NHD-0216K3Z-NSW-BBW-V3 while changing the backlight.
  /*  SPI Wiring Reference for: NHD-0216K3Z-NSW-BBW-V3
  ---------------------------
  LCD         |   Arduino
  ---------------------------
  1(SPISS)  --> 12
  2(SDO)    --> No Connect
  3(SCK)    --> 10
  4(SDA)    --> 11
  5(VSS)    --> Ground
  6(VDD)    --> 5V
*/
/*****************************************************
   Arduino pin definition
  /*****************************************************/
#define SPISS_PIN   12
#define SDA_PIN     11
#define SCK_PIN     10
/*****************************************************
   SPI function to send command and data.
   For more information on SPI please visit our Support Center
  /*****************************************************/
void SPI_OUT(unsigned char a) {
  digitalWrite(SPISS_PIN, LOW);
  for (int n = 0; n < 8; n++) {
    if ((a & 0x80) == 0x80) {
      digitalWrite(SDA_PIN, HIGH);
      delayMicroseconds(200);
    }
    else {
      digitalWrite(SDA_PIN, LOW);
    }
    delayMicroseconds(200);
    a = a << 1;
    digitalWrite(SCK_PIN, LOW);
    digitalWrite(SCK_PIN, HIGH);
    delayMicroseconds(200);
  }
  digitalWrite(SCK_PIN, HIGH);
  delayMicroseconds(200);
  digitalWrite(SPISS_PIN, HIGH);
}
/*****************************************************
   Set Arduino UNO IO ports as Output mode
  /*****************************************************/
void Set_Pins() {
  pinMode(SPISS_PIN, OUTPUT);
  pinMode(SCK_PIN, OUTPUT);
  pinMode(SDA_PIN, OUTPUT);
}
/*****************************************************
   Set LCD Contrast
  /*****************************************************/
void Set_Contrast() {
  SPI_OUT(0xFE);              //prefix command
  SPI_OUT(0x52);              //contrast command
  SPI_OUT(0x28);              //set contrast value
  delayMicroseconds(500);
}
/*****************************************************
   Set LCD Backlight
  /*****************************************************/
void Set_Backlight() {
  SPI_OUT(0xFE);             //prefix command
  SPI_OUT(0x53);             //backlight command
  SPI_OUT(0x08);             //set backlight value
  delayMicroseconds(100);
}
/*****************************************************
   Clear LCD
  /*****************************************************/
void Clear_Display() {
  SPI_OUT(0xFE);             //prefix command
  SPI_OUT(0x51);             //clear display command
  delayMicroseconds(1500);
}
/*****************************************************
   Set cursor
   Mode = 0 sets Blinking cursor off
   Mode = 1 sets Blinking cursor on
  /*****************************************************/
void Set_Cursor(int mode) {
  SPI_OUT(0xfe);          //prefix command
  if (mode == 0) {
    SPI_OUT(0x4c);        //Blinking cursor off
  }
  else if (mode == 1) {
    SPI_OUT(0x4b);        //Blinking cursor on
  }
  delayMicroseconds(100);
}
/*****************************************************
   Set Row address
   Line = 1 sets for first row
   Line = 2 sets for second row
  /*****************************************************/
void Set_Row(int line) {
  SPI_OUT(0xfe);      //prefix command
  SPI_OUT(0x45);      //set cursor command
  if (line == 1) {
    SPI_OUT(0x00);    //cursor position: row one, column one
  }
  else if (line == 2) {
    SPI_OUT(0x40);    //cursor position: row two, column one
  }
  delayMicroseconds(100);
}
/*****************************************************
   Write "NHD-0216K3Z-NSW-BBW-V3" to LCD
  /*****************************************************/
void Part_Number() {
    Set_Row(1);
  SPI_OUT(0x4e); // N
  SPI_OUT(0x48); // H
  SPI_OUT(0x44); // D
  SPI_OUT(0xb0); // -
  SPI_OUT(0x30); // 0
  SPI_OUT(0x32); // 2
  SPI_OUT(0x31); // 1
  SPI_OUT(0x36); // 6
  SPI_OUT(0x4b); // K
  SPI_OUT(0x33); // 3
  SPI_OUT(0x5a); // Z
  SPI_OUT(0xb0); // -
  SPI_OUT(0x4e); // N
  SPI_OUT(0x53); // S
  SPI_OUT(0x57); // W
  SPI_OUT(0xb0); // -
  Set_Row(2);
  SPI_OUT(0x42); // B
  SPI_OUT(0x42); // B
  SPI_OUT(0x57); // W
  SPI_OUT(0xb0); // -
  SPI_OUT(0x56); // V
  SPI_OUT(0x33); // 3
}
/*****************************************************
  Function to:
    - change backlight from highest --> lowest
    - change backlight from lowest  --> highest
  delay(500) = 500 Milliseconds
  /*****************************************************/
void Backlight_loop() {
  for (int x = 8; x >= 0; x--) {
    SPI_OUT(0xFE);              //High to Low Backlight loop
    SPI_OUT(0x53);
    SPI_OUT(x);
    delay(500);
  }
  for (int x = 0; x <= 8; x++) {
    SPI_OUT(0xFE);              //Low to High Backlight loop
    SPI_OUT(0x53);
    SPI_OUT(x);
    delay(500);
  }
}
/*****************************************************
     Main function
  /*****************************************************/
void setup() {
  Set_Pins();         //set IO ports
  Set_Contrast();     //set display contrast
  Set_Backlight();    //set display backlight
  Clear_Display();    //clear display
  Set_Cursor(0);      //turns off blinking cursor
  Part_Number();      //display "NHD-0216K3Z-NSW-BBW-V3"
}
/*****************************************************
     Loop function
  /*****************************************************/
void loop() {
  Backlight_loop();   //High to Low Backlight loop
}
Tekens/lettertypetabellen
Deze code geeft tekens weer uit de lettertypetabel die in het LCD-scherm is opgenomen.
        /*****************************************************
  This code was written for the Arduino UNO using SPI Interface.
  This code displays the font table characters.
  /*  SPI Wiring Reference for: NHD-0216K3Z-NSW-BBW-V3
  ---------------------------
  LCD         |   Arduino
  ---------------------------
  1(SPISS)  --> 12
  2(SDO)    --> No Connect
  3(SCK)    --> 10
  4(SDA)    --> 11
  5(VSS)    --> Ground
  6(VDD)    --> 5V
*/
/*****************************************************
   Arduino pin definition
  /*****************************************************/
#define SPISS_PIN   12
#define SDA_PIN     11
#define SCK_PIN     10
/*****************************************************
   SPI function to send command and data.
   For more information on SPI please visit our Support Center
  /*****************************************************/
void SPI_out(unsigned char a) {
  digitalWrite(SPISS_PIN, LOW);
  for (int n = 0; n < 8; n++) {
    if ((a & 0x80) == 0x80) {
      digitalWrite(SDA_PIN, HIGH);
      delayMicroseconds(200);
    }
    else {
      digitalWrite(SDA_PIN, LOW);
    }
    delayMicroseconds(200);
    a = a << 1;
    digitalWrite(SCK_PIN, LOW);
    digitalWrite(SCK_PIN, HIGH);
    delayMicroseconds(200);
  }
  digitalWrite(SCK_PIN, HIGH);
  delayMicroseconds(200);
  digitalWrite(SPISS_PIN, HIGH);
}
/*****************************************************
   Set Arduino UNO IO ports as Output mode
  /*****************************************************/
void Set_Pins() {
  pinMode(SPISS_PIN, OUTPUT);
  pinMode(SCK_PIN, OUTPUT);
  pinMode(SDA_PIN, OUTPUT);
}
/*****************************************************
   Set LCD Contrast
  /*****************************************************/
void Set_Contrast() {
  SPI_out(0xFE);              //prefix command
  SPI_out(0x52);              //contrast command
  SPI_out(0x28);              //set contrast value
  delayMicroseconds(500);
}
/*****************************************************
   Set LCD Backlight
  /*****************************************************/
void Set_Backlight() {
  SPI_out(0xFE);             //prefix command
  SPI_out(0x53);             //backlight command
  SPI_out(0x08);             //set backlight value
  delayMicroseconds(100);
}
/*****************************************************
   Clear LCD
  /*****************************************************/
void Clear_Display() {
  SPI_out(0xFE);             //prefix command
  SPI_out(0x51);             //clear display command
  delayMicroseconds(1500);
}
/*****************************************************
   Set cursor
   Mode = 0 sets Blinking cursor off
   Mode = 1 sets Blinking cursor on
  /*****************************************************/
void Set_Cursor(int mode) {
  SPI_out(0xfe);          //prefix command
  if (mode == 0) {
    SPI_out(0x4c);        //Blinking cursor off
  }
  else if (mode == 1) {
    SPI_out(0x4b);        //Blinking cursor on
  }
  delayMicroseconds(100);
}
/*****************************************************
   Set Row address
   Line = 1 sets for first row
   Line = 2 sets for second row
  /*****************************************************/
void Set_Row(int line) {
  SPI_out(0xfe);      //prefix command
  SPI_out(0x45);      //set cursor command
  if (line == 1) {
    SPI_out(0x00);    //cursor position: row one, column one
  }
  else if (line == 2) {
    SPI_out(0x40);    //cursor position: row two, column one
  }
  delayMicroseconds(100);
}
/*****************************************************
  Display font characters
    -change the row address every 16 characters displayed
    -used Clear_Display() function to clear the display
     and change the row to the first row
  delay(500) = 500 Milliseconds
  /*****************************************************/
void Font_Table_Characters() {
  Clear_Display();
  for (int i = 0; i < 64; i++) {
    if (i == 16 || i == 48) {
      Set_Row(2);
    }
    else if (i == 32 || i == 64) {
      Clear_Display();
      if (i == 64) {
        i = 0;
      }
    }
    SPI_out(i + 32);
    delay(500);
  }
}
/*****************************************************
     Main function
  /*****************************************************/
void setup() {
  Set_Pins();         //set IO ports
  Set_Contrast();     //set display contrast
  Set_Backlight();    //set display backlight
  Clear_Display();    //clear display
  Set_Cursor(0);      //turns off blinking cursor
}
/*****************************************************
     Loop function
  /*****************************************************/
void loop() {
  Font_Table_Characters();  //Display font characters
}
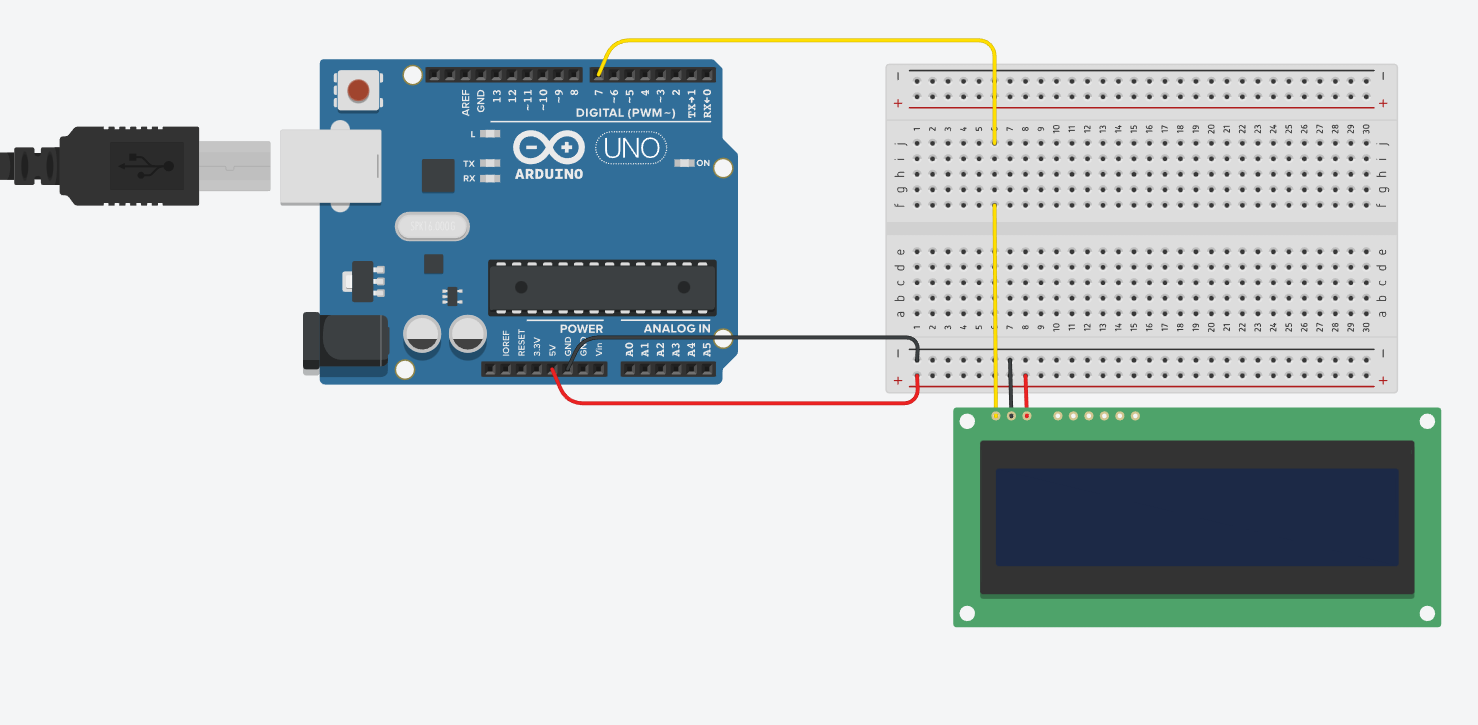
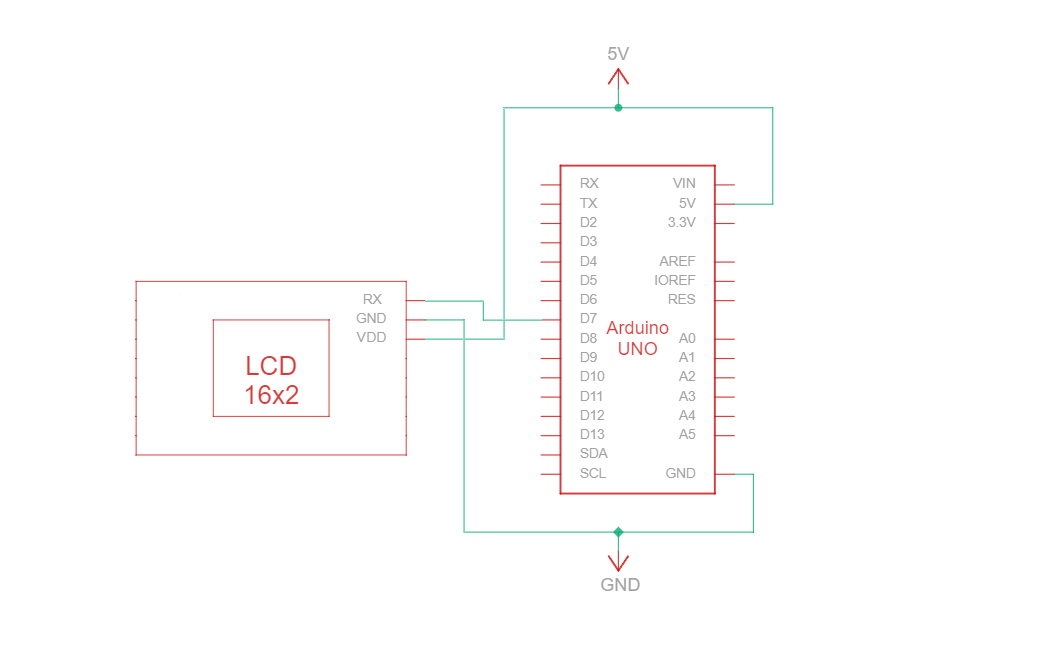
Circuit - Aansluitschema en schema voor RS232 TTL-communicatie
RS232 TTL is een serieel communicatieprotocol dat gebruikmaakt van RS232-specificaties, maar met TTL-logische niveaus (0 V tot Vcc, doorgaans 3,3 V of 5 V). Het RS232 TTL-verbindingscircuit tussen Arduino en het 16-tekens Newhaven-display maakt gebruik van slechts drie draden:
| Arduino | LCD | Type verbinding |
|---|---|---|
| 5V-pin | Pin 3: V DD | Vermogen |
| Aardingspin | Pin 2: Aarde | Grond |
| Pin 7: Digitale I/O-pin | Pin 1: RX | RS-232 (TTL) seriële ingangspoort |
Opmerking:
R1 en R2 op het display moeten open zijn om RS232 TTL in te schakelen, zoals gespecificeerd in het gegevensblad.
RS232 TTL-bedradingscircuit
RS232 TTL-bedradingsschema
We hebben een gedetailleerde, beginnersvriendelijke tutorial gemaakt op Instructables voor RS232 TTL-communicatie. De tutorial bevat alle stappen die nodig zijn om dit project te voltooien. Bekijk hem hier: www.instructables.com/Arduino-LCD-Tutorial/
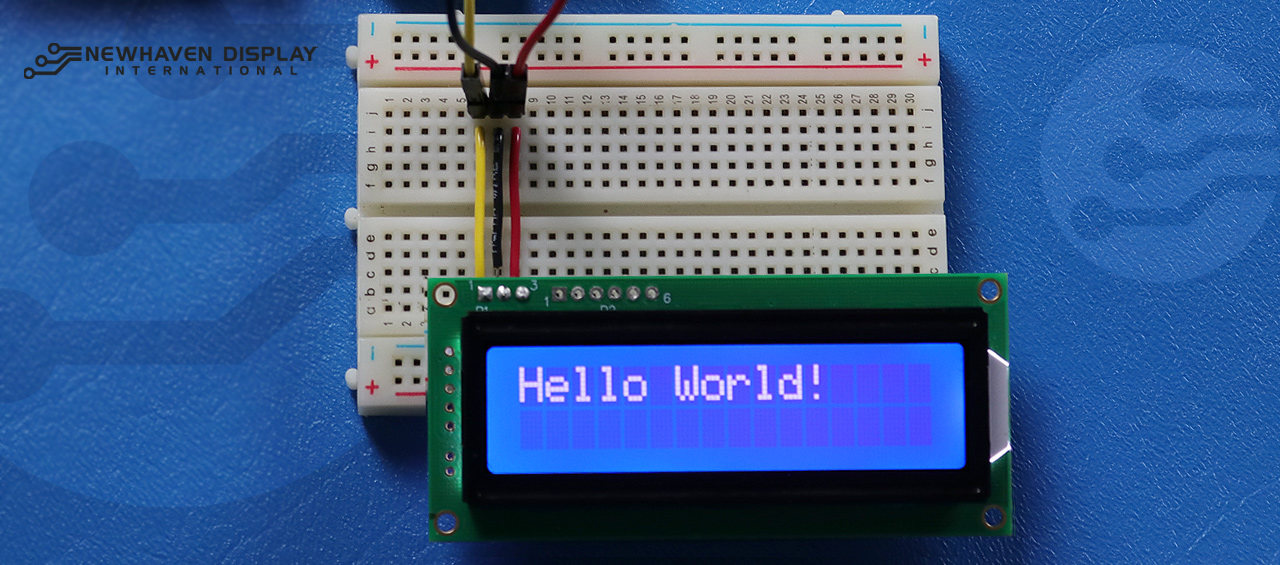
Arduino - LCD Hello World! Codevoorbeeld met behulp van seriële RS232 TTL-communicatie
Het volgende codevoorbeeld geeft "Hello Word!" weer op het LCD-scherm met behulp van RS232 TTL-communicatie.
NHD-0216K3Z-NSW-BBW-V3 ***************************************************** Deze code is geschreven voor de Arduino UNO met behulp van een RS-232-interface. /* RS-232-bedradingsreferentie voor: NHD-0216K3Z-NSW-BBW-V3 --------------------------- LCD | Arduino --------------------------- 1(RX) --> 7 2(VSS) --> Aarde 3(VDD) --> 5V */ #define P1 7 //RX de pin waarop seriële gegevens worden ontvangen. /***************************************************** RS-232-instellingen voor commando's en gegevens. Ga voor meer informatie over RS-232 naar ons Support Center. /*****************************************************/ #include#define RxPin P1 SoftwareSerial NHD_LCD = SoftwareSerial(P1, RxPin); /***************************************************** Set LCD Contrast /*****************************************************/ void Set_Contrast() { NHD_LCD.write(0xFE); //Prefix command NHD_LCD.write(0x52); //Contrast command NHD_LCD.write(0x28); //Set contrast value delayMicroseconds(500); } /***************************************************** Clear LCD /*****************************************************/ void Clear_display() { NHD_LCD.write(0xFE); //Prefix command NHD_LCD.write(0x51); //Clear Display delayMicroseconds(1500); } /***************************************************** Set Arduino UNO IO ports as Output mode /*****************************************************/ void Set_Pins() { pinMode(RxPin, OUTPUT); } /***************************************************** Set LCD Backlight /*****************************************************/ void Set_Backlight() { NHD_LCD.write(0xFE); //prefix command NHD_LCD.write(0x53); //Backlight command NHD_LCD.write(0x08); //Set backlight value delayMicroseconds(100); } /***************************************************** Set cursor Mode = 0 sets Blinking cursor off Mode = 1 sets Blinking cursor on /*****************************************************/ void Set_Cursor(int mode) { NHD_LCD.write(0xFE); //Prefix command if (mode == 0) { NHD_LCD.write(0x4c); //Turn blinking cursor off } else if (mode == 1) { NHD_LCD.write(0x4b); //Turn blinking cursor on } delayMicroseconds(100); } /***************************************************** Write "Hello World!" to LCD /*****************************************************/ void Hello_World() { NHD_LCD.write(0x48); // H NHD_LCD.write(0x65); // e NHD_LCD.write(0x6C); // l NHD_LCD.write(0x6C); // l NHD_LCD.write(0x6F); // o NHD_LCD.write(0x11); // Blank NHD_LCD.write(0x57); // W NHD_LCD.write(0x6f); // o NHD_LCD.write(0x72); // r NHD_LCD.write(0x6c); // l NHD_LCD.write(0x64); // d NHD_LCD.write(0x21); // ! } /***************************************************** Main function /*****************************************************/ void setup() { NHD_LCD.begin(9600); //Sets 9600 Baud Rate the display can receive and transmit data at a rate of 9600 bits per second by default. delay(15); Set_Pins(); //Set IO ports Set_Cursor(0); //Turns off blinking cursor Set_Contrast(); //Set display Contrast Set_Backlight(); //Set display Backlight Clear_display(); //Clear display Hello_World(); //Display "Hello Wolrd!" } void loop() { }
Problemen met uw LCD oplossen - Arduino-project
Hieronder bespreken we enkele veelvoorkomende stappen die u kunt nemen wanneer u problemen ondervindt met uw Arduino-LCD-project.
- Controleer de bedradingsaansluitingen: Het meest voorkomende probleem bij het aansluiten van een LCD-scherm op een Arduino is onjuiste bedrading. Controleer uw bedradingsaansluitingen aan de hand van het meegeleverde pinout-diagram en circuit om een goede connectiviteit te garanderen. Houd er bovendien rekening mee dat het NHD-0216K3Z-NSW-BBW-V3 kan worden geconfigureerd voor gebruik met SPI-, I2C- en RS232 TTL-interfaces. Er moet een weerstand van 0 ohm op het R2-gedeelte van de printplaat worden gesoldeerd om met de SPI-interface te kunnen werken.
- Controleer de onderdelen: zoek naar zichtbare tekenen van schade aan de Arduino, het LCD-scherm of de aansluitkabels.
- Controleer de code: Zorg ervoor dat de code die je op je Arduino hebt gezet klopt en geen fouten heeft.
- Controleer de stroomvoorziening: zorg ervoor dat uw stroombron voldoende is om zowel de Arduino als het LCD-scherm van stroom te voorzien.
- Test met een LCD-scherm waarvan je zeker weet dat het goed werkt: Als je nog steeds problemen hebt, probeer dan een ander LCD-scherm dat zeker goed werkt aan te sluiten op je Arduino. Zo kun je vaststellen of het probleem bij het LCD-scherm ligt of bij het Arduino-bord zelf.
- Contrast aanpassenAls u moeite heeft om de weergegeven tekst op het LCD-scherm te zien, probeer dan het contrast aan te passen met behulp van de softwarefunctie.
Contrast instellen(), zoals hierboven beschreven. Verschillende lichtomstandigheden kunnen verschillende contrastinstellingen vereisen voor optimale zichtbaarheid. - Controleer de versie van Arduino IDE: Zorg ervoor dat u de nieuwste versie van Arduino IDE gebruikt. Verouderde versies kunnen bugs bevatten of incompatibel zijn met uw project.
- Test afzonderlijke functies: Als u problemen ondervindt met specifieke functies, zoals scrollen of contrastregeling, probeer dan eenvoudigere code uit te voeren, zoals het voorbeeld "Hello World!", om het probleem te isoleren. Zo kunt u vaststellen of het probleem te maken heeft met de code of met de hardware.
- Vraag hulp aan de community: Als u het probleem niet kunt oplossen na het volgen van de bovenstaande stappen voor probleemoplossing, kunt u overwegen om hulp te vragen aan de online community. Online forums, zoals het Newhaven Display Support Forum, deArduino Stack Exchange of hetArduino.cc-forum, zijn uitstekende bronnen om hulp te krijgen van ervaren gebruikers.
Door deze stappen voor probleemoplossing te volgen, zou u de meeste problemen met betrekking tot het aansluiten van een LCD-scherm op een Arduino-bord moeten kunnen diagnosticeren en oplossen. Vergeet niet dat geduld en aandacht voor details essentieel zijn bij het oplossen van problemen met elektronica-projecten.
Aanvullende bronnen
- Officiële website van Arduino UNO.
- LCD 16x2 productbeschrijving.
- LCD 16x2 productgegevensblad en specificaties.
- Beginnersvriendelijke Arduino-LCD Instructables-handleiding
- Forum voor ondersteuning van karakter-LCD's.
- Lees onze beginnershandleiding voor het maken van prototypes van displays.
- Voorbeeldcode voor karakter-LCD.
- Leer hoe u elektronica kunt beschermen tegen ESD.
- Lees meer over de verschillende soorten LCD-schermen.
- Meer informatie over LCD-modi.