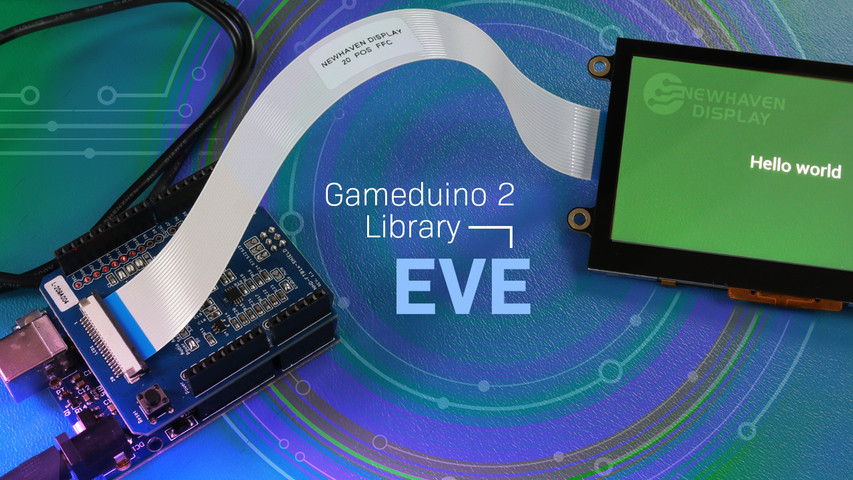
Using Gameduino 2 Library with EVE TFT Modules
Jul 6th 2023
The Gameduino 2 library, written by James Bowman, is designed for the FT80x/FT81x graphic controller IC series and supports various microcontrollers. This library includes a range of example sketches, from simple "Hello World" programs to more complex programs that use widgets, access to PNG files from a microSD card, and even generate board game simulations.
In this tutorial, we will use an Arduino Uno to drive our NHD-4.3-480272FT-CSXP-CTP module and list the necessary changes to compile the basic "Hello World" sketch.
Compatible TFT EVE Displays for This Tutorial
The guide covers the use of the Gameduino 2 library with the following Newhaven Display EVE TFT modules:
| Display Size | Part Numbers |
|---|---|
| 3.5” TFT | NHD-3.5-320240FT-CSXP-T |
| 4.3” TFT | NHD-4.3-800480FT-CSXP-CTP NHD-4.3-480272FT-CSXP-CTP NHD-4.3-480272FT-CSXP-T |
| 5.0” TFT | NHD-5.0-800480FT-CSXP-CTP NHD-5.0-800480FT-CTXL-CTP NHD-5.0-800480FT-CTXL-T |
| 7.0” TFT | NHD-7.0-800480FT-CSXV-CTP NHD-7.0-800480FT-CSXV-T |
ハードウェアおよびソフトウェアの要件
To use the Gameduino 2 library, you will need the following:
- Newhaven Display 4.3 inch IPS EVE Capacitive TFT NHD-4.3-480272FT-CSXP-CTP
- Newhaven Display 20 POS FFC
- Newhaven Display NHD-FT81x-SHIELD
- Arduino Uno
- USB 2.0 Cable Type A/B
- Arduino IDE tool installed
- 9V Power Supply
- Gameduino2 Library
- Eve Asset Builder (For images)
Software Setup: Load the Library to Your Arduino IDE
Steps to load the Gameduino 2 library to the Arduino board.
- Download the Library: Download the Gameduino2 library for your project.
- Open Your Arduino IDE: Launch your Arduino IDE software on your computer. Make sure you have the latest version of the IDE to avoid any issues.
-
Add the Library to Arduino IDE: After launching the Arduino IDE, navigate to Sketch > Include Library > Add .ZIP Library. Locate the downloaded library file on your computer and select it.
If you're new to installing libraries for Arduino, you can find detailed instructions on the official Arduino website.
- Verify the Installation: Once the library is installed, it should be available in the IDE as shown in the image below. To verify this, go to File > Examples, and you should see Gameduino2 listed. If you can see it, then the library has been successfully installed. If it's not there, repeat the process or troubleshoot for any errors.
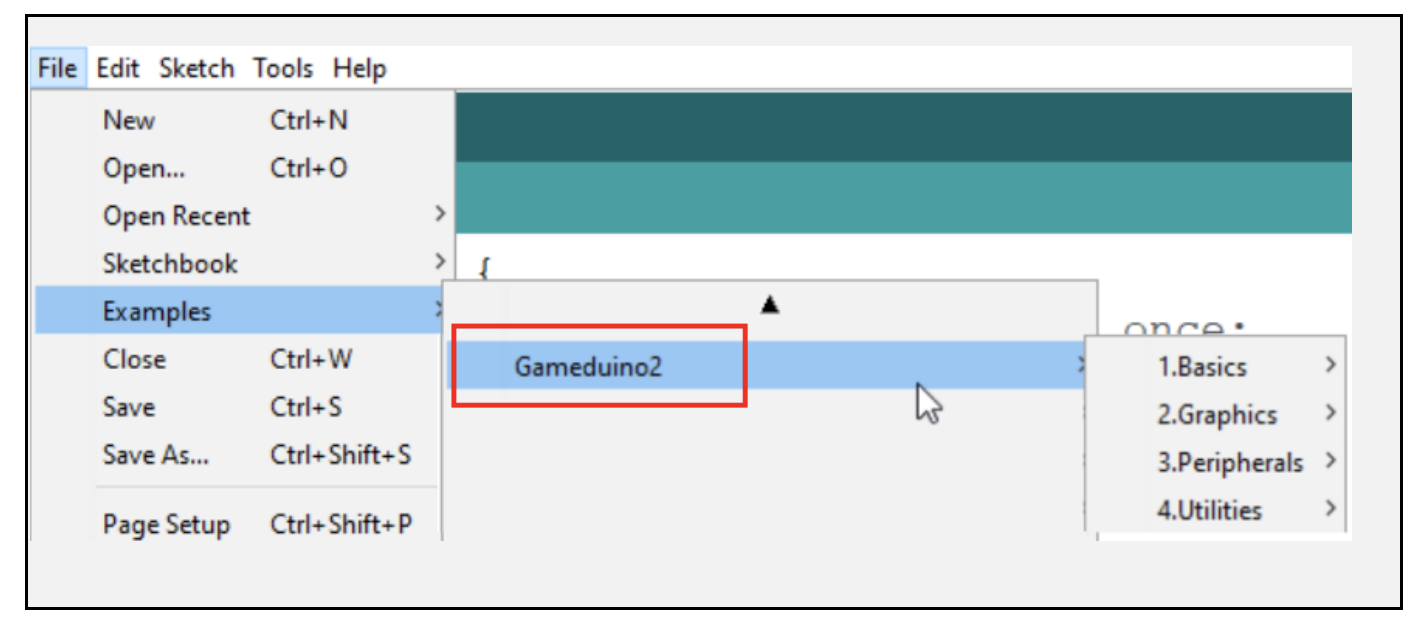
Remember to restart the Arduino IDE if your new library does not appear in the list of examples. If you encounter any issues, consult the Arduino community forum for assistance.
Hardware Setup
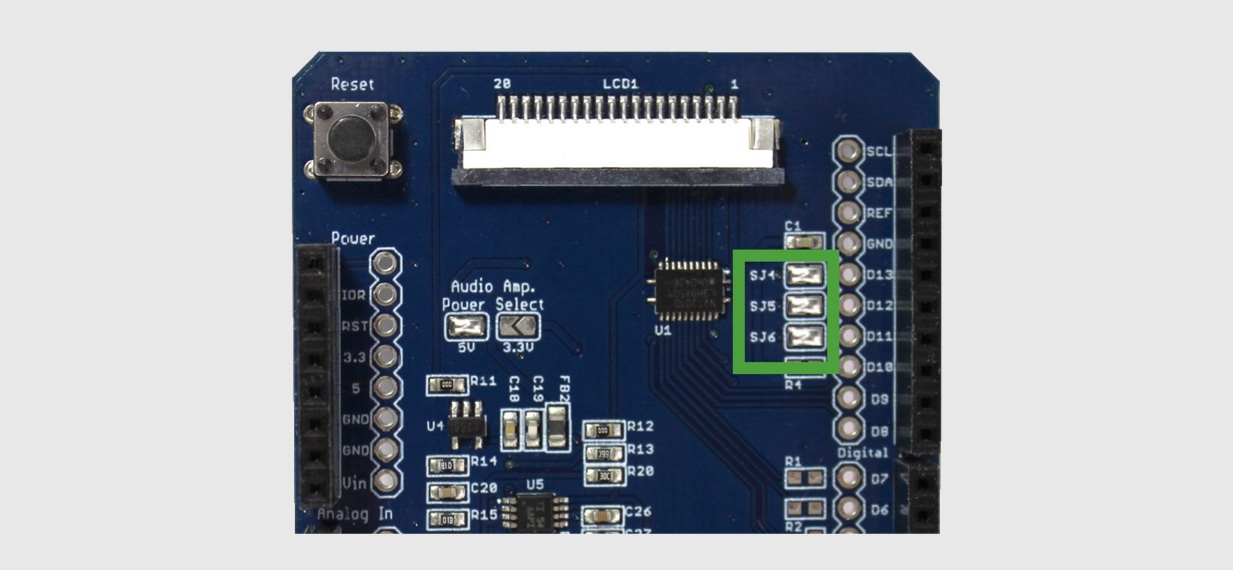
Before connecting, make sure the NHD-FT81x-SHIELD has J4, J5, and J6 shorted and J1-J3 open for Arduino Uno Connection as shown below:
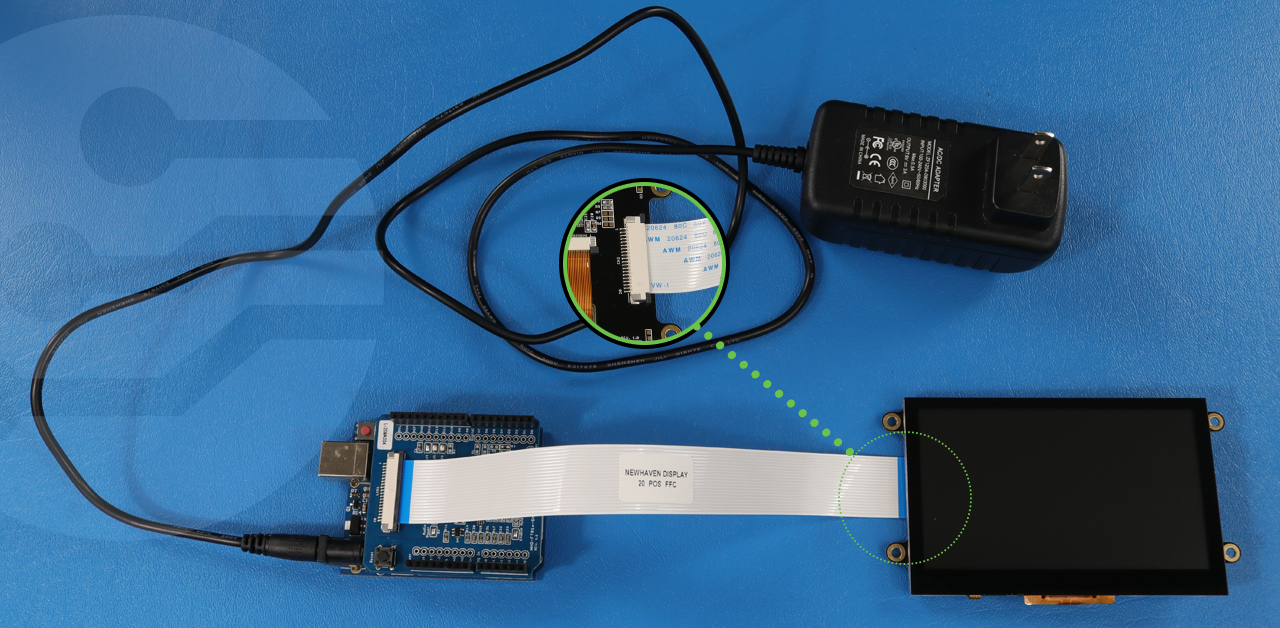
Attach the shield to your Arduino, then connect the TFT display and the shield using the 20-Pin flat flex cable and connect the 9V power supply to the Arduino Uno.
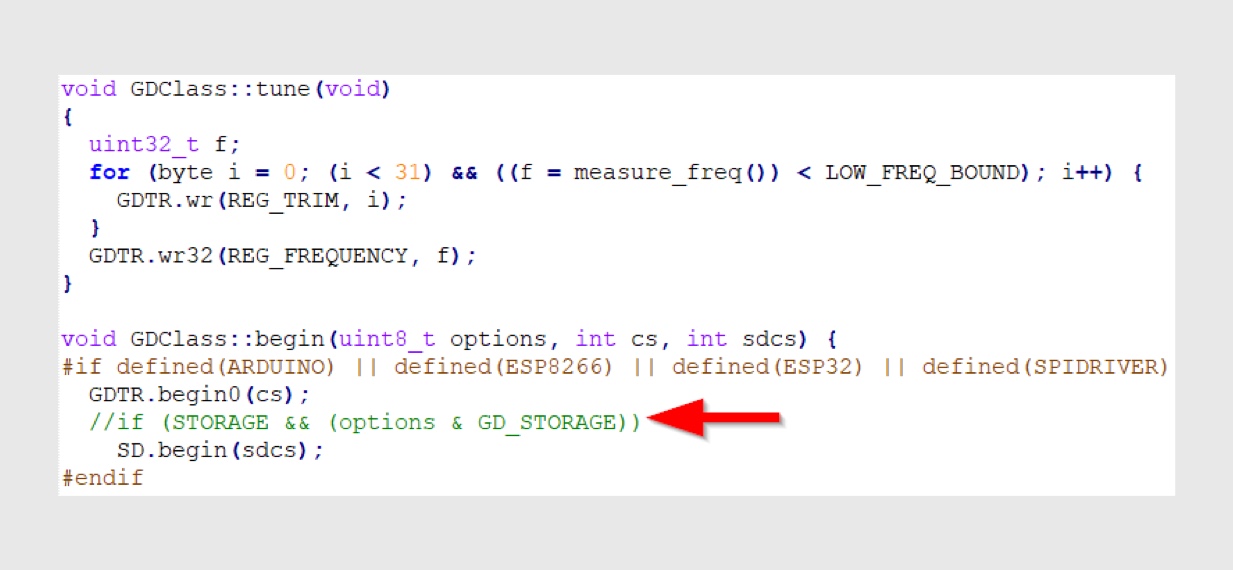
Modifying Gameduino2 Library
Before running any of the example sketches, the GD2.cpp file needs to be modified by commenting a line of code in order to make the Gameduino2 library compatible with our EVE displays. To do this, follow the steps below:
- Navigate to Documents > Arduino > libraries > Gameduino2 > GD2.cpp.
- Open GD2.cpp in your preferred code editor.
- Ensure
//if (STORAGE && (options & GD_STORAGE))is commented out. - Save the changes and close the modified file.
EVE TFT Registers
The required timing values for each respective display can be copied and pasted from the table below.
| TFT Size | 解像度 | Register Values |
|---|---|---|
| 3.5” TFT | 320×240 |
            GD.wr16(REG_HSIZE, 320);
            GD.wr16(REG_HCYCLE, 408);
            GD.wr16(REG_HOFFSET, 70);
            GD.wr16(REG_HSYNC0, 0);
            GD.wr16(REG_HSYNC1, 10);
            GD.wr16(REG_VSIZE, 240);
            GD.wr16(REG_VCYCLE, 263);
            GD.wr16(REG_VOFFSET, 13);
            GD.wr16(REG_VSYNC0, 0);
            GD.wr16(REG_VSYNC1, 2);
            GD.wr16(REG_PCLK, 8);
            GD.wr16(REG_SWIZZLE, 0);
            GD.wr16(REG_PCLK_POL, 0);
            GD.wr16(REG_CSPREAD, 1);
            GD.wr16(REG_DITHER, 1);
            GD.wr16(REG_ROTATE, 0);
|
| 4.3” TFT | 480 x 272 |
            GD.wr16(REG_HSIZE, 480);
            GD.wr16(REG_HCYCLE, 548);
            GD.wr16(REG_HOFFSET, 43);
            GD.wr16(REG_HSYNC0, 0);
            GD.wr16(REG_HSYNC1, 41);
            GD.wr16(REG_VSIZE, 272);
            GD.wr16(REG_VCYCLE, 292);
            GD.wr16(REG_VOFFSET, 12);
            GD.wr16(REG_VSYNC0, 0);
            GD.wr16(REG_VSYNC1, 10);
            GD.wr16(REG_PCLK, 5);
            GD.wr16(REG_SWIZZLE, 0);
            GD.wr16(REG_PCLK_POL, 1);
            GD.wr16(REG_CSPREAD, 1);
            GD.wr16(REG_DITHER, 1);
            GD.wr16(REG_ROTATE, 0);
|
| 4.3” TFT | 800 x 480 |
            GD.wr16(REG_HSIZE, 800);
            GD.wr16(REG_HCYCLE, 928);
            GD.wr16(REG_HOFFSET, 88);
            GD.wr16(REG_HSYNC0, 0);
            GD.wr16(REG_HSYNC1, 48);
            GD.wr16(REG_VSIZE, 480);
            GD.wr16(REG_VCYCLE, 525);
            GD.wr16(REG_VOFFSET, 32);
            GD.wr16(REG_VSYNC0, 0);
            GD.wr16(REG_VSYNC1, 3);
            GD.wr16(REG_PCLK, 2);
            GD.wr16(REG_SWIZZLE, 0);
            GD.wr16(REG_PCLK_POL, 1);
            GD.wr16(REG_CSPREAD,0);
            GD.wr16(REG_DITHER, 1);
            GD.wr16(REG_ROTATE, 0);
|
| 5.0” TFT | 800 x 480 |
            GD.wr16(REG_HSIZE, 800);
            GD.wr16(REG_HCYCLE, 928);
            GD.wr16(REG_HOFFSET, 88);
            GD.wr16(REG_HSYNC0, 0);
            GD.wr16(REG_HSYNC1, 48);
            GD.wr16(REG_VSIZE, 480);
            GD.wr16(REG_VCYCLE, 525);
            GD.wr16(REG_VOFFSET, 32);
            GD.wr16(REG_VSYNC0, 0);
            GD.wr16(REG_VSYNC1, 3);
            GD.wr16(REG_PCLK, 2);
            GD.wr16(REG_SWIZZLE, 0);
            GD.wr16(REG_PCLK_POL, 0);
            GD.wr16(REG_CSPREAD, 0);
            GD.wr16(REG_DITHER, 1);
            GD.wr16(REG_ROTATE, 0);
|
| 7.0” TFT | 800 x 480 |
            GD.wr16(REG_HSIZE, 800);
            GD.wr16(REG_HCYCLE, 928);
            GD.wr16(REG_HOFFSET, 88);
            GD.wr16(REG_HSYNC0, 0);
            GD.wr16(REG_HSYNC1, 48);
            GD.wr16(REG_VSIZE, 480);
            GD.wr16(REG_VCYCLE, 525);
            GD.wr16(REG_VOFFSET, 32);
            GD.wr16(REG_VSYNC0, 0);
            GD.wr16(REG_VSYNC1, 3);
            GD.wr16(REG_PCLK, 2);
            GD.wr16(REG_SWIZZLE, 0);
            GD.wr16(REG_PCLK_POL, 1);
            GD.wr16(REG_CSPREAD, 0);
            GD.wr16(REG_DITHER, 1);
            GD.wr16(REG_ROTATE, 0);
|
Example: Hello World
Once the above modifications have been made to the respective file, its time to test the ‘Hello World’ sketch:
Note: The following changes will reference our 4.3” EVE TFT timings / registers as an example guide.
- Open the helloword.ino file by going to File > Examples > Gameduino2 > Basics > Hello World.
- Replace
GD.begin(0);withGD.begin(0,10,5);においてsetup()function. - Obtain the values from the EVE TFT Registers table above for your display size.
- Add the function
TFT_4_3()and call it in the setup function as shown in the code below. - Upload code to your Arduino Uno board. Make sure to select the board and port before uploading the sketch file. Please refer to the Upload a sketch in Arduino IDE for reference.
The final code should look similar to this:
#include#include #include void TFT_4_3() { GD.wr16(REG_HSIZE, 480); GD.wr16(REG_HCYCLE, 548); GD.wr16(REG_HOFFSET, 43); GD.wr16(REG_HSYNC0, 0); GD.wr16(REG_HSYNC1, 41); GD.wr16(REG_VSIZE, 272); GD.wr16(REG_VCYCLE, 292); GD.wr16(REG_VOFFSET, 12); GD.wr16(REG_VSYNC0, 0); GD.wr16(REG_VSYNC1, 10); GD.wr16(REG_PCLK, 5); GD.wr16(REG_SWIZZLE, 0); GD.wr16(REG_PCLK_POL, 1); GD.wr16(REG_CSPREAD, 1); GD.wr16(REG_DITHER, 1); GD.wr16(REG_ROTATE, 0); GD.swap(); } void setup() { GD.begin(0,10,5); TFT_4_3(); } void loop() { GD.ClearColorRGB(0x103000); GD.Clear(); GD.cmd_text(GD.w / 2, GD.h / 2, 31, OPT_CENTER, "Hello world"); GD.swap(); }
If the modifications were made successfully, you should expect to see the following on the EVE TFT Display:
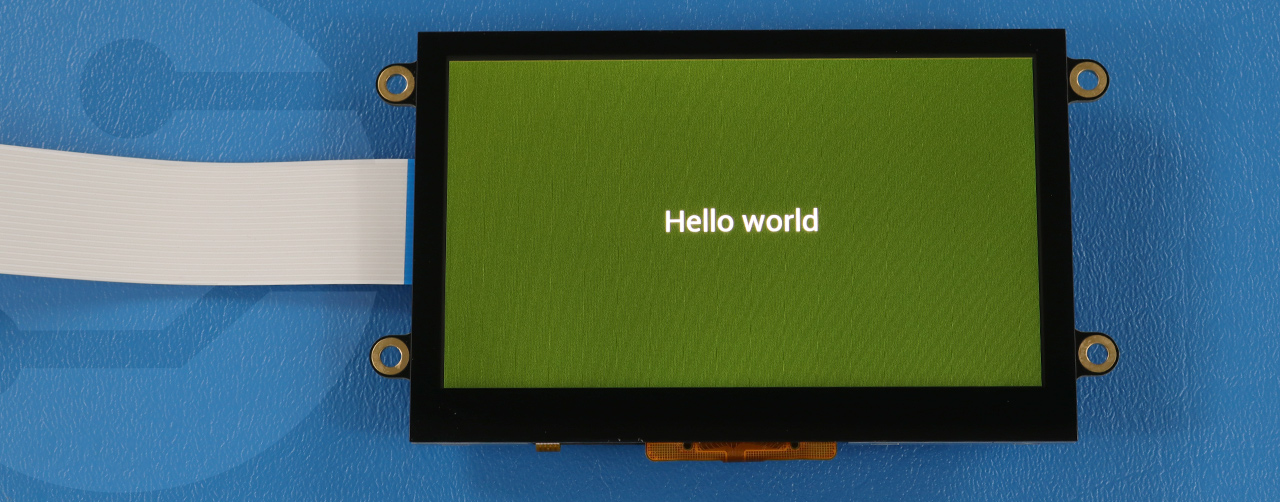
Congratulations! You can now enjoy running the example sketches and explore the exciting capabilities of the Gameduino2 library with our EVE TFT displays.
Software Support
Please note all software related to the Gameduino2 library was designed by James Bowman, and is not created nor maintained by Newhaven Display International Inc. For any additional software support relating to the Gameduino2 library, we recommend visiting the James Bowman Github repository.
Reference Links
- Gameduino2 Homepage
- Gameduino2 Github Page
- Gameduino2 Cookbook
- FTDI EVE Example Files
- Preview or download this application notes in PDF format.
Additional Resources
For additional support on using our TFT EVE series displays with the Gameduino2 library or questions about our other display products, please contact us through any of our technical support channels:
| 電子メール | techsupport@newhavendisplay.com |
| Phone | (847) 844-8795 |
| サポートセンター | Newhavenディスプレイサポートセンター |