
एलसीडी को Arduino से कैसे कनेक्ट करें
19 मई 2023
एलसीडी (लिक्विड क्रिस्टल डिस्प्ले) आर्डिनो प्रोजेक्ट्स में आमतौर पर इस्तेमाल होने वाला डिस्प्ले है, क्योंकि यह उपयोगकर्ता को टेक्स्ट और बेसिक कैरेक्टर जैसी जानकारी दिखाने का एक सरल तरीका प्रदान करता है। यह शुरुआती और अनुभवी उपयोगकर्ताओं दोनों के लिए उपयोगी डिस्प्ले है और आमतौर पर आर्डिनो बोर्ड का उपयोग शुरू करते समय लोग सबसे पहले इसी डिस्प्ले का इस्तेमाल करते हैं।
यह ट्यूटोरियल आपको सीरियल संचार का उपयोग करके 16x2 एलसीडी कैरेक्टर डिस्प्ले और Arduino UNO बोर्ड के बीच कनेक्शन और इंटरैक्ट करने का तरीका दिखाएगा।
इस ट्यूटोरियल में बताए गए सिद्धांतों को अन्य एलसीडी डिस्प्ले और अन्य डेवलपमेंट बोर्ड पर भी लागू किया जा सकता है। चलिए शुरू करते हैं!
एलसीडी - आर्डिनो ट्यूटोरियल - विषय-सूची
- आवश्यक हार्डवेयर और उपकरण
- एलसीडी पिनआउट
- Arduino पिनआउट
- परिपथ - SPI संचार के लिए कनेक्शन आरेख और योजनाबद्ध आरेख
- SPI इंटरफ़ेस का उपयोग करने वाला उदाहरण कोड
- सर्किट - RS232 TTL संचार के लिए कनेक्शन आरेख और योजनाबद्ध आरेख
- हेलो वर्ल्ड! RS232 TTL इंटरफ़ेस का उपयोग करके उदाहरण कोड
- एलसीडी की समस्या का निवारण - Arduino प्रोजेक्ट
- अतिरिक्त संसाधन
आवश्यक हार्डवेयर और उपकरण
एलसीडी विभिन्न आकारों और कॉन्फ़िगरेशन में आते हैं, लेकिन सबसे अधिक उपयोग किया जाने वाला 16x2 एलसीडी है। इसमें 2 पंक्तियाँ होती हैं जिनमें से प्रत्येक पंक्ति में 16 अक्षर प्रदर्शित हो सकते हैं।
हम 16x2 न्यूहेवन डिस्प्ले पार्ट नंबर का उपयोग करेंगे। NHD-0216K3Z-NSW-BBW-V3 इसमें PIC16F690 माइक्रोकंट्रोलर अंतर्निहित है। यह एलसीडी तीन सीरियल इंटरफेस को सपोर्ट करता है: I2C, SPI और RS-232 (TTL)। यह लेख SPI और RS-232 इंटरफेस पर केंद्रित होगा और दोनों के लिए कोड उदाहरण प्रदान करेगा।
यह डिस्प्ले यहां से खरीदा जा सकता है। डेटाशीट और उत्पाद विनिर्देश यहां से देखे या डाउनलोड किए जा सकते हैं।
कृपया ध्यान दें कि SPI इंटरफ़ेस का उपयोग करने के लिए डिस्प्ले पर एक रेसिस्टर को सोल्डर करना आवश्यक है, जबकि RS-232 TTL इंटरफ़ेस में इसकी आवश्यकता नहीं होती है। इसलिए, यदि आप रेसिस्टर को सोल्डर किए बिना इस ट्यूटोरियल का पालन करना चाहते हैं, तो आप RS-232 TTL इंटरफ़ेस के निर्देशों और कोड उदाहरण अनुभाग का अनुसरण कर सकते हैं।
एलसीडी को Arduino से कनेक्ट करने के लिए आपको जिन चीजों की आवश्यकता होगी
- एलसीडी 16x2
- सिंगल रो पिन हेडर कनेक्टर
- Arduino UNO
- ब्रेडबोर्ड
- जम्पर तार
- सोल्डर और सोल्डरिंग आयरन
- यूएसबी ए मेल से बी मेल केबल (प्रिंटर केबल)
- Arduino IDE
- 0 ओम प्रतिरोधक (वैकल्पिक - केवल SPI संचार के लिए)
इस ट्यूटोरियल को शुरू करने से पहले, हमारा सुझाव है कि आप हमारा ब्लॉग लेख "इलेक्ट्रॉनिक्स को ईएसडी से कैसे बचाएं" पढ़ें, खासकर यदि आप इलेक्ट्रॉनिक्स में नौसिखिया हैं।
16x2 एलसीडी पिनआउट
न्यूहेवन 16x2 कैरेक्टर एलसीडी, सीरियल संचार का उपयोग करके Arduino UNO बोर्ड के साथ इंटरैक्ट करने का एक सरल तरीका प्रदान करता है। P1 पोर्ट पर पिन विशेष रूप से RS232 TTL सीरियल संचार के लिए डिज़ाइन किए गए हैं, और P2 पोर्ट पर पिन सीरियल I2C और SPI संचार के लिए हैं।
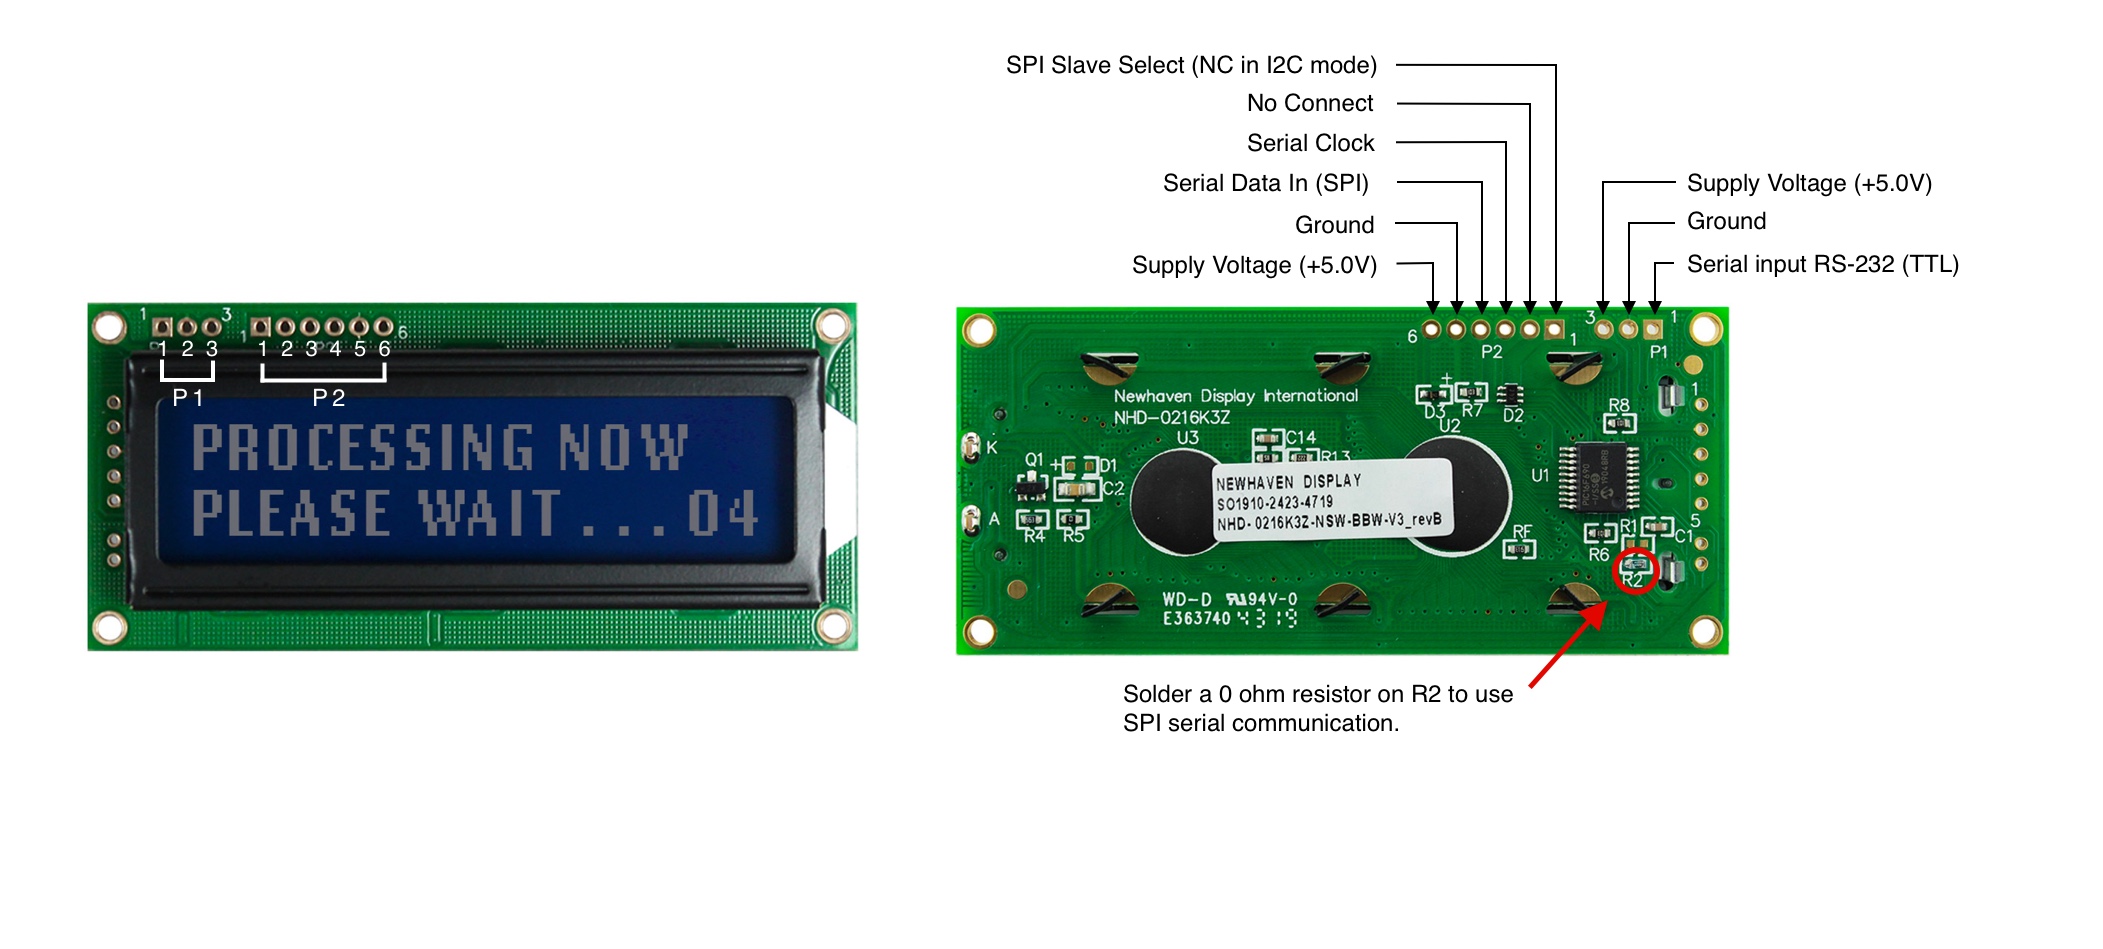
P1 पिन का विवरण - RS232 TTL संचार
| पिन नंबर | प्रतीक | फ़ंक्शन विवरण |
|---|---|---|
| 1 | आरएक्स | आरएस-232 (टीटीएल) सीरियल इनपुट |
| 2 | वी एसएस | मैदान |
| 3 | वी डीडी | आपूर्ति वोल्टेज (+5.0V) |
P2 पिन का विवरण - SPI और I2C संचार
| पिन नंबर | प्रतीक | फ़ंक्शन विवरण |
|---|---|---|
| 1 | स्पिस | SPI स्लेव सेलेक्ट (I2C मोड में NC) |
| 2 | एसडीओ | कोई कनेक्ट नहीं |
| 3 | एससीके/एससीएल | सीरियल क्लॉक |
| 4 | एसडीआई/एसडीए | सीरियल डेटा इन (SPI) / सीरियल डेटा (I2C) |
| 5 | वी एसएस | मैदान |
| 6 | वी डीडी | आपूर्ति वोल्टेज (+5.0V) |
एलसीडी पिनआउट की पूरी विशिष्टता यहाँ देखी जा सकती है।
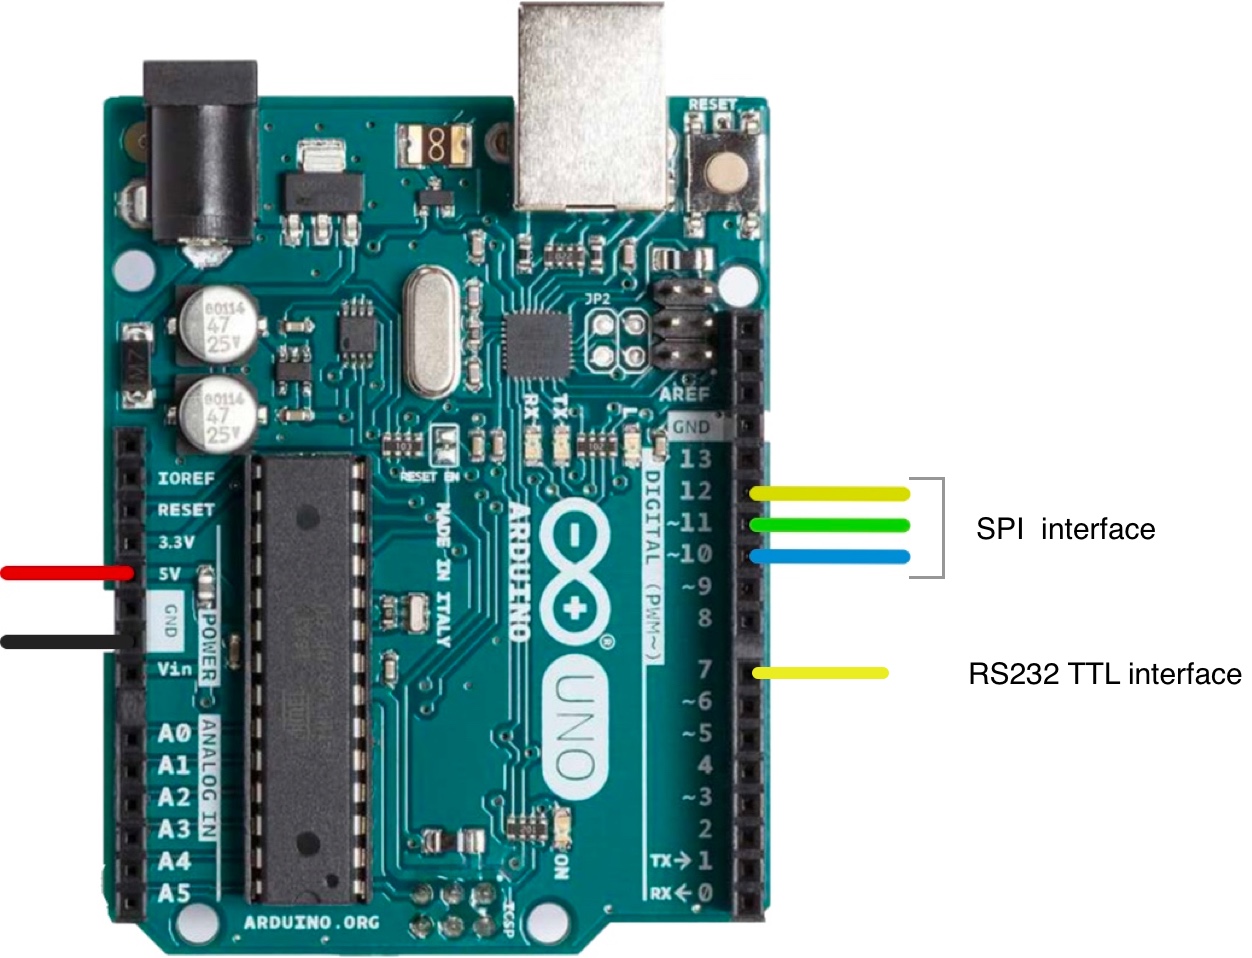
Arduino पिनआउट
Arduino UNO बोर्ड में 20 इनपुट/आउटपुट पिन हैं, जिनमें 14 डिजिटल पिन और 6 एनालॉग पिन शामिल हैं, और इस प्रोजेक्ट के लिए, हम पावर सिग्नल से 5V और GND पिन, SPI या I2C के लिए पिन 10, 11 और 12, और RS232 TTL के लिए पिन 7 का उपयोग करेंगे।
Arduino UNO के पिनआउट का पूरा आरेख यहां देखा जा सकता है।
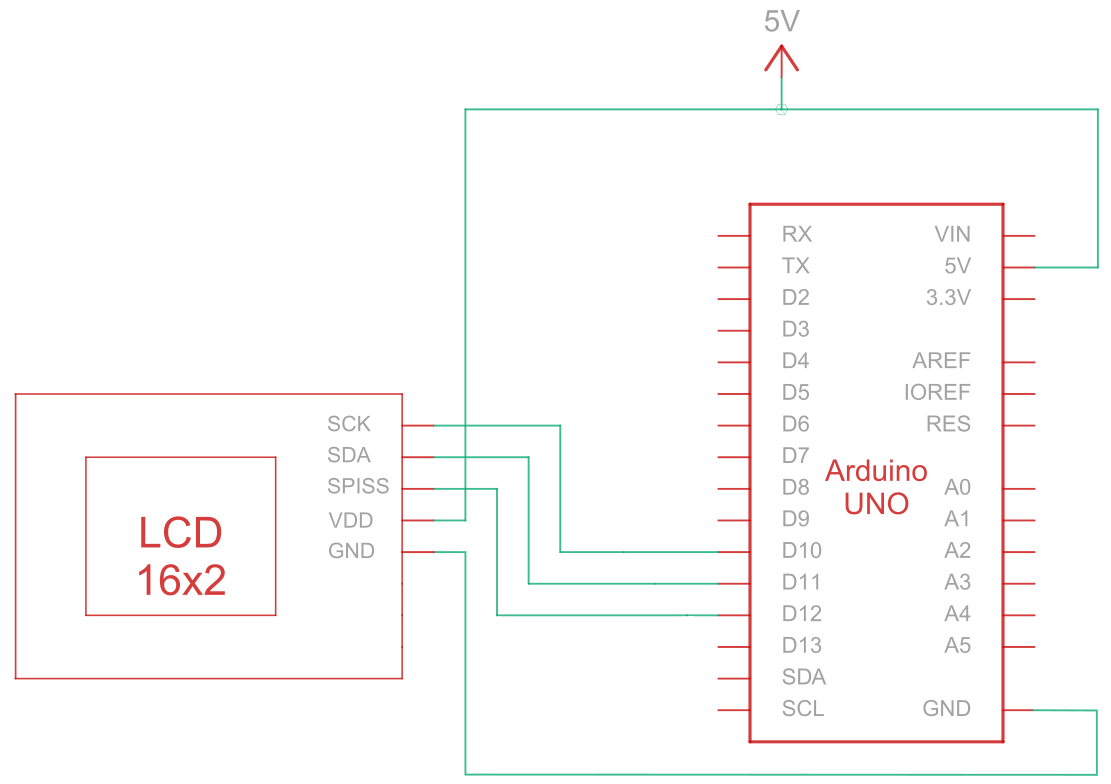
परिपथ - SPI संचार के लिए कनेक्शन आरेख और योजनाबद्ध आरेख
सीरियल पेरिफेरल इंटरफेस (SPI) एक सिंक्रोनस सीरियल कम्युनिकेशन बस है जिसका उपयोग कई उपकरणों के बीच कम दूरी और उच्च गति के संचार के लिए किया जाता है। Arduino (मास्टर डिवाइस) और LCD (स्लेव डिवाइस) के बीच SPI संचार के लिए कनेक्शन सर्किट में पाँच तारों का उपयोग किया जाता है, जैसा कि नीचे दी गई तालिका में दर्शाया गया है:
| Arduino | एलसीडी | रिश्ते का प्रकार |
|---|---|---|
| 5V पिन | पिन 6: V DD | शक्ति |
| ग्राउंड पिन | पिन 5: ग्राउंड | मैदान |
| पिन 10: स्लेव सेलेक्ट | पिन 3: एससीके/एससीएल | सीरियल क्लॉक |
| पिन 11: मिसो | पिन 4: सीरियल डेटा इन (SPI) / सीरियल डेटा (I2C) | सीरियल डेटा में |
| पिन 12: मोसी | पिन 1: SPISS | एसपीआई स्लेव चयन |
टिप्पणी:
SPI को सक्षम करने के लिए R1 को खुला रखना और R2 को डेटाशीट में निर्दिष्ट अनुसार शॉर्ट करना आवश्यक है। साथ ही, शुरू करने से पहले, सुनिश्चित करें कि सर्किट को जोड़ते समय Arduino बंद हो।
एसपीआई वायरिंग सर्किट
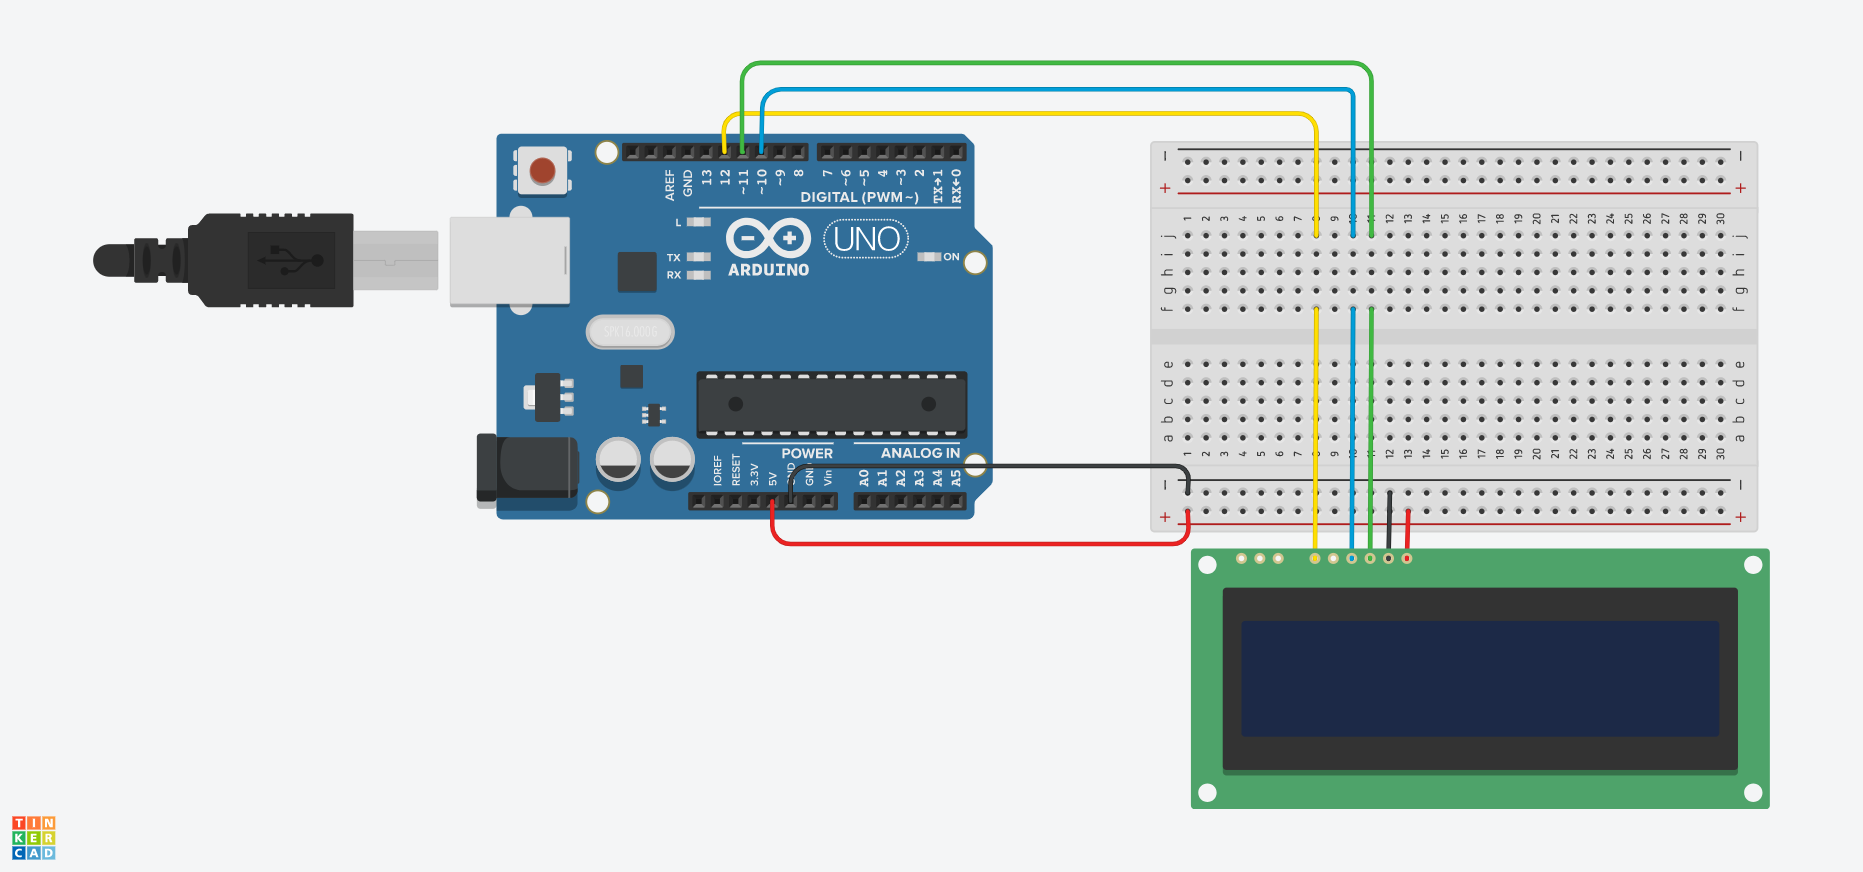
एसपीआई वायरिंग आरेख
SPI इंटरफ़ेस का उपयोग करके Arduino - LCD उदाहरण कोड
नीचे दिए गए कोड उदाहरण दिखाते हैं कि SPI इंटरफ़ेस का उपयोग करके Arduino और 16x2 कैरेक्टर वाले LCD के बीच सीरियल संचार कैसे किया जाता है। आपको कोड उदाहरणों में उपयोगी टिप्पणियाँ मिलेंगी, लेकिन आइए नीचे कुछ कार्यों को विस्तार से समझते हैं:
- The
एसपीआई_आउट()यह फ़ंक्शन SPI के माध्यम से LCD डिस्प्ले पर कमांड और डेटा भेजता है। यह इनपुट बाइट के 8 बिट्स में से प्रत्येक को एक-एक करके स्कैन करता है और प्रत्येक बिट का मान LCD डिस्प्ले पर भेजता है। - The
सेट_पिन्स()यह फ़ंक्शन SPI पिनों को आउटपुट पिन के रूप में कॉन्फ़िगर करता है। - The
Set_Contrast()यह फ़ंक्शन एलसीडी डिस्प्ले के कंट्रास्ट को सेट करता है। - The
सेट_बैकलाइट()यह फ़ंक्शन एलसीडी डिस्प्ले की बैकलाइट सेट करता है। - The
क्लियर_डिस्प्ले()यह फ़ंक्शन एलसीडी स्क्रीन को साफ़ करता है। - The
सेट_कर्सर()यह फ़ंक्शन इनपुट पैरामीटर के आधार पर एलसीडी डिस्प्ले पर ब्लिंकिंग कर्सर को सक्षम या अक्षम करता है। - The
स्थापित करना()यह फ़ंक्शन मुख्य फ़ंक्शन है और Arduino के शुरू होने पर एक बार निष्पादित होता है। इसका उपयोग सेटिंग्स, वैरिएबल को इनिशियलाइज़ करने और प्रोजेक्ट के लिए आवश्यक अन्य फ़ंक्शन और कॉन्फ़िगरेशन चलाने के लिए किया जाता है। - The
कुंडली()यह फ़ंक्शन Arduino बोर्ड के चालू रहने की पूरी अवधि के लिए निरंतर लूप में चलता रहता है। नीचे दिए गए कुछ उदाहरणों में, यह फ़ंक्शन खाली है और कुछ नहीं करता है क्योंकि हमें कुछ फ़ंक्शन को केवल एक बार चलाने की आवश्यकता है।
SPI का उपयोग करके Arduino - LCD कोड के उदाहरण:
- हैलो वर्ल्ड!
- पहली और दूसरी पंक्ति पर पाठ प्रदर्शित करें
- लंबा पाठ प्रदर्शित करें
- ब्लिंकिंग कर्सर के साथ टेक्स्ट प्रदर्शित करें
- कर्सर + ऑटोस्क्रॉल टेक्स्ट
- स्वतः स्क्रॉल
- अंतर
- बैकलाइट
- वर्ण/फ़ॉन्ट तालिकाएँ
आप अपने विशिष्ट Arduino-आधारित प्रोजेक्ट की आवश्यकताओं के अनुरूप कोड उदाहरणों को अनुकूलित और विस्तारित कर सकते हैं।
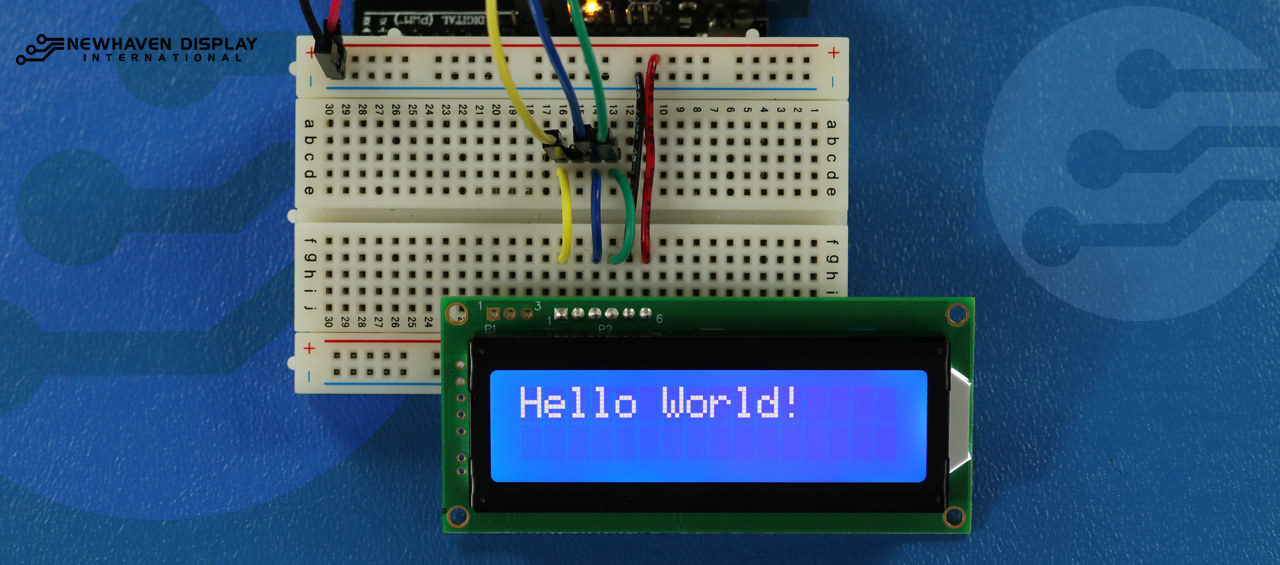
हैलो वर्ल्ड!
निम्नलिखित कोड उदाहरण एलसीडी पर "हेलो वर्ड!" प्रदर्शित करता है।
/*  SPI Wiring Reference for: NHD-0216K3Z-NSW-BBW-V3
  ---------------------------
  LCD         |   Arduino
  ---------------------------
  1(SPISS)  --> 12
  2(SDO)    --> No Connect
  3(SCK)    --> 10
  4(SDA)    --> 11
  5(VSS)    --> Ground
  6(VDD)    --> 5V
*/
/*****************************************************
   Arduino pin definition
  /*****************************************************/
#define SPISS_PIN   12
#define SDA_PIN     11
#define SCK_PIN     10
/*****************************************************
   SPI function to send command and data.
   For more information on SPI please visit our Support Center
  /*****************************************************/
void SPI_Out(unsigned char a) {
  digitalWrite(SPISS_PIN, LOW);
  for (int n = 0; n < 8; n++) {
    if ((a & 0x80) == 0x80) {
      digitalWrite(SDA_PIN, HIGH);
      delayMicroseconds(200);
    }
    else {
      digitalWrite(SDA_PIN, LOW);
    }
    delayMicroseconds(200);
    a = a << 1;
    digitalWrite(SCK_PIN, LOW);
    digitalWrite(SCK_PIN, HIGH);
    delayMicroseconds(200);
  }
  digitalWrite(SCK_PIN, HIGH);
  delayMicroseconds(200);
  digitalWrite(SPISS_PIN, HIGH);
}
/*****************************************************
   Set Arduino UNO IO ports as Output mode
  /*****************************************************/
void Set_Pins() {
  pinMode(SPISS_PIN, OUTPUT);
  pinMode(SCK_PIN, OUTPUT);
  pinMode(SDA_PIN, OUTPUT);
}
/*****************************************************
   Set LCD Contrast
  /*****************************************************/
void Set_Contrast() {
  SPI_Out(0xFE);              //prefix command
  SPI_Out(0x52);              //contrast command
  SPI_Out(0x28);              //set contrast value
  delayMicroseconds(500);
}
/*****************************************************
   Set LCD Backlight
  /*****************************************************/
void Set_Backlight() {
  SPI_Out(0xFE);             //prefix command
  SPI_Out(0x53);             //backlight command
  SPI_Out(0x08);             //set backlight value
  delayMicroseconds(100);
}
/*****************************************************
   Clear LCD
  /*****************************************************/
void Clear_Display() {
  SPI_Out(0xFE);             //prefix command
  SPI_Out(0x51);             //clear display command
  delayMicroseconds(1500);
}
/*****************************************************
   Set cursor
   Mode = 0 sets Blinking cursor off
   Mode = 1 sets Blinking cursor on
  /*****************************************************/
void Set_Cursor(int mode) {
  SPI_Out(0xfe);          //prefix command
  if (mode == 0) {
    SPI_Out(0x4c);        //Blinking cursor off
  }
  else if (mode == 1) {
    SPI_Out(0x4b);        //Blinking cursor on
  }
  delayMicroseconds(100);
}
/*****************************************************
   Write "Hello World!" to LCD
  /*****************************************************/
void Hello_World() {
  SPI_Out(0x48); // H
  SPI_Out(0x65); // E
  SPI_Out(0x6C); // l
  SPI_Out(0x6C); // l
  SPI_Out(0x6F); // o
  SPI_Out(0x11); // Blank
  SPI_Out(0x57); // W
  SPI_Out(0x6f); // o
  SPI_Out(0x72); // r
  SPI_Out(0x6c); // l
  SPI_Out(0x64); // d
  SPI_Out(0x21); // !
}
/*****************************************************
     Main function
  /*****************************************************/
void setup() {
  Set_Pins();         //set IO ports
  Set_Cursor(0);      //turns off blinking cursor
  Set_Contrast();     //set display contrast
  Set_Backlight();    //set display backlight
  Clear_Display();    //clear display
  Hello_World();      //display "Hello World!"
}
void loop() {
}
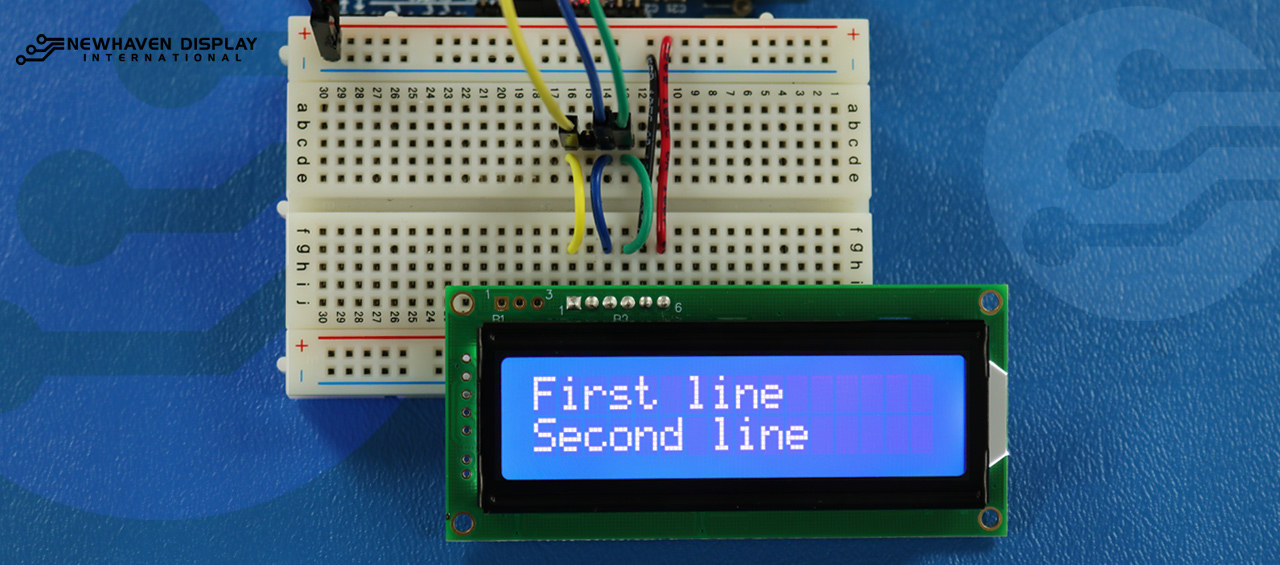
पहली और दूसरी पंक्ति पर पाठ प्रदर्शित करें
यह कोड पहली पंक्ति में "First Line" और दूसरी पंक्ति में "Second Line" टेक्स्ट दिखाएगा।
/*****************************************************
  This code was written for the Arduino UNO using SPI Interface.
  This code displays text in row one and row two of LCD.
  /*  SPI Wiring Reference for: NHD-0216K3Z-NSW-BBW-V3
  ---------------------------
  LCD         |   Arduino
  ---------------------------
  1(SPISS)  --> 12
  2(SDO)    --> No Connect
  3(SCK)    --> 10
  4(SDA)    --> 11
  5(VSS)    --> Ground
  6(VDD)    --> 5V
*/
/*****************************************************
   Arduino pin definition
  /*****************************************************/
#define SPISS_PIN   12
#define SDA_PIN     11
#define SCK_PIN     10
/*****************************************************
   SPI function to send command and data.
   For more information on SPI please visit our Support Center
  /*****************************************************/
void SPI_Out(unsigned char a) {
  digitalWrite(SPISS_PIN, LOW);
  for (int n = 0; n < 8; n++) {
    if ((a & 0x80) == 0x80) {
      digitalWrite(SDA_PIN, HIGH);
      delayMicroseconds(200);
    }
    else {
      digitalWrite(SDA_PIN, LOW);
    }
    delayMicroseconds(200);
    a = a << 1;
    digitalWrite(SCK_PIN, LOW);
    digitalWrite(SCK_PIN, HIGH);
    delayMicroseconds(200);
  }
  digitalWrite(SCK_PIN, HIGH);
  delayMicroseconds(200);
  digitalWrite(SPISS_PIN, HIGH);
}
/*****************************************************
   Set Arduino UNO IO ports as Output mode
  /*****************************************************/
void Set_Pins() {
  pinMode(SPISS_PIN, OUTPUT);
  pinMode(SCK_PIN, OUTPUT);
  pinMode(SDA_PIN, OUTPUT);
}
/*****************************************************
   Set LCD Contrast
  /*****************************************************/
void Set_Contrast() {
  SPI_Out(0xFE);              //prefix command
  SPI_Out(0x52);              //contrast command
  SPI_Out(0x28);              //set contrast value
  delayMicroseconds(500);
}
/*****************************************************
   Set LCD Backlight
  /*****************************************************/
void Set_Backlight() {
  SPI_Out(0xFE);             //prefix command
  SPI_Out(0x53);             //backlight command
  SPI_Out(0x08);             //set backlight value
  delayMicroseconds(100);
}
/*****************************************************
   Clear LCD
  /*****************************************************/
void Clear_Display() {
  SPI_Out(0xFE);             //prefix command
  SPI_Out(0x51);             //clear display command
  delayMicroseconds(1500);
}
/*****************************************************
   Write "First Line" to row one on LCD
  /*****************************************************/
void Send_First_Line_Text() {
  SPI_Out(0x46); // F
  SPI_Out(0x69); // i
  SPI_Out(0x72); // r
  SPI_Out(0x73); // s
  SPI_Out(0x74); // t
  SPI_Out(0x20); // blank space
  SPI_Out(0x6c); // l
  SPI_Out(0x69); // i
  SPI_Out(0x6e); // n
  SPI_Out(0x65); // e
}
/*****************************************************
   Write "Second Line" to row two on LCD
  /*****************************************************/
void Send_Second_Line_Text() {
  SPI_Out(0x53); // S
  SPI_Out(0x65); // e
  SPI_Out(0x63); // c
  SPI_Out(0x6f); // o
  SPI_Out(0x6e); // n
  SPI_Out(0x64); // d
  SPI_Out(0x20); // blank space
  SPI_Out(0x6c); // l
  SPI_Out(0x69); // i
  SPI_Out(0x6e); // n
  SPI_Out(0x65); // e
}
/*****************************************************
   Set Row address
   Line = 1 sets for first row
   Line = 2 sets for second row
  /*****************************************************/
void Set_Row(int line) {
  SPI_Out(0xfe);      //prefix command
  SPI_Out(0x45);      //set cursor command
  if (line == 1) {
    SPI_Out(0x00);    //cursor position: row one, column one
  }
  else if (line == 2) {
    SPI_Out(0x40);    //cursor position: row two, column one
  }
  delayMicroseconds(100);
}
/*****************************************************
     Main function
  /*****************************************************/
void setup() {
  Set_Pins();         //set IO ports
  Set_Contrast();     //set display contrast
  Set_Backlight();    //set display backlight
  Clear_Display();    //clear display
  Set_Row(1);
  Send_First_Line_Text();       //writes to first line of display
  Set_Row(2);
  Send_Second_Line_Text();      //writes to second line of display
  delay(1000);
}
void loop() {
}
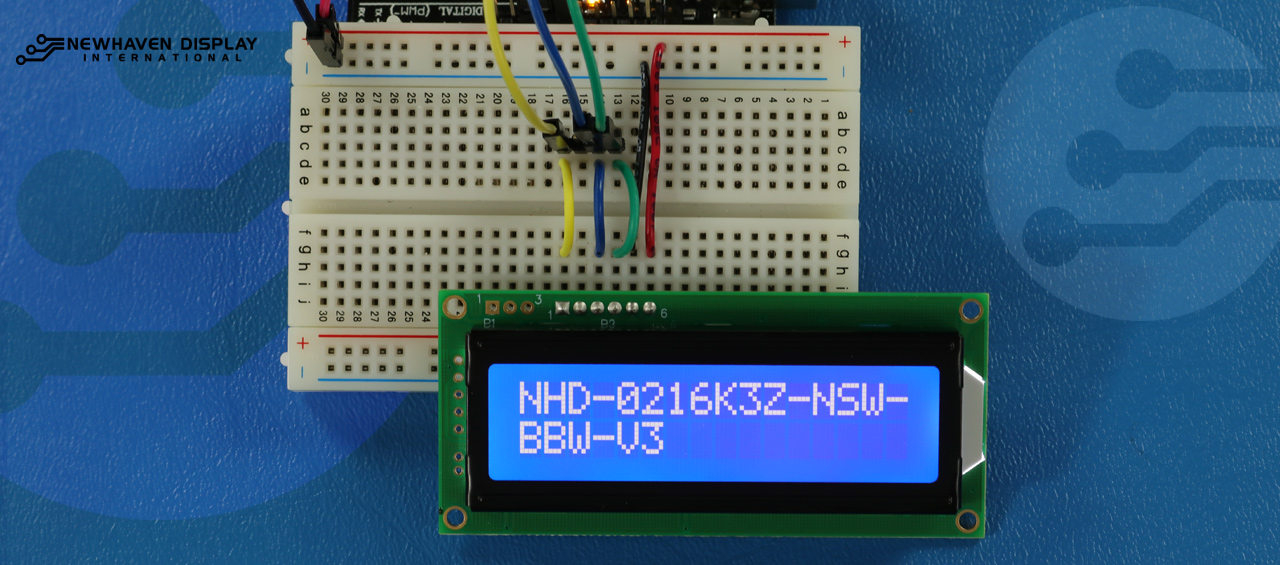
लंबा पाठ प्रदर्शित करें
यह कोड दूसरी पंक्ति तक फैले हुए पाठ को प्रदर्शित करता है। इस उदाहरण के लिए, हम " NHD-0216K3Z-NSW-BBW-V3 ".
/*****************************************************
  This code displays the part number: NHD-0216K3Z-NSW-BBW-V3.
  /*  SPI Wiring Reference for: NHD-0216K3Z-NSW-BBW-V3
  ---------------------------
  LCD         |   Arduino
  ---------------------------
  1(SPISS)  --> 12
  2(SDO)    --> No Connect
  3(SCK)    --> 10
  4(SDA)    --> 11
  5(VSS)    --> Ground
  6(VDD)    --> 5V
*/
/*****************************************************
   Arduino pin definition
  /*****************************************************/
#define SPISS_PIN   12
#define SDA_PIN     11
#define SCK_PIN     10
/*****************************************************
   SPI function to send command and data.
   For more information on SPI please visit our Support Center
  /*****************************************************/
void SPI_Out(unsigned char a) {
  digitalWrite(SPISS_PIN, LOW);
  for (int n = 0; n < 8; n++) {
    if ((a & 0x80) == 0x80) {
      digitalWrite(SDA_PIN, HIGH);
      delayMicroseconds(200);
    }
    else {
      digitalWrite(SDA_PIN, LOW);
    }
    delayMicroseconds(200);
    a = a << 1;
    digitalWrite(SCK_PIN, LOW);
    digitalWrite(SCK_PIN, HIGH);
    delayMicroseconds(200);
  }
  digitalWrite(SCK_PIN, HIGH);
  delayMicroseconds(200);
  digitalWrite(SPISS_PIN, HIGH);
}
/*****************************************************
   Set Arduino UNO IO ports as Output mode
  /*****************************************************/
void Set_Pins() {
  pinMode(SPISS_PIN, OUTPUT);
  pinMode(SCK_PIN, OUTPUT);
  pinMode(SDA_PIN, OUTPUT);
}
/*****************************************************
   Set LCD Contrast
  /*****************************************************/
void Set_Contrast() {
  SPI_Out(0xFE);              //prefix command
  SPI_Out(0x52);              //contrast command
  SPI_Out(0x28);              //set contrast value
  delayMicroseconds(500);
}
/*****************************************************
   Set LCD Backlight
  /*****************************************************/
void Set_Backlight() {
  SPI_Out(0xFE);             //prefix command
  SPI_Out(0x53);             //backlight command
  SPI_Out(0x08);             //set backlight value
  delayMicroseconds(100);
}
/*****************************************************
   Clear LCD
  /*****************************************************/
void Clear_Display() {
  SPI_Out(0xFE);             //prefix command
  SPI_Out(0x51);             //clear display command
  delayMicroseconds(1500);
}
/*****************************************************
   Set cursor
   Mode = 0 sets Blinking cursor off
   Mode = 1 sets Blinking cursor on
  /*****************************************************/
void Set_Cursor(int mode) {
  SPI_Out(0xfe);          //prefix command
  if (mode == 0) {
    SPI_Out(0x4c);        //Blinking cursor off
  }
  else if (mode == 1) {
    SPI_Out(0x4b);        //Blinking cursor on
  }
  delayMicroseconds(100);
}
/*****************************************************
   Set Row address
   Line = 1 sets for first row
   Line = 2 sets for second row
  /*****************************************************/
void Set_Row(int line) {
  SPI_Out(0xfe);      //prefix command
  SPI_Out(0x45);      //set cursor command
  if (line == 1) {
    SPI_Out(0x00);    //cursor position: row one, column one
  }
  else if (line == 2) {
    SPI_Out(0x40);    //cursor position: row two, column one
  }
  delayMicroseconds(100);
}
/*****************************************************
   Write "NHD-0216K3Z-NSW-BBW-V3" to LCD
  /*****************************************************/
void Part_Number() {
  Set_Row(1);
  SPI_Out(0x4e); // N
  SPI_Out(0x48); // H
  SPI_Out(0x44); // D
  SPI_Out(0xb0); // -
  SPI_Out(0x30); // 0
  SPI_Out(0x32); // 2
  SPI_Out(0x31); // 1
  SPI_Out(0x36); // 6
  SPI_Out(0x4b); // K
  SPI_Out(0x33); // 3
  SPI_Out(0x5a); // Z
  SPI_Out(0xb0); // -
  SPI_Out(0x4e); // N
  SPI_Out(0x53); // S
  SPI_Out(0x57); // W
  SPI_Out(0xb0); // -
  Set_Row(2);
  SPI_Out(0x42); // B
  SPI_Out(0x42); // B
  SPI_Out(0x57); // W
  SPI_Out(0xb0); // -
  SPI_Out(0x56); // V
  SPI_Out(0x33); // 3
}
/*****************************************************
     Main function
  /*****************************************************/
void setup() {
  Set_Pins();         //set IO ports
  Set_Cursor(0);      //turns off blinking cursor
  Set_Contrast();     //set display contrast
  Set_Backlight();    //set display backlight
  Clear_Display();    //clear display
  Part_Number();      //display "NHD-0216K3Z-NSW-BBW-V3"
}
void loop() {
}
ब्लिंक - ब्लिंकिंग कर्सर के साथ टेक्स्ट प्रदर्शित करें
यह कोड ब्लिंकिंग कर्सर के साथ टेक्स्ट प्रदर्शित करता है। इस उदाहरण के लिए, हम " NHD-0216K3Z-NSW-BBW-V3 ".
/*****************************************************
  This code displays the part number: NHD-0216K3Z-NSW-BBW-V3 with cursor on.
  /*  SPI Wiring Reference for: NHD-0216K3Z-NSW-BBW-V3
  ---------------------------
  LCD         |   Arduino
  ---------------------------
  1(SPISS)  --> 12
  2(SDO)    --> No Connect
  3(SCK)    --> 10
  4(SDA)    --> 11
  5(VSS)    --> Ground
  6(VDD)    --> 5V
*/
/*****************************************************
   Arduino pin definition
  /*****************************************************/
#define SPISS_PIN   12
#define SDA_PIN     11
#define SCK_PIN     10
/*****************************************************
   SPI function to send command and data.
   For more information on SPI please visit our Support Center
  /*****************************************************/
void SPI_Out(unsigned char a) {
  digitalWrite(SPISS_PIN, LOW);
  for (int n = 0; n < 8; n++) {
    if ((a & 0x80) == 0x80) {
      digitalWrite(SDA_PIN, HIGH);
      delayMicroseconds(200);
    }
    else {
      digitalWrite(SDA_PIN, LOW);
    }
    delayMicroseconds(200);
    a = a << 1;
    digitalWrite(SCK_PIN, LOW);
    digitalWrite(SCK_PIN, HIGH);
    delayMicroseconds(200);
  }
  digitalWrite(SCK_PIN, HIGH);
  delayMicroseconds(200);
  digitalWrite(SPISS_PIN, HIGH);
}
/*****************************************************
   Set Arduino UNO IO ports as Output mode
  /*****************************************************/
void Set_Pins() {
  pinMode(SPISS_PIN, OUTPUT);
  pinMode(SCK_PIN, OUTPUT);
  pinMode(SDA_PIN, OUTPUT);
}
/*****************************************************
   Set LCD Contrast
  /*****************************************************/
void Set_Contrast() {
  SPI_Out(0xFE);              //prefix command
  SPI_Out(0x52);              //contrast command
  SPI_Out(0x28);              //set contrast value
  delayMicroseconds(500);
}
/*****************************************************
   Set LCD Backlight
  /*****************************************************/
void Set_Backlight() {
  SPI_Out(0xFE);             //prefix command
  SPI_Out(0x53);             //backlight command
  SPI_Out(0x08);             //set backlight value
  delayMicroseconds(100);
}
/*****************************************************
   Clear LCD
  /*****************************************************/
void Clear_Display() {
  SPI_Out(0xFE);             //prefix command
  SPI_Out(0x51);             //clear display command
  delayMicroseconds(1500);
}
/*****************************************************
   Set cursor
   Mode = 0 sets Blinking cursor off
   Mode = 1 sets Blinking cursor on
  /*****************************************************/
void Set_Cursor(int mode) {
  SPI_Out(0xfe);          //prefix command
  if (mode == 0) {
    SPI_Out(0x4c);        //Blinking cursor off
  }
  else if (mode == 1) {
    SPI_Out(0x4b);        //Blinking cursor on
  }
  delayMicroseconds(100);
}
/*****************************************************
   Set Row address
   Line = 1 sets for first row
   Line = 2 sets for second row
  /*****************************************************/
void Set_Row(int line) {
  SPI_Out(0xfe);      //prefix command
  SPI_Out(0x45);      //set cursor command
  if (line == 1) {
    SPI_Out(0x00);    //cursor position: row one, column one
  }
  else if (line == 2) {
    SPI_Out(0x40);    //cursor position: row two, column one
  }
  delayMicroseconds(100);
}
/*****************************************************
   Write "NHD-0216K3Z-NSW-BBW-V3" to LCD
   delay(500) = 500 Milliseconds
  /*****************************************************/
void Part_Number() {
  Set_Row(1);
  SPI_Out(0x4e); // N
  delay(500);
  SPI_Out(0x48); // H
  delay(500);
  SPI_Out(0x44); // D
  delay(500);
  SPI_Out(0xb0); // -
  delay(500);
  SPI_Out(0x30); // 0
  delay(500);
  SPI_Out(0x32); // 2
  delay(500);
  SPI_Out(0x31); // 1
  delay(500);
  SPI_Out(0x36); // 6
  delay(500);
  SPI_Out(0x4b); // K
  delay(500);
  SPI_Out(0x33); // 3
  delay(500);
  SPI_Out(0x5a); // Z
  delay(500);
  SPI_Out(0xb0); // -
  delay(500);
  SPI_Out(0x4e); // N
  delay(500);
  SPI_Out(0x53); // S
  delay(500);
  SPI_Out(0x57); // W
  delay(500);
  SPI_Out(0xb0); // -
  Set_Row(2);
  delay(500);
  SPI_Out(0x42); // B
  delay(500);
  SPI_Out(0x42); // B
  delay(500);
  SPI_Out(0x57); // W
  delay(500);
  SPI_Out(0xb0); // -
  delay(500);
  SPI_Out(0x56); // V
  delay(500);
  SPI_Out(0x33); // 3
}
/*****************************************************
     Main function
  /*****************************************************/
void setup() {
  Set_Pins();         //set IO ports
  Set_Contrast();     //set display contrast
  Set_Backlight();    //set display backlight
  Clear_Display();    //clear display
  Set_Cursor(1);      //turns on blinking cursor
  Part_Number();      //display "NHD-0216K3Z-NSW-BBW-V3"
}
void loop() {
}
कर्सर + ऑटोस्क्रॉल टेक्स्ट
यह कोड पहले कर्सर के साथ टेक्स्ट प्रदर्शित करता है और फिर दाईं ओर ऑटोस्क्रॉलिंग को प्रारंभ करता है।
/*****************************************************
  This code was written for the Arduino UNO using SPI Interface.
  This code displays the part number: NHD-0216K3Z-NSW-BBW-V3 while shifting to the right with a blinking cursor.
  /*  SPI Wiring Reference for: NHD-0216K3Z-NSW-BBW-V3
  ---------------------------
  LCD         |   Arduino
  ---------------------------
  1(SPISS)  --> 12
  2(SDO)    --> No Connect
  3(SCK)    --> 10
  4(SDA)    --> 11
  5(VSS)    --> Ground
  6(VDD)    --> 5V
*/
/*****************************************************
   Arduino pin definition
  /*****************************************************/
#define SPISS_PIN   12
#define SDA_PIN     11
#define SCK_PIN     10
/*****************************************************
   SPI function to send command and data.
   For more information on SPI please visit our Support Center
  /*****************************************************/
void SPI_Out(unsigned char a) {
  digitalWrite(SPISS_PIN, LOW);
  for (int n = 0; n < 8; n++) {
    if ((a & 0x80) == 0x80) {
      digitalWrite(SDA_PIN, HIGH);
      delayMicroseconds(200);
    }
    else {
      digitalWrite(SDA_PIN, LOW);
    }
    delayMicroseconds(200);
    a = a << 1;
    digitalWrite(SCK_PIN, LOW);
    digitalWrite(SCK_PIN, HIGH);
    delayMicroseconds(200);
  }
  digitalWrite(SCK_PIN, HIGH);
  delayMicroseconds(200);
  digitalWrite(SPISS_PIN, HIGH);
}
/*****************************************************
   Set Arduino UNO IO ports as Output mode
  /*****************************************************/
void Set_Pins() {
  pinMode(SPISS_PIN, OUTPUT);
  pinMode(SCK_PIN, OUTPUT);
  pinMode(SDA_PIN, OUTPUT);
}
/*****************************************************
   Set LCD Contrast
  /*****************************************************/
void Set_Contrast() {
  SPI_Out(0xFE);              //prefix command
  SPI_Out(0x52);              //contrast command
  SPI_Out(0x28);              //set contrast value
  delayMicroseconds(500);
}
/*****************************************************
   Set LCD Backlight
  /*****************************************************/
void Set_Backlight() {
  SPI_Out(0xFE);             //prefix command
  SPI_Out(0x53);             //backlight command
  SPI_Out(0x08);             //set backlight value
  delayMicroseconds(100);
}
/*****************************************************
   Clear LCD
  /*****************************************************/
void Clear_Display() {
  SPI_Out(0xFE);             //prefix command
  SPI_Out(0x51);             //clear display command
  delayMicroseconds(1500);
}
/*****************************************************
   Set cursor
   Mode = 0 sets Blinking cursor off
   Mode = 1 sets Blinking cursor on
  /*****************************************************/
void Set_Cursor(int mode) {
  SPI_Out(0xfe);          //prefix command
  if (mode == 0) {
    SPI_Out(0x4c);        //Blinking cursor off
  }
  else if (mode == 1) {
    SPI_Out(0x4b);        //Blinking cursor on
  }
  delayMicroseconds(100);
}
/*****************************************************
   Set Row address
   Line = 1 sets for first row
   Line = 2 sets for second row
  /*****************************************************/
void Set_Row(int line) {
  SPI_Out(0xfe);      //prefix command
  SPI_Out(0x45);      //set cursor command
  if (line == 1) {
    SPI_Out(0x00);    //cursor position: row one, column one
  }
  else if (line == 2) {
    SPI_Out(0x40);    //cursor position: row two, column one
  }
  delayMicroseconds(100);
}
/*****************************************************
   Write "NHD-0216K3Z-NSW-BBW-V3" to LCD
  /*****************************************************/
void Part_Number() {
    Set_Row(1);
  SPI_Out(0x4e); // N
  SPI_Out(0x48); // H
  SPI_Out(0x44); // D
  SPI_Out(0xb0); // -
  SPI_Out(0x30); // 0
  SPI_Out(0x32); // 2
  SPI_Out(0x31); // 1
  SPI_Out(0x36); // 6
  SPI_Out(0x4b); // K
  SPI_Out(0x33); // 3
  SPI_Out(0x5a); // Z
  SPI_Out(0xb0); // -
  SPI_Out(0x4e); // N
  SPI_Out(0x53); // S
  SPI_Out(0x57); // W
  SPI_Out(0xb0); // -
  Set_Row(2);
  SPI_Out(0x42); // B
  SPI_Out(0x42); // B
  SPI_Out(0x57); // W
  SPI_Out(0xb0); // -
  SPI_Out(0x56); // V
  SPI_Out(0x33); // 3
}
/*****************************************************
   Set Shifting mode
   Mode = 0 Move display one place to the left
   Mode = 1 Move display one place to the right
   delay(500) = 500 Milliseconds
  /*****************************************************/
void Set_Shift(int mode) {
  SPI_Out(0xfe);      //prefix command
  if (mode == 0) {
    SPI_Out(0x55);    //Move display one place to the left
  }
  else if (mode == 1) {
    SPI_Out(0x56);    //Move display one place to the right
  }
  delay(500);
}
/*****************************************************
     Main function
  /*****************************************************/
void setup() {
  Set_Pins();         //set IO ports
  Set_Contrast();     //set display contrast
  Set_Backlight();    //set display backlight
  Clear_Display();    //clear display
  Set_Cursor(1);      //turns on blinking cursor
  Part_Number();      //display "NHD-0216K3Z-NSW-BBW-V3"
}
/*****************************************************
     Loop function
  /*****************************************************/
void loop() {
  Set_Shift(1);     //shift display to the right
}
ऑटोस्क्रॉल टेक्स्ट
यह कोड टेक्स्ट को ऑटोस्क्रॉल करता है। NHD-0216K3Z-NSW-BBW-V3 ".
/*****************************************************
  This code was written for the Arduino UNO using SPI Interface.
  This code displays the part number: NHD-0216K3Z-NSW-BBW-V3 while shifting to the right.
  /*  SPI Wiring Reference for: NHD-0216K3Z-NSW-BBW-V3
  ---------------------------
  LCD         |   Arduino
  ---------------------------
  1(SPISS)  --> 12
  2(SDO)    --> No Connect
  3(SCK)    --> 10
  4(SDA)    --> 11
  5(VSS)    --> Ground
  6(VDD)    --> 5V
*/
/*****************************************************
   Arduino pin definition
  /*****************************************************/
#define SPISS_PIN   12
#define SDA_PIN     11
#define SCK_PIN     10
/*****************************************************
   SPI function to send command and data.
   For more information on SPI please visit our Support Center
  /*****************************************************/
void SPI_Out(unsigned char a) {
  digitalWrite(SPISS_PIN, LOW);
  for (int n = 0; n < 8; n++) {
    if ((a & 0x80) == 0x80) {
      digitalWrite(SDA_PIN, HIGH);
      delayMicroseconds(200);
    }
    else {
      digitalWrite(SDA_PIN, LOW);
    }
    delayMicroseconds(200);
    a = a << 1;
    digitalWrite(SCK_PIN, LOW);
    digitalWrite(SCK_PIN, HIGH);
    delayMicroseconds(200);
  }
  digitalWrite(SCK_PIN, HIGH);
  delayMicroseconds(200);
  digitalWrite(SPISS_PIN, HIGH);
}
/*****************************************************
   Set Arduino UNO IO ports as Output mode
  /*****************************************************/
void Set_Pins() {
  pinMode(SPISS_PIN, OUTPUT);
  pinMode(SCK_PIN, OUTPUT);
  pinMode(SDA_PIN, OUTPUT);
}
/*****************************************************
   Set LCD Contrast
  /*****************************************************/
void Set_Contrast() {
  SPI_Out(0xFE);              //prefix command
  SPI_Out(0x52);              //contrast command
  SPI_Out(0x28);              //set contrast value
  delayMicroseconds(500);
}
/*****************************************************
   Set LCD Backlight
  /*****************************************************/
void Set_Backlight() {
  SPI_Out(0xFE);             //prefix command
  SPI_Out(0x53);             //backlight command
  SPI_Out(0x08);             //set backlight value
  delayMicroseconds(100);
}
/*****************************************************
   Clear LCD
  /*****************************************************/
void Clear_Display() {
  SPI_Out(0xFE);             //prefix command
  SPI_Out(0x51);             //clear display command
  delayMicroseconds(1500);
}
/*****************************************************
   Set cursor
   Mode = 0 sets Blinking cursor off
   Mode = 1 sets Blinking cursor on
  /*****************************************************/
void Set_Cursor(int mode) {
  SPI_Out(0xfe);          //prefix command
  if (mode == 0) {
    SPI_Out(0x4c);        //Blinking cursor off
  }
  else if (mode == 1) {
    SPI_Out(0x4b);        //Blinking cursor on
  }
  delayMicroseconds(100);
}
/*****************************************************
   Set Row address
   Line = 1 sets for first row
   Line = 2 sets for second row
  /*****************************************************/
void Set_Row(int line) {
  SPI_Out(0xfe);      //prefix command
  SPI_Out(0x45);      //set cursor command
  if (line == 1) {
    SPI_Out(0x00);    //cursor position: row one, column one
  }
  else if (line == 2) {
    SPI_Out(0x40);    //cursor position: row two, column one
  }
  delayMicroseconds(100);
}
/*****************************************************
   Write "NHD-0216K3Z-NSW-BBW-V3" to LCD
  /*****************************************************/
void Part_Number() {
    Set_Row(1);
  SPI_Out(0x4e); // N
  SPI_Out(0x48); // H
  SPI_Out(0x44); // D
  SPI_Out(0xb0); // -
  SPI_Out(0x30); // 0
  SPI_Out(0x32); // 2
  SPI_Out(0x31); // 1
  SPI_Out(0x36); // 6
  SPI_Out(0x4b); // K
  SPI_Out(0x33); // 3
  SPI_Out(0x5a); // Z
  SPI_Out(0xb0); // -
  SPI_Out(0x4e); // N
  SPI_Out(0x53); // S
  SPI_Out(0x57); // W
  SPI_Out(0xb0); // -
  Set_Row(2);
  SPI_Out(0x42); // B
  SPI_Out(0x42); // B
  SPI_Out(0x57); // W
  SPI_Out(0xb0); // -
  SPI_Out(0x56); // V
  SPI_Out(0x33); // 3
}
/*****************************************************
   Set Shifting mode
   Mode = 0 Move display one place to the left
   Mode = 1 Move display one place to the right
   delay(500) = 500 Milliseconds
  /*****************************************************/
void Set_Shift(int mode) {
  SPI_Out(0xfe);      //prefix command
  if (mode == 0) {
    SPI_Out(0x55);    //Move display one place to the left
  }
  else if (mode == 1) {
    SPI_Out(0x56);    //Move display one place to the right
  }
  delay(500);
}
/*****************************************************
     Main function
  /*****************************************************/
void setup() {
  Set_Pins();         //set IO ports
  Set_Contrast();     //set display contrast
  Set_Backlight();    //set display backlight
  Clear_Display();    //clear display
  Set_Cursor(0);      //turns off blinking cursor
  Part_Number();      //display "NHD-0216K3Z-NSW-BBW-V3"
}
/*****************************************************
     Loop function
  /*****************************************************/
void loop() {
  Set_Shift(1);     //shift display to the right
}
एलसीडी कंट्रास्ट को समायोजित करना
यह कोड " NHD-0216K3Z-NSW-BBW-V3 कंट्रास्ट बदलते समय।
    /*****************************************************
  This code was written for the Arduino UNO using SPI Interface.
  This code displays the part number: NHD-0216K3Z-NSW-BBW-V3 while changing the contrast.
  /*  SPI Wiring Reference for: NHD-0216K3Z-NSW-BBW-V3
  ---------------------------
  LCD         |   Arduino
  ---------------------------
  1(SPISS)  --> 12
  2(SDO)    --> No Connect
  3(SCK)    --> 10
  4(SDA)    --> 11
  5(VSS)    --> Ground
  6(VDD)    --> 5V
*/
/*****************************************************
   Arduino pin definition
  /*****************************************************/
#define SPISS_PIN   12
#define SDA_PIN     11
#define SCK_PIN     10
/*****************************************************
   SPI function to send command and data.
   For more information on SPI please visit our Support Center
  /*****************************************************/
void SPI_Out(unsigned char a) {
  digitalWrite(SPISS_PIN, LOW);
  for (int n = 0; n < 8; n++) {
    if ((a & 0x80) == 0x80) {
      digitalWrite(SDA_PIN, HIGH);
      delayMicroseconds(200);
    }
    else {
      digitalWrite(SDA_PIN, LOW);
    }
    delayMicroseconds(200);
    a = a << 1;
    digitalWrite(SCK_PIN, LOW);
    digitalWrite(SCK_PIN, HIGH);
    delayMicroseconds(200);
  }
  digitalWrite(SCK_PIN, HIGH);
  delayMicroseconds(200);
  digitalWrite(SPISS_PIN, HIGH);
}
/*****************************************************
   Set Arduino UNO IO ports as Output mode
  /*****************************************************/
void Set_Pins() {
  pinMode(SPISS_PIN, OUTPUT);
  pinMode(SCK_PIN, OUTPUT);
  pinMode(SDA_PIN, OUTPUT);
}
/*****************************************************
   Set LCD Contrast
  /*****************************************************/
void Set_Contrast() {
  SPI_Out(0xFE);              //prefix command
  SPI_Out(0x52);              //contrast command
  SPI_Out(0x32);              //set contrast value
  delayMicroseconds(500);
}
/*****************************************************
   Set LCD Backlight
  /*****************************************************/
void Set_Backlight() {
  SPI_Out(0xFE);             //prefix command
  SPI_Out(0x53);             //backlight command
  SPI_Out(0x08);             //set backlight value
  delayMicroseconds(100);
}
/*****************************************************
   Clear LCD
  /*****************************************************/
void Clear_Display() {
  SPI_Out(0xFE);             //prefix command
  SPI_Out(0x51);             //clear display command
  delayMicroseconds(1500);
}
/*****************************************************
   Set cursor
   Mode = 0 sets Blinking cursor off
   Mode = 1 sets Blinking cursor on
  /*****************************************************/
void Set_Cursor(int mode) {
  SPI_Out(0xfe);          //prefix command
  if (mode == 0) {
    SPI_Out(0x4c);        //Blinking cursor off
  }
  else if (mode == 1) {
    SPI_Out(0x4b);        //Blinking cursor on
  }
  delayMicroseconds(100);
}
/*****************************************************
   Set Row address
   Line = 1 sets for first row
   Line = 2 sets for second row
  /*****************************************************/
void Set_Row(int line) {
  SPI_Out(0xfe);      //prefix command
  SPI_Out(0x45);      //set cursor command
  if (line == 1) {
    SPI_Out(0x00);    //cursor position: row one, column one
  }
  else if (line == 2) {
    SPI_Out(0x40);    //cursor position: row two, column one
  }
  delayMicroseconds(100);
}
/*****************************************************
   Write "NHD-0216K3Z-NSW-BBW-V3" to LCD
  /*****************************************************/
void Part_Number() {
  Set_Row(1);
  SPI_Out(0x4e); // N
  SPI_Out(0x48); // H
  SPI_Out(0x44); // D
  SPI_Out(0xb0); // -
  SPI_Out(0x30); // 0
  SPI_Out(0x32); // 2
  SPI_Out(0x31); // 1
  SPI_Out(0x36); // 6
  SPI_Out(0x4b); // K
  SPI_Out(0x33); // 3
  SPI_Out(0x5a); // Z
  SPI_Out(0xb0); // -
  SPI_Out(0x4e); // N
  SPI_Out(0x53); // S
  SPI_Out(0x57); // W
  SPI_Out(0xb0); // -
  Set_Row(2);
  SPI_Out(0x42); // B
  SPI_Out(0x42); // B
  SPI_Out(0x57); // W
  SPI_Out(0xb0); // -
  SPI_Out(0x56); // V
  SPI_Out(0x33); // 3
}
/*****************************************************
  Function to:
    - change contrast from highest --> lowest
    - change contrast from lowest  --> highest
  delay(100) = 100 Milliseconds
  /*****************************************************/
void Contrast_Cycle() {
  for (int x = 50; x >= 0; x--) {
    SPI_Out(0xFE);             //High to Low contrast loop
    SPI_Out(0x52);
    SPI_Out(x);
    delay(100);
  }
  for (int x = 0; x <= 50; x++) {
    SPI_Out(0xFE);             //Low to High contrats loop
    SPI_Out(0x52);
    SPI_Out(x);
    delay(100);
  }
}
/*****************************************************
     Main function
  /*****************************************************/
void setup() {
  Set_Pins();         //set IO ports
  Set_Contrast();     //set display contrast
  Set_Backlight();    //set display backlight
  Clear_Display();    //clear display
  Set_Cursor(0);      //turns off blinking cursor
  Part_Number();      //display "NHD-0216K3Z-NSW-BBW-V3"
}
/*****************************************************
     Loop function
  /*****************************************************/
void loop() {
  Contrast_Cycle(); //cycle through contrast
}
एलसीडी बैकलाइट का उपयोग कैसे करें
एलसीडी की बैकलाइट को नियंत्रित या समायोजित करने के कई तरीके हैं। एलसीडी बैकलाइट को नियंत्रित या समायोजित करने के दो सबसे आम तरीके कमांड या पोटेंशियोमीटर के माध्यम से हैं।
हमारे सीरियल डिस्प्ले के लिए जैसे कि NHD-0216K3Z-NSW-BBW-V3 बैकलाइट को कमांड के जरिए नियंत्रित किया जा सकता है। बैकलाइट_लूप() यह फ़ंक्शन बैकलाइट की चमक का मान उच्चतम से निम्नतम और फिर निम्नतम से उच्चतम तक एक निरंतर लूप में सेट करता है।
नीचे दिया गया कोड " NHD-0216K3Z-NSW-BBW-V3 बैकलाइट की तीव्रता बदलते समय।
        /*****************************************************
  This code was written for the Arduino UNO using SPI Interface.
  This code displays the part number: NHD-0216K3Z-NSW-BBW-V3 while changing the backlight.
  /*  SPI Wiring Reference for: NHD-0216K3Z-NSW-BBW-V3
  ---------------------------
  LCD         |   Arduino
  ---------------------------
  1(SPISS)  --> 12
  2(SDO)    --> No Connect
  3(SCK)    --> 10
  4(SDA)    --> 11
  5(VSS)    --> Ground
  6(VDD)    --> 5V
*/
/*****************************************************
   Arduino pin definition
  /*****************************************************/
#define SPISS_PIN   12
#define SDA_PIN     11
#define SCK_PIN     10
/*****************************************************
   SPI function to send command and data.
   For more information on SPI please visit our Support Center
  /*****************************************************/
void SPI_OUT(unsigned char a) {
  digitalWrite(SPISS_PIN, LOW);
  for (int n = 0; n < 8; n++) {
    if ((a & 0x80) == 0x80) {
      digitalWrite(SDA_PIN, HIGH);
      delayMicroseconds(200);
    }
    else {
      digitalWrite(SDA_PIN, LOW);
    }
    delayMicroseconds(200);
    a = a << 1;
    digitalWrite(SCK_PIN, LOW);
    digitalWrite(SCK_PIN, HIGH);
    delayMicroseconds(200);
  }
  digitalWrite(SCK_PIN, HIGH);
  delayMicroseconds(200);
  digitalWrite(SPISS_PIN, HIGH);
}
/*****************************************************
   Set Arduino UNO IO ports as Output mode
  /*****************************************************/
void Set_Pins() {
  pinMode(SPISS_PIN, OUTPUT);
  pinMode(SCK_PIN, OUTPUT);
  pinMode(SDA_PIN, OUTPUT);
}
/*****************************************************
   Set LCD Contrast
  /*****************************************************/
void Set_Contrast() {
  SPI_OUT(0xFE);              //prefix command
  SPI_OUT(0x52);              //contrast command
  SPI_OUT(0x28);              //set contrast value
  delayMicroseconds(500);
}
/*****************************************************
   Set LCD Backlight
  /*****************************************************/
void Set_Backlight() {
  SPI_OUT(0xFE);             //prefix command
  SPI_OUT(0x53);             //backlight command
  SPI_OUT(0x08);             //set backlight value
  delayMicroseconds(100);
}
/*****************************************************
   Clear LCD
  /*****************************************************/
void Clear_Display() {
  SPI_OUT(0xFE);             //prefix command
  SPI_OUT(0x51);             //clear display command
  delayMicroseconds(1500);
}
/*****************************************************
   Set cursor
   Mode = 0 sets Blinking cursor off
   Mode = 1 sets Blinking cursor on
  /*****************************************************/
void Set_Cursor(int mode) {
  SPI_OUT(0xfe);          //prefix command
  if (mode == 0) {
    SPI_OUT(0x4c);        //Blinking cursor off
  }
  else if (mode == 1) {
    SPI_OUT(0x4b);        //Blinking cursor on
  }
  delayMicroseconds(100);
}
/*****************************************************
   Set Row address
   Line = 1 sets for first row
   Line = 2 sets for second row
  /*****************************************************/
void Set_Row(int line) {
  SPI_OUT(0xfe);      //prefix command
  SPI_OUT(0x45);      //set cursor command
  if (line == 1) {
    SPI_OUT(0x00);    //cursor position: row one, column one
  }
  else if (line == 2) {
    SPI_OUT(0x40);    //cursor position: row two, column one
  }
  delayMicroseconds(100);
}
/*****************************************************
   Write "NHD-0216K3Z-NSW-BBW-V3" to LCD
  /*****************************************************/
void Part_Number() {
    Set_Row(1);
  SPI_OUT(0x4e); // N
  SPI_OUT(0x48); // H
  SPI_OUT(0x44); // D
  SPI_OUT(0xb0); // -
  SPI_OUT(0x30); // 0
  SPI_OUT(0x32); // 2
  SPI_OUT(0x31); // 1
  SPI_OUT(0x36); // 6
  SPI_OUT(0x4b); // K
  SPI_OUT(0x33); // 3
  SPI_OUT(0x5a); // Z
  SPI_OUT(0xb0); // -
  SPI_OUT(0x4e); // N
  SPI_OUT(0x53); // S
  SPI_OUT(0x57); // W
  SPI_OUT(0xb0); // -
  Set_Row(2);
  SPI_OUT(0x42); // B
  SPI_OUT(0x42); // B
  SPI_OUT(0x57); // W
  SPI_OUT(0xb0); // -
  SPI_OUT(0x56); // V
  SPI_OUT(0x33); // 3
}
/*****************************************************
  Function to:
    - change backlight from highest --> lowest
    - change backlight from lowest  --> highest
  delay(500) = 500 Milliseconds
  /*****************************************************/
void Backlight_loop() {
  for (int x = 8; x >= 0; x--) {
    SPI_OUT(0xFE);              //High to Low Backlight loop
    SPI_OUT(0x53);
    SPI_OUT(x);
    delay(500);
  }
  for (int x = 0; x <= 8; x++) {
    SPI_OUT(0xFE);              //Low to High Backlight loop
    SPI_OUT(0x53);
    SPI_OUT(x);
    delay(500);
  }
}
/*****************************************************
     Main function
  /*****************************************************/
void setup() {
  Set_Pins();         //set IO ports
  Set_Contrast();     //set display contrast
  Set_Backlight();    //set display backlight
  Clear_Display();    //clear display
  Set_Cursor(0);      //turns off blinking cursor
  Part_Number();      //display "NHD-0216K3Z-NSW-BBW-V3"
}
/*****************************************************
     Loop function
  /*****************************************************/
void loop() {
  Backlight_loop();   //High to Low Backlight loop
}
वर्ण/फ़ॉन्ट तालिकाएँ
यह कोड एलसीडी में शामिल फॉन्ट टेबल से अक्षर प्रदर्शित करता है।
        /*****************************************************
  This code was written for the Arduino UNO using SPI Interface.
  This code displays the font table characters.
  /*  SPI Wiring Reference for: NHD-0216K3Z-NSW-BBW-V3
  ---------------------------
  LCD         |   Arduino
  ---------------------------
  1(SPISS)  --> 12
  2(SDO)    --> No Connect
  3(SCK)    --> 10
  4(SDA)    --> 11
  5(VSS)    --> Ground
  6(VDD)    --> 5V
*/
/*****************************************************
   Arduino pin definition
  /*****************************************************/
#define SPISS_PIN   12
#define SDA_PIN     11
#define SCK_PIN     10
/*****************************************************
   SPI function to send command and data.
   For more information on SPI please visit our Support Center
  /*****************************************************/
void SPI_out(unsigned char a) {
  digitalWrite(SPISS_PIN, LOW);
  for (int n = 0; n < 8; n++) {
    if ((a & 0x80) == 0x80) {
      digitalWrite(SDA_PIN, HIGH);
      delayMicroseconds(200);
    }
    else {
      digitalWrite(SDA_PIN, LOW);
    }
    delayMicroseconds(200);
    a = a << 1;
    digitalWrite(SCK_PIN, LOW);
    digitalWrite(SCK_PIN, HIGH);
    delayMicroseconds(200);
  }
  digitalWrite(SCK_PIN, HIGH);
  delayMicroseconds(200);
  digitalWrite(SPISS_PIN, HIGH);
}
/*****************************************************
   Set Arduino UNO IO ports as Output mode
  /*****************************************************/
void Set_Pins() {
  pinMode(SPISS_PIN, OUTPUT);
  pinMode(SCK_PIN, OUTPUT);
  pinMode(SDA_PIN, OUTPUT);
}
/*****************************************************
   Set LCD Contrast
  /*****************************************************/
void Set_Contrast() {
  SPI_out(0xFE);              //prefix command
  SPI_out(0x52);              //contrast command
  SPI_out(0x28);              //set contrast value
  delayMicroseconds(500);
}
/*****************************************************
   Set LCD Backlight
  /*****************************************************/
void Set_Backlight() {
  SPI_out(0xFE);             //prefix command
  SPI_out(0x53);             //backlight command
  SPI_out(0x08);             //set backlight value
  delayMicroseconds(100);
}
/*****************************************************
   Clear LCD
  /*****************************************************/
void Clear_Display() {
  SPI_out(0xFE);             //prefix command
  SPI_out(0x51);             //clear display command
  delayMicroseconds(1500);
}
/*****************************************************
   Set cursor
   Mode = 0 sets Blinking cursor off
   Mode = 1 sets Blinking cursor on
  /*****************************************************/
void Set_Cursor(int mode) {
  SPI_out(0xfe);          //prefix command
  if (mode == 0) {
    SPI_out(0x4c);        //Blinking cursor off
  }
  else if (mode == 1) {
    SPI_out(0x4b);        //Blinking cursor on
  }
  delayMicroseconds(100);
}
/*****************************************************
   Set Row address
   Line = 1 sets for first row
   Line = 2 sets for second row
  /*****************************************************/
void Set_Row(int line) {
  SPI_out(0xfe);      //prefix command
  SPI_out(0x45);      //set cursor command
  if (line == 1) {
    SPI_out(0x00);    //cursor position: row one, column one
  }
  else if (line == 2) {
    SPI_out(0x40);    //cursor position: row two, column one
  }
  delayMicroseconds(100);
}
/*****************************************************
  Display font characters
    -change the row address every 16 characters displayed
    -used Clear_Display() function to clear the display
     and change the row to the first row
  delay(500) = 500 Milliseconds
  /*****************************************************/
void Font_Table_Characters() {
  Clear_Display();
  for (int i = 0; i < 64; i++) {
    if (i == 16 || i == 48) {
      Set_Row(2);
    }
    else if (i == 32 || i == 64) {
      Clear_Display();
      if (i == 64) {
        i = 0;
      }
    }
    SPI_out(i + 32);
    delay(500);
  }
}
/*****************************************************
     Main function
  /*****************************************************/
void setup() {
  Set_Pins();         //set IO ports
  Set_Contrast();     //set display contrast
  Set_Backlight();    //set display backlight
  Clear_Display();    //clear display
  Set_Cursor(0);      //turns off blinking cursor
}
/*****************************************************
     Loop function
  /*****************************************************/
void loop() {
  Font_Table_Characters();  //Display font characters
}
सर्किट - RS232 TTL संचार के लिए कनेक्शन आरेख और योजनाबद्ध आरेख
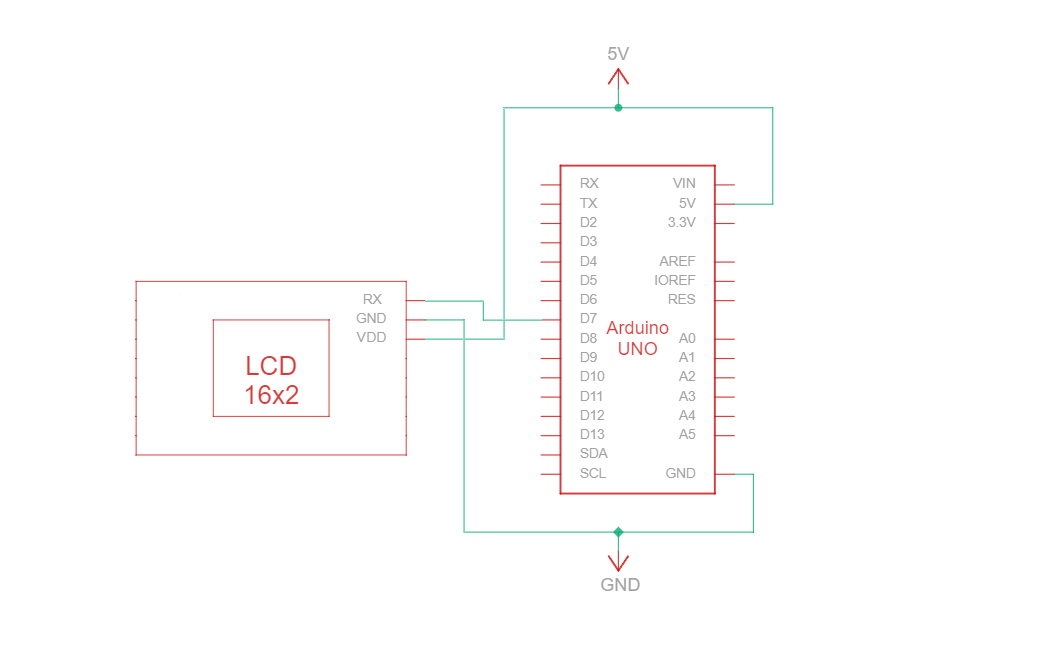
RS232 TTL एक सीरियल संचार प्रोटोकॉल है जो RS232-प्रकार के विनिर्देशों का उपयोग करता है लेकिन TTL लॉजिक स्तरों (0V से Vcc, आमतौर पर 3.3V या 5V) के साथ। Arduino और 16-कैरेक्टर वाले Newhaven डिस्प्ले के बीच RS232 TTL कनेक्शन सर्किट में केवल तीन तारों का उपयोग होता है:
| Arduino | एलसीडी | रिश्ते का प्रकार |
|---|---|---|
| 5V पिन | पिन 3: V DD | शक्ति |
| ग्राउंड पिन | पिन 2: ग्राउंड | मैदान |
| पिन 7: डिजिटल इनपुट/आउटपुट पिन | पिन 1: आरएक्स | RS-232 (TTL) सीरियल इनपुट पोर्ट |
टिप्पणी:
डेटाशीट में निर्दिष्ट अनुसार RS232 TTL को सक्षम करने के लिए डिस्प्ले पर R1 और R2 खुले होने चाहिए।
RS232 TTL वायरिंग सर्किट
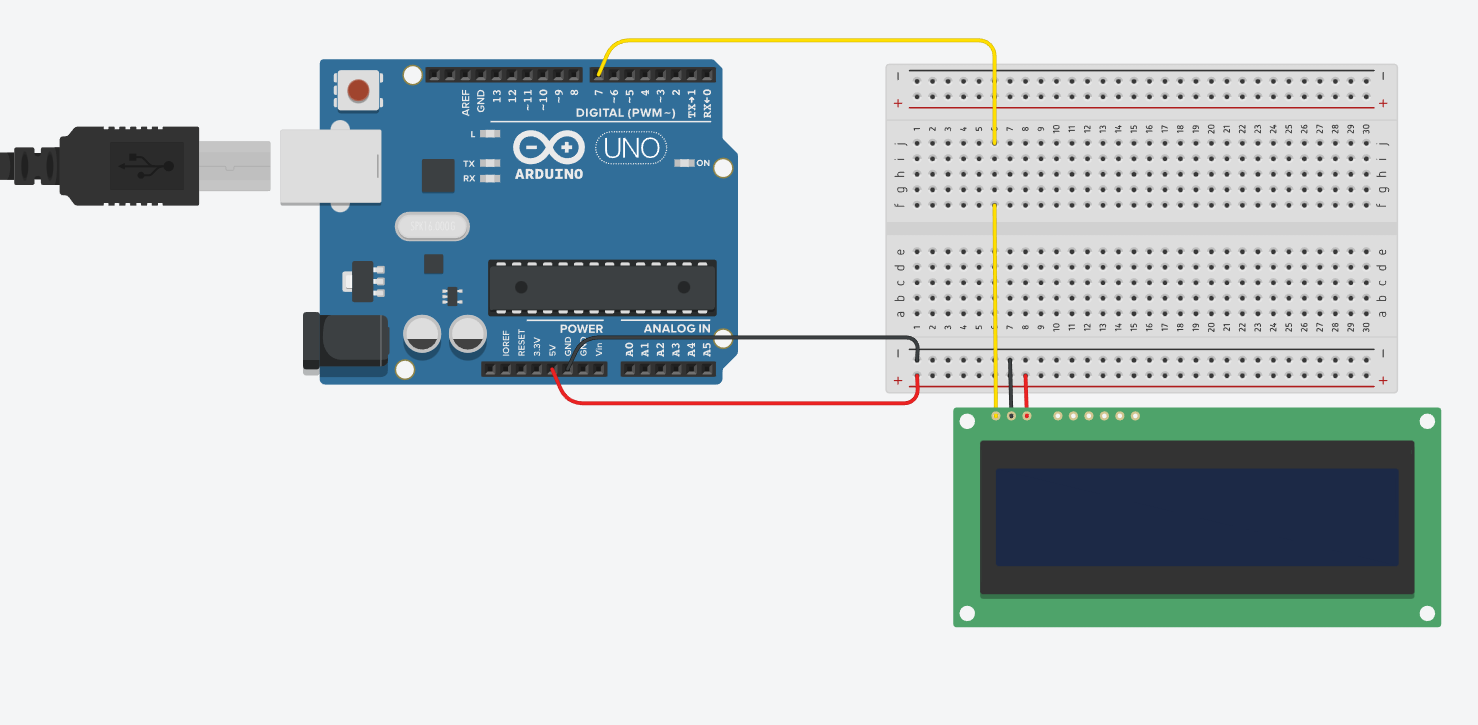
RS232 TTL वायरिंग आरेख
हमने Instructables पर RS232 TTL संचार के लिए एक विस्तृत और आसान ट्यूटोरियल बनाया है। इस ट्यूटोरियल में इस प्रोजेक्ट को पूरा करने के लिए सभी आवश्यक चरण शामिल हैं। इसे यहां देखें: www.instructables.com/Arduino-LCD-Tutorial/
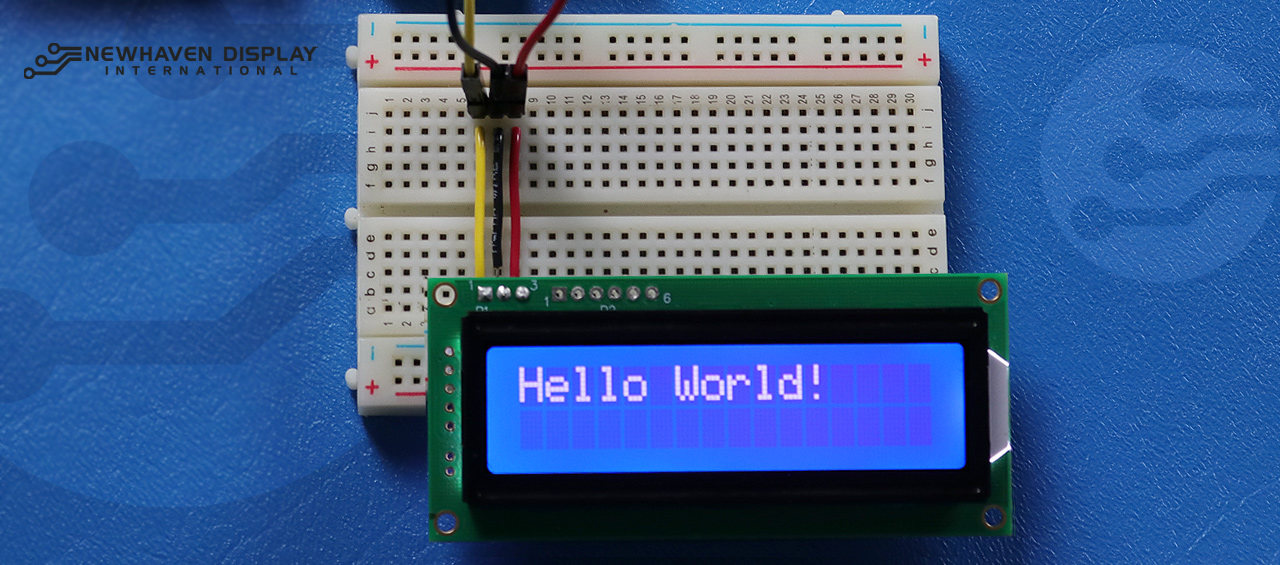
Arduino - LCD पर "हेलो वर्ल्ड!" का कोड उदाहरण, सीरियल RS232 TTL संचार का उपयोग करते हुए
निम्नलिखित कोड उदाहरण RS232 TTL संचार का उपयोग करके LCD पर "Hello Word!" प्रदर्शित करता है।
/***************************************************** यह कोड Arduino UNO के लिए RS-232 इंटरफ़ेस का उपयोग करके लिखा गया था। /* RS-232 वायरिंग संदर्भ: NHD-0216K3Z-NSW-BBW-V3 --------------------------- एलसीडी | Arduino --------------------------- 1(RX) --> 7 2(VSS) --> ग्राउंड 3(VDD) --> 5V */ #define P1 7 //RX वह पिन जिस पर सीरियल डेटा प्राप्त करना है। /***************************************************** कमांड और डेटा के लिए RS-232 सेटअप। RS-232 के बारे में अधिक जानकारी के लिए कृपया हमारे सहायता केंद्र पर जाएँ /*****************************************************/ #include#define RxPin P1 SoftwareSerial NHD_LCD = SoftwareSerial(P1, RxPin); /***************************************************** Set LCD Contrast /*****************************************************/ void Set_Contrast() { NHD_LCD.write(0xFE); //Prefix command NHD_LCD.write(0x52); //Contrast command NHD_LCD.write(0x28); //Set contrast value delayMicroseconds(500); } /***************************************************** Clear LCD /*****************************************************/ void Clear_display() { NHD_LCD.write(0xFE); //Prefix command NHD_LCD.write(0x51); //Clear Display delayMicroseconds(1500); } /***************************************************** Set Arduino UNO IO ports as Output mode /*****************************************************/ void Set_Pins() { pinMode(RxPin, OUTPUT); } /***************************************************** Set LCD Backlight /*****************************************************/ void Set_Backlight() { NHD_LCD.write(0xFE); //prefix command NHD_LCD.write(0x53); //Backlight command NHD_LCD.write(0x08); //Set backlight value delayMicroseconds(100); } /***************************************************** Set cursor Mode = 0 sets Blinking cursor off Mode = 1 sets Blinking cursor on /*****************************************************/ void Set_Cursor(int mode) { NHD_LCD.write(0xFE); //Prefix command if (mode == 0) { NHD_LCD.write(0x4c); //Turn blinking cursor off } else if (mode == 1) { NHD_LCD.write(0x4b); //Turn blinking cursor on } delayMicroseconds(100); } /***************************************************** Write "Hello World!" to LCD /*****************************************************/ void Hello_World() { NHD_LCD.write(0x48); // H NHD_LCD.write(0x65); // e NHD_LCD.write(0x6C); // l NHD_LCD.write(0x6C); // l NHD_LCD.write(0x6F); // o NHD_LCD.write(0x11); // Blank NHD_LCD.write(0x57); // W NHD_LCD.write(0x6f); // o NHD_LCD.write(0x72); // r NHD_LCD.write(0x6c); // l NHD_LCD.write(0x64); // d NHD_LCD.write(0x21); // ! } /***************************************************** Main function /*****************************************************/ void setup() { NHD_LCD.begin(9600); //Sets 9600 Baud Rate the display can receive and transmit data at a rate of 9600 bits per second by default. delay(15); Set_Pins(); //Set IO ports Set_Cursor(0); //Turns off blinking cursor Set_Contrast(); //Set display Contrast Set_Backlight(); //Set display Backlight Clear_display(); //Clear display Hello_World(); //Display "Hello Wolrd!" } void loop() { }
एलसीडी की समस्या का निवारण - Arduino प्रोजेक्ट
नीचे हम आपके Arduino - LCD प्रोजेक्ट में आने वाली समस्याओं या दिक्कतों के लिए उठाए जाने वाले कुछ सामान्य कदमों पर चर्चा करेंगे।
- वायरिंग कनेक्शन की जाँच करें : एलसीडी को आर्डिनो से कनेक्ट करते समय सबसे आम समस्या गलत वायरिंग होती है। सही कनेक्टिविटी सुनिश्चित करने के लिए दिए गए पिनआउट आरेख और सर्किट के अनुसार अपने वायरिंग कनेक्शन की जाँच करें। इसके अलावा, ध्यान रखें कि NHD-0216K3Z-NSW-BBW-V3 डिस्प्ले को SPI, I2C और RS232 TTL इंटरफेस के साथ काम करने के लिए कॉन्फ़िगर किया जा सकता है। SPI इंटरफेस के साथ काम करने के लिए PCB के R2 सेक्शन पर 0 ओम का रेसिस्टर सोल्डर करना आवश्यक है।
- पुर्जों का निरीक्षण करें : Arduino, LCD या कनेक्टिंग तारों पर किसी भी प्रकार की क्षति के दृश्य संकेतों की तलाश करें।
- कोड की जाँच करें : सुनिश्चित करें कि आपके Arduino पर अपलोड किया गया कोड सही है और त्रुटियों से मुक्त है।
- बिजली आपूर्ति की जांच करें : सुनिश्चित करें कि आपका बिजली स्रोत Arduino और LCD दोनों को चलाने के लिए पर्याप्त है।
- किसी सही काम कर रहे एलसीडी से जांच करें : यदि आपको अभी भी समस्या आ रही है, तो अपने Arduino से किसी दूसरे, सही काम कर रहे एलसीडी को कनेक्ट करके देखें। इससे आपको यह पता लगाने में मदद मिलेगी कि समस्या एलसीडी में है या Arduino बोर्ड में।
- कंट्रास्ट समायोजित करेंयदि आपको एलसीडी पर प्रदर्शित टेक्स्ट देखने में परेशानी हो रही है, तो सॉफ़्टवेयर फ़ंक्शन का उपयोग करके कॉन्ट्रास्ट को समायोजित करने का प्रयास करें।
Set_Contrast()जैसा कि ऊपर बताया गया है। अलग-अलग प्रकाश स्थितियों में बेहतर दृश्यता के लिए अलग-अलग कंट्रास्ट सेटिंग्स की आवश्यकता हो सकती है। - Arduino IDE का संस्करण जांचें : सुनिश्चित करें कि आप Arduino IDE का नवीनतम संस्करण उपयोग कर रहे हैं। पुराने संस्करणों में बग हो सकते हैं या वे आपके प्रोजेक्ट के साथ असंगत हो सकते हैं।
- अलग-अलग फ़ीचर्स की जांच करें : यदि आपको स्क्रॉलिंग या कॉन्ट्रास्ट कंट्रोल जैसे विशिष्ट फ़ीचर्स में समस्या आ रही है, तो समस्या का पता लगाने के लिए "हेलो वर्ल्ड!" जैसे सरल कोड को चलाकर देखें। इससे आपको यह निर्धारित करने में मदद मिलेगी कि समस्या कोड से संबंधित है या हार्डवेयर से।
- समुदाय से सहायता लें : यदि उपरोक्त समस्या निवारण चरणों का पालन करने के बाद भी समस्या का समाधान नहीं हो पाता है, तो ऑनलाइन समुदाय से सहायता लेने पर विचार करें। न्यूहेवन डिस्प्ले सपोर्ट फोरम , आर्डिनो स्टैक एक्सचेंज या आर्डिनो.सीसी फोरम जैसे ऑनलाइन फोरम अनुभवी उपयोगकर्ताओं से सहायता प्राप्त करने के लिए उत्कृष्ट संसाधन हैं।
इन समस्या निवारण चरणों का पालन करके, आप एलसीडी को आर्डिनो बोर्ड से जोड़ने से संबंधित अधिकांश समस्याओं का निदान और समाधान कर सकेंगे। याद रखें, इलेक्ट्रॉनिक प्रोजेक्ट्स में समस्या निवारण करते समय धैर्य और बारीकियों पर ध्यान देना महत्वपूर्ण है।
अतिरिक्त संसाधन
- Arduino UNO की आधिकारिक वेबसाइट ।
- एलसीडी 16x2 उत्पाद विवरण ।
- एलसीडी 16x2 उत्पाद डेटाशीट और विशिष्टताएँ ।
- शुरुआती लोगों के लिए Arduino-LCD का आसान ट्यूटोरियल
- कैरेक्टर एलसीडी सपोर्ट फोरम ।
- डिस्प्ले के प्रोटोटाइप बनाने के लिए हमारी शुरुआती गाइड पढ़ें।
- कैरेक्टर एलसीडी सैंपल कोड ।
- इलेक्ट्रॉनिक उपकरणों को ईएसडी से बचाने का तरीका जानें।
- एलसीडी के प्रकारों के बारे में जानें।
- एलसीडी मोड के बारे में जानें।